 Cantus
 — quick-start manual
For Cantus 0.1.0-beta.1 and later, on Windows, macOS and Linux · Leer en español
Cantus is a free, open-source digital audio workstation: record, compose, mix and master a song, from the first note to a finished file. This manual gets you there in an evening. Everything it names is in the program as it is today; where the beta still has gaps, chapter 14 says so.
Contents
- Install
- First run: set up your audio
- The workspace
- Record audio and MIDI
- Edit: clips, piano roll, automation
- Mix: the mixer, inserts and sends
- Master: the master chain, Fervor, Latitudo, Culmen
- Export
- Sounds: the browser and sound packs
- Instruments and effects: the device picker
- Projects, autosave and settings
- Keyboard shortcuts
- Privacy and updates
- Known issues and limitations
- Report a bug
Also: What an AI agent can do in Cantus — the tools, the unit catalogue, the music linter.
Also: Separating stems — a song into drums, bass, vocals and the rest, on your computer. Also: Finding and hearing presets — by style and role, heard before you choose.
Also: Exporting a dancing video — your dancers with the song, for social media or a video editor.
Also: Converting audio to MIDI — a melody, chords or a drum loop into notes on a new track.
Also: Pulsus III: pads on their own strips, a chain per pad, kits from anywhere — split a kit to strips, effects on one pad, a folder or an SFZ as a kit.
Also: The arrangement: time, sections and ripple — insert and delete time on every track, drag a section to move its bars, the ripple mode.
Also: Chorda: recorded pianos and the piano's mixer — the modelled piano or a recorded one (the Salamander, bitKlavier, your own SFZ), its microphones on strips, Add our room, a mic's delay.
Also: Tympanum, the acoustic drummer — modelled and recorded drum kits in their room, their microphones on strips, the bleed, the hybrid voice.
Also: The audio editor — cut, silence, fade, normalise, take the noise out, remove silence and see the spectrum, on a clip's take.
Also: Saltator, a character that dances to your song — the dancer's window, its moves, React to; Fuga the ninja and Volta the mecha lead the cast.
Also: The stage — a dancer over the workspace, on the Stage tab, in a companion window and on stream (OBS).
Also: The recording mode — render every strip that feeds the master so the buffer can go lower while you record.
Also: VCA faders and mixer snapshots — move a group of strips together, store the desk and recall it, cue it on the timeline.
Also: External gear and control surfaces - a hardware synth or effect on a track with its latency measured, and Mackie Control / HUI surfaces.
Also: Importing a character — a dancer wearing your own Lottie, sprite sheet or DragonBones character. Also: Editing a clip with an ARA plug-in — an ARA 2 plug-in that sees the whole recording renders your audio clip.
AI in this manual: AI agents (MCP) — connect Claude or another assistant; The mastering assistant; Listening for AI agents.
1. Install
Cantus runs on Windows, macOS and Linux; every release has one file for each, on the releases page and behind the download button of cantusdaw.com, which gives you your system's:
- Windows 11, x64:
Cantus-<version>-windows-x64-setup.exe(or the portable zip). - macOS, Apple silicon or Intel:
Cantus-<version>-macos-universal.dmg. - Linux x86-64, Ubuntu 22.04 or newer (or alike):
Cantus-<version>-linux-x86_64.AppImage.
SHA256SUMS.txt beside them lets you check a download: Get-FileHash <file> on Windows, shasum -a 256 <file> on a Mac, sha256sum <file> on Linux. About 200 MB of disk. Setting up your audio on each system is chapter 2.
On Windows
You need Windows 11, 64-bit (Windows 10 untested).
- Download
Cantus-0.1.0-beta.1-windows-x64-setup.exefrom the releases page. - Run it. It installs for you alone, in
%LOCALAPPDATA%\Programs\Cantus, and asks for no administrator rights. This beta is not code-signed yet, so Windows may show "Windows protected your PC": choose More info ▸ Run anyway. - Choose the components: the program (required), Open .cantus projects with Cantus (on), a desktop shortcut (off), the CLAP and VST3 plug-ins for other DAWs (on), and FlexASIO driver (downloaded now) (off — tick it if your sound card has no ASIO driver of its own; see chapter 2).
- The Privacy page says what Cantus sends over the network (only a daily question about new versions, and the downloads you ask for). Check for updates once a day (recommended) is ticked; untick it to turn the check off (also later in Settings ▸ Updates).
Portable copy. Unzip Cantus-0.1.0-beta.1-windows-x64-portable.zip anywhere (a USB stick works). Because of the portable.txt beside cantus.exe, that copy keeps its settings in the data folder next to it and writes nothing to your profile.
Uninstall from Windows' Apps. Your settings, presets and autosaves — and the sample cache (up to 16 GB, see chapter 11) — are removed only if you tick that box; your projects are never touched.
On a Mac
- Download
Cantus-<version>-macos-universal.dmg— one disk image for Apple silicon and Intel Macs. - Open it and drag Cantus onto Applications. Eject the disk image.
- Open Cantus from Applications (or Launchpad). A notarised release opens straight away; one that is not yet notarised makes macOS say it cannot verify the developer: right-click Cantus ▸ Open ▸ Open once (or System Settings ▸ Privacy & Security ▸ Open Anyway), and it opens normally from then on.
- The first time you record, macOS asks whether Cantus may use the microphone: allow it (later in System Settings ▸ Privacy & Security ▸ Microphone).
Cantus keeps its settings, presets and autosaves in ~/Library/Application Support/Cantus. Uninstall by moving Cantus from Applications to the Bin; that folder is yours to delete or keep.
On Linux
- Download
Cantus-<version>-linux-x86_64.AppImage— one file that runs on most distributions from the last few years, with nothing to install and no administrator. - Make it executable and open it: in a file manager, Properties ▸ Permissions ▸ Allow executing as a program, or in a terminal
chmod +x Cantus-*.AppImage && ./Cantus-*.AppImage. Keep it where you like (a folder such as~/Applicationsis a good home): Cantus updates that file in place. - If it does not start and says FUSE is missing, install your distribution's
libfuse2(Ubuntu 22.04:sudo apt install libfuse2; 24.04:libfuse2t64).
Cantus keeps its settings in ~/.config/cantus and its presets, autosaves and sounds in ~/.local/share/cantus (or wherever $XDG_CONFIG_HOME and $XDG_DATA_HOME say). Uninstall by deleting the AppImage. A Cantus from your distribution's packages or from Flatpak is installed and updated by them instead.
2. First run: set up your audio
The first time Cantus starts, the window Set up your audio opens over the music.
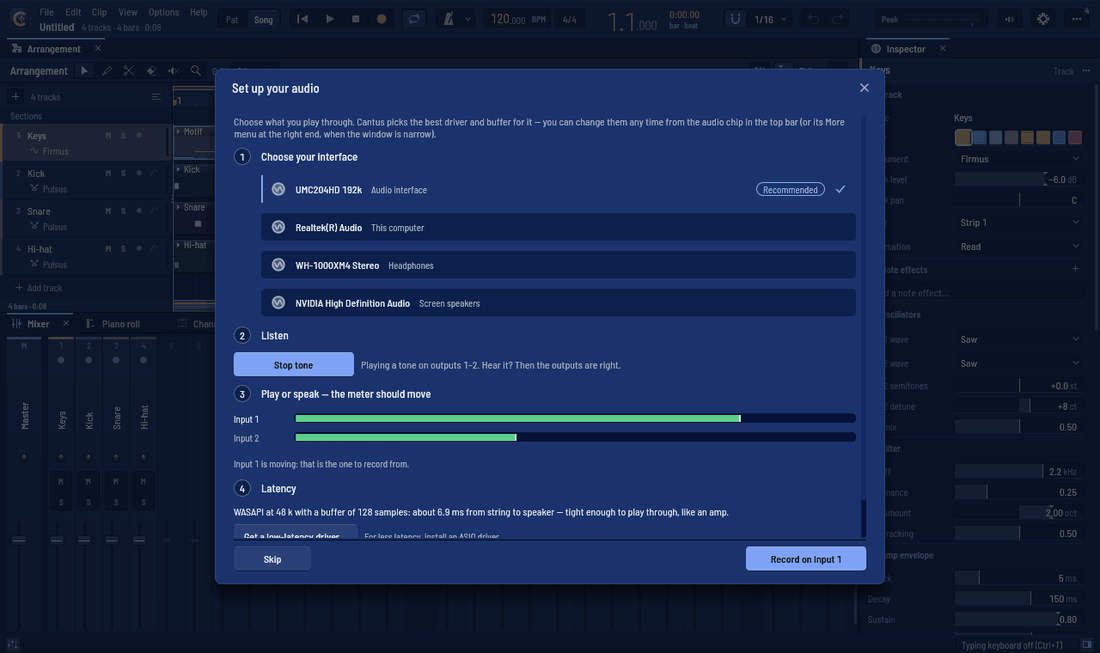
- Choose your interface. Each audio device has a card: an Audio interface, This computer, Headphones… Click the one you play and listen through. Cantus picks a driver and a buffer for it: ASIO at 128 samples for an interface with its own ASIO driver, otherwise WASAPI (Windows' own audio) at 256.
- Listen. Click Test tone: you should hear a soft tone on outputs 1–2.
- Play or speak — the meter should move. Strum, sing or speak into what is plugged in; the input that moves is the one you will record from.
- Latency. Cantus says how long the sound takes from string to speaker, and whether that is tight enough to play through. For the most accurate takes, cable output 1 to input 1 and click Measure latency; Cantus then places every take to the sample.
Click Record on … and Cantus adds an audio track on that input, armed and ready: press R to record. Skip closes the window; it does not open by itself again (the Setup assistant… button in the audio chip brings it back).
On a Mac the driver is Core Audio, which every interface uses: there is no ASIO to install. Choose the buffer (128 samples is a good start) and the rate on the device page; an aggregate device made in Audio MIDI Setup (two interfaces as one) is listed like any other. The first time you record, macOS asks whether Cantus may use the microphone — allow it, or no input reaches Cantus (System Settings ▸ Privacy & Security ▸ Microphone). Cantus's audio threads work with Core Audio's own as one group, so Apple silicon runs them on its fast cores.
The audio chip
The chip in the top bar (or in its ⋯ menu when the window is narrow) shows the device, driver, rate, buffer and latency — for example UMC204HD · ASIO · 48 k · 128 · 6.1 ms. Its lamp is green when the audio runs, amber after a dropout, red when the device is lost or the driver stopped. Click it to change anything; every change applies at once and is remembered for that interface:
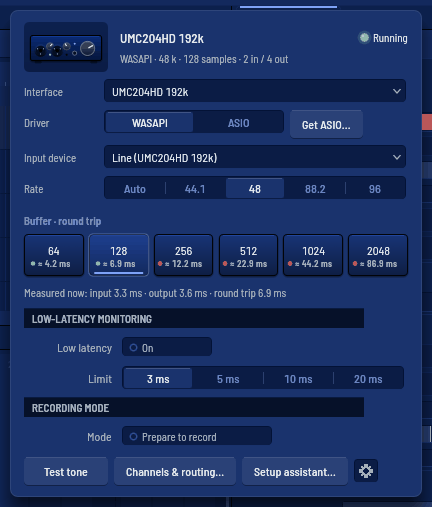
- Interface, Driver (WASAPI or ASIO, with the ASIO driver list), Input device, Rate;
- Buffer · round trip: 64 to 2048 samples, each with its latency. Smaller is tighter for playing; larger is safer for big mixes. If the top bar counts dropouts, take the next size up;
- problems appear on top with a button that fixes them (Restart audio, Use this computer's audio, Run at 48 kHz…);
- Test tone, Channels & routing… (name your inputs and outputs, choose a headphone cue pair), Setup assistant…, and the gear for every setting.
Which driver? Use your interface's own ASIO driver if it has one (Behringer, Focusrite, PreSonus, Steinberg, MOTU, RME…). For a laptop's built-in sound, use WASAPI, or install FlexASIO for lower latency. Get ASIO… in the popover opens a window with FlexASIO's download page, ASIO4ALL's page and the makers' driver pages; after installing a driver, click Rescan drivers. Cantus never installs drivers by itself.
Plugging an interface in offers to switch to it; unplugging one offers your computer's audio, and Cantus goes back to it when it returns. If a driver stops responding, Cantus restarts the audio once by itself. You cannot change the device while recording.
3. The workspace
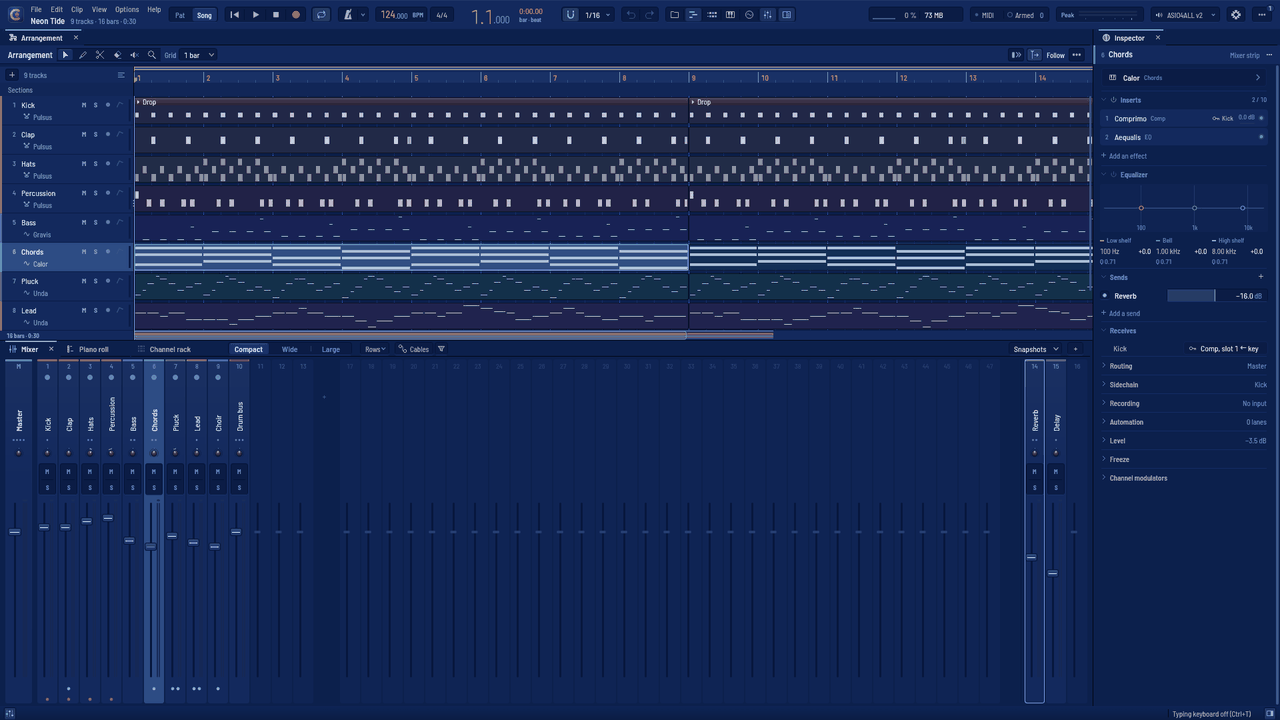
Cantus opens on a song — the second drop of the demo Neon Tide, looping — so the first thing you hear is music. Press Space to play it. Nothing dances at start: the whole demo (File ▸ Demo songs) keeps its dancer, and you can add one to any song (Saltator).
- The top bar (see below): one row — the menus over the project's name, then the transport, the metronome, the tempo, the clock, the grid, the windows, and at the right the meters, the audio device, Settings and More.
- The arrangement (centre): tracks and their clips on a timeline.
- The clip browser (
Alt+F5, View ▸ Clip browser): every clip of the song as a tile, beside the arrangement (see chapter 5). - The lower zone: the Mixer, the Piano roll and the Channel rack as tabs.
- The inspector (right,
I): everything about the selected track, strip or clip. - The status line (bottom): the help line — what is under the pointer, its value, what drives it (an automation clip, a modulator, a controller, a VCA) and the keys that act on it — then plug-in latency, samples loading, the typing keyboard's octave and minimised devices. Every control says something there; nothing is left blank.
Every area can be shown or hidden with its window key or its function key (F5 arrangement, Alt+F5 clip browser, F6 channel rack, F7 piano roll, F9 mixer, Alt+F8 browser, I inspector). Drag the splitters to resize (a right-click resets one, a double-click folds or unfolds it); right-click a tab for its menu:
- Collapse area (
Ctrl+Alt+C) folds the area to its tab bar — or, in a row, to a thin rail with its glyph — and keeps its place; Expand area, a click on the rail or a drag of the folded line brings it back exactly as it was. - Maximise area (a double-click on its tab, or
Ctrl+Alt+Enter) gives it the workspace with the inspector kept beside it, at its width, so what you select is still at hand; the hidden areas wait in a row of tabs at its foot — click one to bring the areas back with it in front, or Show the docks. Again, or showing any area, gives the others back;Ihides the inspector alone and the area stays maximised. Floating windows stay. To give the area the whole workspace instead: Settings ▸ Appearance ▸ Layout and controls ▸ Maximise keeps: Nothing. - Float puts it in a window of its own; Dock brings it back.
Ctrl+F6 and Ctrl+Shift+F6 move the keyboard's focus from area to area (the focused tab's glyph is lit); Shift+F10 opens what a right-click on the selection opens; Esc closes what opened last. Every area that holds more than it shows scrolls. Save the arrangement of the window under View ▸ Layout ▸ Save layout…; the layout is kept between sessions.
The look. Cantus is drawn in Slate Lapis by default: Slate's calm room, where panels are set apart by value rather than by lines, in a deep night blue; one lapis accent means on or selected and nothing else, and the logo's gold marks the clock, the rulers' numbers, the playhead and the loop. Your track colours are a stripe and a tint until you select a track — then it lights across the window (its header, clips, strip and the inspector). The type is Barlow Semi Condensed, whose figures keep their width as they count; keys and fields are flat wells with a dark edge and a light lip; in silence nothing reads "−∞". Settings ▸ Appearance (Ctrl+,) holds every theme as a picture, in four groups: round 39's families — Slate Lapis (the default, first, Night and Paper), Slate (the same system in grey-blue with an azure accent, the default of 0.1.0-beta.14 and beta.15), Graphite and gold and Studio ink; the themes of earlier versions, redrawn in the new look — Cantus Night · Paper (espresso and the logo's copper, verdigris on the selection), Blue Hour · Daylight (deep navy, and white with blue), Pewter · Chalk (slate grey with orange and lime, and its chalk twin: the old Slate and Paper, renamed), Ink & Gold · Parchment, Ultraviolet and Lagoon; the new ones — Evergreen Night · Paper (forest green and brass, with real patch cords in the mixer), Bordeaux (wine and rose gold) and Print (black ink on white paper and one vermilion); and the high-contrast pair (every text at 7:1). A click sets a family in both lights; a theme made in one light (Ultraviolet, Lagoon, Bordeaux, Print) also switches the window to that mode. Then the mode (Night, Paper, or follow the system), the cable style, the taskbar icon's colours, and the recolouring (hue, saturation, brightness, contrast, every colour role, or click an element to recolour it). A theme you chose is kept: a setting saved by an earlier version opens in the theme it names, with your own colour changes kept, and themes you made yourself are untouched. If you never chose one — Slate untouched in a setting of beta.14 or beta.15 — Cantus opens in today's default, Slate Lapis; one click on Slate's picture brings Slate back, and it stays. In the high-contrast themes and your own older ones the faders still offer two caps (Faders: Classic and Metal); every other theme draws one cap, lit from above.
Layout and controls (Settings ▸ Appearance, under the look): five choices of this computer, not of the song, each starting where most people want it —
- Maximise keeps: The inspector beside it (the default) or Nothing: the whole workspace.
- Top bar extras: None (the default), Automation arm, Typing keyboard or Both — the keys the bar carried before version 0.1.0-beta.14 (see the top bar).
- Mixer's right dock: At the window's edge (the default, as FL Studio's desk: the room before it holds the next empty strips, numbered) or After the last strip.
- Inspector values: Value bars (the default: a well filled to the value, the number inside) or Slim bars (a thin bar with a handle, the number beside it).
- Lit mute button: In colour (the default: a muted strip's or track's M lit in the theme's accent) or Grey.
Instrument pictures (Settings ▸ Appearance ▸ Instrument pictures): how Chorda's piano and Tympanum's kit are drawn in their rooms. Drawn (the default) is light and fast: one picture made when something changes, nothing drawn at rest. Photographic adds traced reflections (the lid mirroring the frame and the strings, the floor mirroring the instrument) and soft shadows; it takes a moment to draw — about a second for a full picture, on a background thread that never competes with the audio — and shows a quick version while you drag a control. The sound never changes; the choice is this computer's, not the song's.
The size follows your screen until you choose one: about 125 % on a 1920-pixel screen (less when Windows already scales), never under 100 % nor over 200 %. Ctrl+Plus, Ctrl+Minus and Ctrl+0, or Settings ▸ Appearance, set your own, which is kept; a size you chose in an earlier version is kept too.
Typing a name or a value works the same everywhere — renaming a track, a clip, a pad or a strip, a search, a level: the field opens with its words selected, so typing replaces them; Enter or a click elsewhere keeps what you typed; Esc puts back what was there. While you type, no shortcut fires. Names can be in any script — Japanese, Chinese, Korean, Hindi, Thai, Arabic, Hebrew…: Cantus uses your system's own fonts for them (see the known issues about right-to-left scripts).
Demo songs. File ▸ Demo songs… (Ctrl+Shift+N) opens seven songs made entirely with Cantus's own instruments and effects: With All Your Heart (cinematic pop — the modelled grand Chorda pedalled from its automation lane, every modulation and dynamics effect of round 28, Tonus hard-tuning the topline, modulators and automation, mastered to −11 LUFS), Neon Tide (house), Morning Light (pop ballad), Sunday Strut (funk and soul), Paper Lanterns (lo-fi hip-hop), Aurora (cinematic) and Midnight Static (trap). Open one, play it, take it apart.
The command palette
Ctrl+Shift+P (View ▸ Command palette…) opens a field near the top of the window that finds anything Cantus can do. Type a few letters — of any word, in your language or in English: mix finds Show the mixer, new tr New track with…, spl Split clip — and the list narrows as you type; the arrows move, Enter runs the row, Esc closes. It holds:
- every action with its shortcut at the right (the same as the menus and the keys);
- the areas and windows (the devices panel, the shortcuts, the appearance editor, the start page…) and every Settings page (Settings: Audio…);
- every effect — inserted on the selected strip (or the selected track's, or the master) — and every instrument, on a new track after the selected one; your own track templates too;
- the recent projects and the project templates (see Templates).
What you choose often and lately comes first; with nothing typed, the list starts with what you used last.
The undo history
Alt+H (View ▸ Show the undo history) shows every step of the project's history, beside the inspector — dock it, stack it or float it like any area. Each step is named by what it did — Move 3 notes, Insert Concentus on Lead, Rename track to Bass — under a first row for the project as it was opened. The current step is lit; the steps after it, the ones Redo would bring back, are dimmed; the step your file holds says SAVED, and the steps since the last save carry a dot. Click any row to go there: Cantus undoes (or redoes) each step between, as Ctrl+Z would — nothing is lost, and a click on a later row comes back.
The top bar
The top bar is one row, 44 points high. Every key sits in a recessed well on its centre line; a key that is on is tinted inside its well — green for play, red for record, the accent for the rest. The groups pack in two clusters: at the left the menus, Pat / Song, the transport, the metronome, the tempo, the clock, the grid, undo and the windows; at the right the system meters, the inputs, the master meter, the audio device, the tools, Settings (the gear) and More. At 1920 × 1080 and 100 % only the tools wait in More (in Spanish the inputs too); at a larger size more groups fold.
- The menus: File, Edit, Clip, View, Help over the project's name and its summary (
9 tracks · 16 bars · 0:30). Click the name to rename the project in place (Enterkeeps it,Escleaves); the window's title follows it, with•while there are unsaved changes. On a narrow bar the menus become one ≡ key holding each menu as a submenu. Every row of the menus shows its shortcut, or is in the command palette under the same words. - Pat / Song (
L): song mode plays the arrangement; pattern mode plays the clip you are editing in the piano roll or the channel rack — with whatever the rack shows on the other tracks in that stretch — alone and looped, and the clock counts from the pattern's start; the playhead stays in the pattern (Home or a click outside it goes to its top). Choosing another note clip changes what plays; selecting a track, an audio clip or nothing keeps the pattern. Leaving pattern mode puts the playhead back where the song was. Pattern mode does not record, and cannot be switched on in the middle of a take (a take belongs to the song: switch to song mode first); export always renders the song. It is saved with the project. - Transport: go to start, play, stop, record, loop. Right-click the record key for the recording options (count-in, punch, takes).
- Metronome (
Ctrl+M): its key and its ▾ in one well. The ▾ holds the count-in (off, 1, 2, 4 bars), the click's level, the sound (Classic, Woodblock, Beep), the accent on the first beat of each bar and when it plays (always, while recording, during the count-in). The sound and the accent are saved with the song. - Tempo:
124.000 BPM— drag it, turn the wheel, double-click for 120; click the unit to tap (Shift+T): it reads TAP in the accent while you tap; tap at least twice — the tempo is the average of your last taps, a pause starts again, and each run of taps is one undo step. Beside it the time signature: click it for the beats, the note value and the usual metres. - The clock: the time large and thin,
bar · beatunder it; while recording it turns red and the take's time takes the time's place. - Grid and snap: the magnet and the grid in one well — the grid and snap of the editor you are working in (the arrangement, the piano roll or the channel rack); with an audio clip in the piano roll's place, the pitch editor's grid, and with an automation clip, the arrangement's grid. The same values as the editor's own toolbar.
- Undo and redo, and the seven window keys: browser, arrangement, rack, piano roll, the plug-in window (
F8), mixer, inspector. The session view is onTaband in View; the typing keyboard onCtrl+Tand the status line; automation's arm and modes on their keys and in the palette. Want them on the bar? Settings ▸ Appearance ▸ Layout and controls ▸ Top bar extras: the automation arm comes back after the loop key (lit violet while armed; its ▾, or a right-click, sets every track's mode at once and the touch glide), and the typing keyboard's key before the inputs (lit while your computer's keys play the selected track). With both, at 1920 × 1080 and 100 % the bar still folds only the tools (in Spanish the inputs too). - CPU, memory, dropouts: the audio callback's load as a small graph with its number, the memory Cantus uses, and dropouts as a red pill when there are any (the latest one's cause on the status line).
- Inputs: the MIDI lamp (it lights as notes come in) and the armed ring with how many tracks will record.
- Master meter: two thin lanes with the scale's ticks, grooves at rest (never "−∞") and a clip lamp. Its figures are on the help line when you point at it: Peak shows the left and right peaks and holds the highest of the last two seconds; LUFS shows the master's loudness — momentary, short-term, the integrated loudness of the pass (from Play; it holds after Stop) and the highest true peak since you pressed play (click to reset).
- Sync (shown while Link or an outside clock is followed, or when you show it in Customise top bar…): LINK and its peers, Q (Link's quantum) and EXT (the source's tempo and lock light) — see Playing in sync.
- The audio device (see the audio chip): its name, or the amber warning with No device; then the tools: the element picker and the interface's zoom; the gear opens Settings.
More. On a narrower window (or at a larger size) the groups fold in a fixed order — the tools, the inputs, CPU and memory, the windows, then compact forms of the device, the metronome, the meter, the tempo, the clock and the menus — and wait in More, which shows how many are folded. Its panel lays them out in sections: Metronome (its key, switch and shortcut; count-in, level, sound, accent), Windows (each key with its shortcut under it), Performance (CPU, memory, voices and dropouts as graphs of the last 30 s with their numbers), Inputs (the ports, the armed tracks by name) and Tools and zoom (− 100 % +); smaller pieces under Also here. Everything works there as on the bar; a group comes back to the bar as soon as it fits. The transport always stays. Customise top bar… (at the foot of More, in View, or right-click the bar): tick a group to show or hide it, drag it by its grip to move it, Reset for the default. Your order is kept.
4. Record audio and MIDI
An audio track
- Add an audio track:
Ctrl+Shift+A, or right-click the + above the track headers ▸ Add audio track. (The first-run setup's Record on … makes one for you.) - Arm it: click the round red lamp on its header (or
Alt+R). Shift+click arms that track alone. An armed track shows its input meter. - Choose its input: the input chip on the header (In 1, In 1-2…; shown when the track row is tall enough), the inspector's Recording section, or the track's menu.
- Monitoring: the speaker key on the header cycles Off, Auto (you hear the input while the track is armed — the default) and On. The inspector also has Trim (−24 to +24 dB before recording).
- Press
R(or the record key). Every armed track records; pressRorSpaceto stop. The whole pass is one undo step.
Takes are written as 32-bit float WAV files: into the project's Audio folder once it is saved, until then into %LOCALAPPDATA%\Cantus\recordings\; saving moves them into the project. Each take is placed earlier by the measured latency, so it lines up with what you heard.
Before FX or after FX (round 40). The inspector's Recording section has Take from: Before FX · After FX. Before FX (the default) records the input as it arrives, after its trim — the strip's inserts change what you hear, not the take. After FX records the strip after its inserts (before its EQ, pan and fader), in stereo, as you hear it — Logic's and Studio One's "record with effects". The take still lands where you played it: a latent insert's delay is taken out. Two things to know: the inserts hear the input only while it is monitored (Auto or On), and they work on everything the strip carries at that moment. The choice is saved with the song, per track; one undo step.
Recording options
The ▾ beside the record key (or right-click it) opens Recording options:
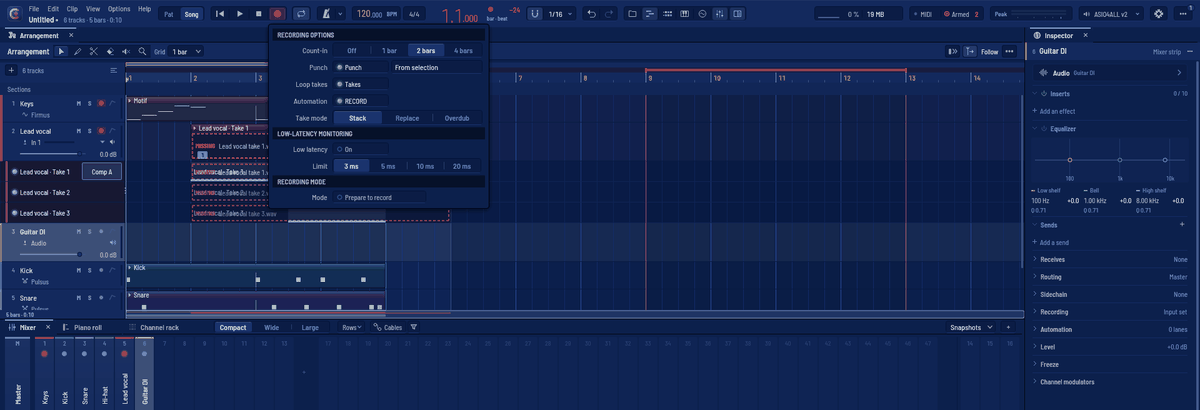
- Count-in: off, 1, 2 or 4 bars before the take (
Alt+C). The count-in clicks whether or not the Metronome (Ctrl+M) is on. It plays before recording from stop — the top bar's chip says so with a small red dot, and its menu under Before recording — as in FL Studio and Ableton; Play alone starts at once. To hear it before playing too, tick Also on play in the chip's menu (or the metronome's options ▾): off by default, kept for every project. - Punch: record only inside a range. From selection takes the time selection;
Alt+Puses the selection, else the loop, else two bars from the playhead. The range shows as a red brace under the ruler: drag its ends. Everything played is kept in the file; punch only sets the clip's window. - Loop takes: with the loop on, each pass becomes a take.
- Take mode: Stack (old clips move to take lanes — the default), Replace (cut what the take covers) or Overdub (MIDI: add notes to the clip).
- The click — its level, sound, accent and when it plays — is the metronome's, in the top bar.
Monitoring with low latency
Delay compensation keeps every track in time with the slowest one: with a linear-phase EQ somewhere in the song, everything — the input you monitor included — waits for it, and a singer can hear themself 96 ms late. Low-latency monitoring (Alt+Shift+R, or its switch in the record options, in the audio chip's popover and in the inspector's recording rows) changes that while it is on:
- What you monitor (an armed track's input in Auto, any input set to On, or an armed instrument track you play) reaches your ears without waiting for the other tracks: a voice through Tonus is heard 2.7 ms late instead of 96 ms. The backing stays in time with itself.
- An insert on the monitored path whose latency is above the limit (3 ms by default; 5, 10 or 20 ms in the same rows) is bypassed — the list says which: Monitoring without: Aequalis, Culmen (and how many more, past eight). They come back the moment you switch it off, with nothing left over from before.
- The audio chip shows the round trip of what you monitor — the driver's, the input's wait (for an audio input: notes you play only go out) and the monitored chain's — while it is on.
- Your take is placed exactly where it would be with it off: what is recorded is the raw input, placed by the latency in force when the take started. If the backing's latency changes during the take (you switch the mode, an automated look-ahead), what you play after is placed by the new one: every part lands where you played it.
For the lowest delay, monitor through a strip of your own: a bus that mixes your voice with other recorded tracks keeps those in time, and your voice waits there with them.
Takes and comping
Every take is kept on a take lane under the track: open them with the small disclosure at the bottom of the track's colour cell, Alt+T, or the track menu's Show takes. Drag across a take to comp that stretch into the track; click a take to use all of it. Right-click a lane for Use this take, Delete unused takes (which also drops recordings nothing plays any more), Explode takes to new tracks and Hide takes.
Seams. Where two takes meet in the comp they crossfade: equal-power, 10 ms by default, centred on the seam, each take reading on into its own recording. A seam has a small diamond at the foot of the track; drag it (or the edge of either take there) and both sides move together. Right-click it for its crossfade — Off, 5, 10, 20 or 50 ms — or to use that one for every seam of the track. Each piece of the comp shows the number of its take, and the take lanes light what is in the comp.
Alternate comps. The first take lane's header has the comp's chip, Comp A. Click it for the comps: switch between them (each comes back exactly as you left it, pitch edits included), New comp (a copy of this one, to try another idea), Rename, Delete, Flatten (keep the comp, drop the takes) and Flatten and merge (the comp bounced into one recording beside the takes — their files stay on disk). The same menu turns Quick swipe off (then dragging on a lane selects time and a click selects a take) and grouped comping on or off: tracks whose strips are in one mixer group — a drum kit's microphones recorded together — comp together, the same stretch of the same take on each; their seams move together, take the same crossfades, and their comps switch and are made together. Every change is one undo step.
What belongs to the comp. The pieces a swipe or a promote makes are the comp's, and so is the take that plays over the others after a recording (the last pass of a loop, or a take recorded over older ones; a recording where no take lies is a plain clip that plays under every comp): they switch with the comp, and stay its own when split, nudged or slipped. A copy is never the comp's, wherever it is pasted — right over its take too: it stays on the playing lane through every switch, under every comp. A piece dragged to another track leaves the comp; after a flatten the pieces are plain clips. The take lanes light the stretch of each take the comp plays.
MIDI
Arm an instrument track (one with no audio input) and press R: notes from every MIDI keyboard Cantus found (the top bar's MIDI lamp lights as notes come in; its tooltip names the inputs) are recorded into a clip. With nothing armed, R records into the selected track. No keyboard? Ctrl+T turns the typing keyboard on: A–L play notes, Z/X change octave. While it is on, letter shortcuts (including R) are off — use Space or the record key. The keyboard's pitch bend, mod wheel, pedals, every other controller (CC 0–119), channel pressure and how fast you let each key go (release velocity) are recorded too: they land in the clip's lanes under the notes in the piano roll.
MPE: per-note expression
An MPE controller (a Seaboard, a LinnStrument, an Osmose, a Sensel) gives each note its own pitch bend, pressure and timbre (slide, CC 74). Cantus records them on the notes, shows and edits them in the piano roll, and plays them to its instruments and to plug-ins.
- Turn it on. Settings ▸ MIDI ▸ MPE: set the controller's port to MPE. Other ports are untouched — a keyboard on channel 5 is never read as an MPE member. Zones: a lower zone of 15 member channels is what most controllers send (members ±48 semitones, master ±2); choose Upper or Both for a split controller. A controller that sends its MCM sets its own zones and bend ranges.
- Playing and recording. Each note is heard with its own bend, pressure and timbre, live and while recording; a take keeps them on its notes (thinned to what an ear tells apart). The master channel's bend, pedal and wheel stay the track's lanes, as on any keyboard.
- In the piano roll. A note's bend is the line through it (a semitone reaches the next row), its pressure the line's weight, its timbre its colour. The lane area's + menu shows a row per kind — Bend, Pressure, Timbre (per note) — with the selected notes' curves (every note's when none is selected): draw with the pencil or the line (Shift snaps a bend to whole semitones), right-click to smooth, thin, scale, flatten or clear. Each gesture is one undo step. Slicing, moving, transposing, quantising, copying and linked copies keep each note's curves with it.
- Our instruments. Unda, Calor, Modulus and Gravis bend each note by its curve (smoothly, glide-safe). A fresh Unda, Calor or Modulus comes with pressure and timbre already routed in its last two matrix slots (Unda: level and wavetable position; Calor: its filter; Modulus: level and brightness) — ordinary routes you can change or remove.
- Plug-ins. The track's inspector ▸ Note expression: Automatic (what the plug-in says it takes), Note expressions (CLAP note expressions, VST3 note expression), MPE (MIDI) (each note on a member channel of its own, with the MCM and a ±48 bend range — for plug-ins that take MIDI only) or Off.
- Files. MIDI files: an MPE track is written as a lower zone (its MCM, the bend range, a member channel per note); an MPE file — with its MCM or recognised by how it plays — is read back as one track with each note's curves; key (poly) pressure is kept. DAWproject carries the curves as the notes' own expressions.
MIDI controllers
Any knob, fader, button or pad of a MIDI controller can drive anything Cantus can set: a parameter of any device (Cantus's own or a hosted plug-in's), a fader, a pan, a width, a send, a modulator's amount, a mute, a solo, a record arm, an insert's bypass or mix, the tempo, and the transport (play, stop, record, loop, the metronome, tap tempo, the markers, PAT / SONG — anything a key can do).
Learn in two clicks. Right-click a control ▸ Learn MIDI controller, then move a control on your hardware: done. Or click the top bar's MIDI cell (or press Ctrl+Shift+M; a right-click on it opens the MIDI settings) for the learn mode: every control that can be learnt is outlined; click one, move a hardware control, click the next. A mapped control wears a small dot at its lower right; in the learn mode it is outlined in the highlight's colour, and the one waiting for your hardware is lit. Esc lets go of a learn (so do 15 seconds without a move). With no MIDI input open, a click on the cell opens the MIDI settings instead. Change MIDI controller and Forget MIDI controller are in the same menu. The mixer's strip and insert menus and the track header's menu have Learn rows for the volume, pan, width, mute, solo, arm, bypass and mix, and a strip's for its effects switch and record arm (the strip's FX bulb and record dot learn in the learn mode too); a send's menu has them for its level; the channel rack's knobs and lamps, and a device's switches and choices, learn like any knob. In the inspector an insert's lamp (bypass) and ring (mix), the inserts' switch and the arm LED learn too, and so does a device window's bypass lamp. A control that stands for one value of a choice learns that value: a band's Solo LED learns that band (a button then solos it and lets it go), a key of Tonus's scale learns its click. Inside a plug-in's own window, move the parameter there, then press Alt+Shift+A (Link the last tweaked parameter to a controller, FL Studio's way — also in the top bar's Clip menu) and move the hardware.
Cantus tells what you moved: a plain knob, a 14-bit fader (its fine controller came too), an endless encoder (and which of the three encodings it speaks), a button, a pad (on a switch it toggles; on a knob its velocity sets the value) or a program change (the bank select a keyboard sends before it is passed over). Press a button and let it go: pressed and released it toggles; a button that stays down by itself (it sends its top value only) sets the target on and off as it is. Any parameter with two states (a device's on/off, a lamp) is a switch: a button sets it at once, with no takeover. NRPN and RPN controls are not learnt — Cantus says so and keeps waiting for another control; set the controller to send plain CCs.
How a mapping reads its control — in the Controllers pane (View menu, or Ctrl+Shift+K), one row per mapping:
- Mode: Absolute (where the control is, the target is), Relative (an encoder: each step moves the target — on a choice, one choice per step), Toggle (each press flips it), Momentary (held: on; let go: off), Trigger (each press fires an action).
- From / To: the part of the target's travel the control covers, in the target's own units (−∞ dB to +6 dB, 200 Hz to 4 kHz, 60 to 180 BPM…), a choice by its names (Clean to Opto, Linear phase to Minimum phase; a plug-in's choices by the plug-in's own words), a switch with no names Off and On; To below From turns it round. Drag a cell, or double-click it and type — a number, or a choice's name; right-click resets it.
- Curve: a bend, so the first half of the turn does less (or more); typed in percent (−100 to 100), kept as typed.
- Takeover, for a control that does not move itself when the value changes elsewhere: Pick up (the default: nothing moves until the knob passes the value — no jumps), Scale (the value moves with the knob, so both reach the end together), Jump. The header sets the takeover new mappings get; a switch has none.
- Feedback (Send): the value goes back to the controller whenever it changes — for motor faders and LED rings, and the lights of the transport's buttons and every switch with a state (play, record, loop, the metronome, punch, count-in…). Off by default; an action that has no state (stop, undo) has no Send. What a controller or a loopback port sends straight back is recognised as the echo it is.
A lit dot at the left of a row shows a message just came. Shared marks one control on several targets (allowed: one knob can open two filters at once). A row whose target is gone (a deleted track) is kept, marked Missing, and works again if undo brings the target back. A plug-in's parameter is learnt with that plug-in: after the instrument or the insert is swapped for another — a plug-in, or one of Cantus's own — the row says Other plug-in, still named after the plug-in and the parameter it was learnt on, its range in percent, and its knob is free (learn the new one's parameter; an undo of the swap brings the old row back to life). An insert swapped for one of Cantus's own keeps its bypass and mix, and a parameter the new effect also has. Not loaded says the plug-in is in the project but not running here (or it stopped); Frozen, that the target's sound is frozen — a move is refused and said, and the knob reaches no other instrument; Not connected, that the mapping's MIDI input is not open; No input, that a strip's record arm has no track with an input to arm.
Two maps. This project's mappings are saved with the project, and every change is one undo step. Everywhere — your global mappings, kept beside your keyboard shortcuts — holds what means the same in every song: the transport, the tempo, the master, the selected track and the selected channel (volume, pan, mute, solo, arm — the master's when the master is selected) and the focused device's first eight knobs (the device window you clicked last). Learning a transport key or the master puts it there; Add a mapping in the pane offers all of them, and every keyboard shortcut's action by its group (arm the selected track, punch, undo, save, the views…). When one control is in both, the project's mapping wins. If the global file cannot be read whole, a copy is kept beside it (the status says its name) and nothing is lost; if not even a copy can be made, it is never written over, and each change to the global mappings says it will not be kept.
While you play and record. A mapped knob no longer reaches the instrument (it does not also bend its filter), and a mapped pad plays no note. A move made with the mouse or a controller is one undo step per gesture. With a parameter under an automation clip, the clip plays it — until a recording pass moves it: from that moment the parameter follows your hand (the clip is set aside for the rest of the pass), and the pass writes what you did as an automation clip, each move at the moment its message arrived, inside the pass (the count-in and anything past the punch-out are not written, and past the punch-out the parameter follows its clip again; Record options ▸ Record automation). While audio records, a knob mapped to the tempo does nothing (the status says why): change the tempo before or after the take.
Channel pressure and key pressure now reach the instrument (Cantus's and hosted ones), and a program change reaches a hosted instrument.
Playing in sync: Ableton Link, MIDI clock and time code
Cantus follows one outside clock at a time, and sends its own clock to the ports you choose. The top bar's Sync group shows it: LINK (its lamp lit while Link is on, the number of other apps in the session beside it), Q (Link's quantum, in beats) and EXT (the source followed: its lamp is the lock light — lit when locked, amber while pulling in or waiting for its moment — and the tempo it plays). Customise top bar… shows or hides the group like any other.
Ableton Link. Click LINK: Cantus joins the Link session of every app on your network (Live, Bitwig, Traktor, phone apps, another Cantus). The session's tempo becomes Cantus's while Link is on — the project's own tempo and its tempo track are kept and come back when Link is off (as in Live, Link overrides them while it is on). The top bar's tempo shows the session's; dragging it changes the session's tempo for everyone, and so does a change of the project's tempo. Press play and Cantus starts on the next quantum (Q: a click steps 1, 2, 3, 4, 8 beats; 4 is a bar of 4/4), in phase with the others; nothing already played moves, and the sound leaves the speakers when the session's beat does (the audio device's latency is allowed for). With Start/stop sync on (Settings ▸ MIDI), a play or a stop in any app starts or stops all of them. The first time Link is turned on, Windows may ask to let Cantus through its firewall (Link talks to the other apps over UDP on your network, as Live does): allow it on private networks. If Link cannot open the network, its lamp turns red and its tooltip says so.
MIDI clock in. In Settings ▸ MIDI, tick Clock on the input the master device is on (or choose Follow ▸ Clock and the port). Cantus then waits for the master: its Start plays from the beginning, Continue from its song position, Stop stops; the tempo follows the master's clocks, filtered so a jittery clock still plays steadily. Your own play key waits for the master too.
MIDI time code in. Tick MTC on the input instead: Cantus chases the code — a full frame locates, quarter frames run it, a short dropout is ridden through, and it stops when the code stops. Start code says which time code is the song's start (an hour, 01:00:00:00, is common); the project's tempo map turns the time into bars.
Clock and time code out. In the Outputs table, tick Clock on a port to send MIDI clock (24 per beat, the song position pointer, start, stop and continue, following the tempo track) and MTC to send time code at the Code rate chosen (24, 25, 29.97 drop-frame or 30) from the Start code. Each output has an Offset (‹ › in half milliseconds, a click sets zero) for a device that answers late; Feedback says whether controller lights and motor faders may use the port.
The ports' table. Each input's Notes and Controls can be turned off (a keyboard that should only send clock, a controller that should only drive the map); keys and pedals already down are still let go. On an MPE port, Controls carry each note's bend, pressure and timbre, so turned off they go silent.
- MPE: the port's MPE zones and bend ranges (see MPE in the piano roll's pages).
- Grid: the controller grid (Launchpad, APC) the port is, mirroring the session view.
The session view while following. A clip or scene launched from stop waits for the source: with Link, the next quantum (or the session's start, with Start/stop sync); with MIDI clock or time code, the master's Start. A scene's own tempo is proposed to the Link session at its launch, so the other apps change with it.
5. Edit: clips, piano roll, automation
Quick gestures
As in FL Studio, the arrangement opens things with no hunting through menus:
- Double-click a track header (anywhere but its name): its instrument opens — the instrument's window (Unda, Pulsus II…) or a CLAP/VST3 plug-in's own window. Firmus and audio tracks, which have no window, show the inspector instead.
- Click a track's name — on the letters themselves (the pointer becomes a text cursor) — to rename it in place: the name is selected, type the new one,
Enterkeeps it (one undo step),Escputs back the old one. A click elsewhere on the header only selects the track, and typing with a track selected never renames it. (Mixer strips and rack pads rename on a double-click.) - Double-click a clip: the piano roll opens on it, the whole clip in view. A step pattern the rack shows with nothing lost — every note a short hit on a step, one pitch per channel (a drum kit may use all its pads; a melody on a synth opens the piano roll, as in FL) — opens in the channel rack instead, at the pattern's own grid and scrolled to its track. An automation clip opens in its large editor; an audio clip opens in the pitch editor (its gain, fades and file stay in the inspector).
- Open editor — in the inspector, the mixer's menus or an instrument's frame — brings a window that is already open back from the tray (or the taskbar, for a plug-in instrument or effect) and to the front; while a plug-in's window is open its key reads Show.
F8and the channel rack's channel button do the same when the window is minimised, behind another tab or under another window, and close it only when it is already in front. (Cantus cannot bring forward a plug-in that floats a window of its own: its key reads Close.)
Clips in the arrangement
- Create: double-click an empty place on a track (a 4-bar clip), or record.
- Select: click;
Ctrl+clickadds; drag on empty space for a marquee;Escclears. - Move: drag (also to another track).
Alt+dragcopies;Ctrlwhile dragging ignores the grid.Left/Rightnudge by the grid,Shiftby a bar. - Trim: drag a clip's edge — its content stays where it is. Slip:
Shift+dragslides the content inside the clip. - Split at the playhead:
Ctrl+E. Glue:Ctrl+J. Duplicate:Ctrl+D(press again to keep tiling). Mute:0. Rename:F2. Colour:Ctrl+Shift+C. - Time selection: drag in the ruler's lower lane; the top strip is the loop — a loop drawn there loops at once (one undo step).
Shift+Lloops the selection,Zzooms to it. - Audio clips have handles for fade in, fade out and gain (double-click one to reset it; right-click a fade for its curve) and a menu with Normalize, Reverse, Reset clip gain and Remove fades.
- Crossfades: drag an audio clip so it starts over another and the overlap crossfades by itself, in the same undo step — the earlier clip fading out while the later one fades in, drawn as two curves across the overlap. Its square at the top of the overlap: drag it sideways to make the crossfade longer or shorter (both clips' edges move about its centre, as far as their audio goes); double-click it for the crossfade's editor (its curve drawn, No crossfade · Equal power · Linear · S-curve, Length in ms); right-click it for the same choices. Equal power (the default) keeps two different recordings level across the overlap; Linear and S-curve suit two takes of the same thing. An overlap with No crossfade plays both clips summed (dashed edges). Turn the automatic crossfades off (or choose their curve) in Settings ▸ Editing or the timeline's right-click menu (Automatic crossfades); the clip menu's Crossfade the overlap crosses (or uncrosses) the selection's overlaps by hand. A clip lying wholly inside another is layered over it, not crossed; clips that only meet are a butt join.
- Clip gain envelopes: right-click an empty place in the arrangement ▸ Show clip gain envelopes (or the clip menu). Each audio clip shows a gain line — +12 dB at the top, 0 dB a quarter of the way down, −∞ at the bottom — and its waveform follows it. On a selected or hovered clip, press on the line to add a point and drag it (Shift: finely); double-click a point to delete it; drag the small circle half-way along a segment to bend it (double-click to straighten); right-click a point or the line for the segment's shape (the automation editor's six), Delete point or Reset gain envelope. The line belongs to the audio: slip the content and it moves with it, trim and it is hidden (not lost), split and both halves keep it, glue and the pieces' lines join, reverse and it plays mirrored with the audio. It works on top of the clip's gain and fades. MIDI clips have no gain line: their notes' velocity is their level.
- Import audio: drag WAV, AIFF, FLAC or Ogg files onto the arrangement (they land at the pointer), or File ▸ Import audio…. A MIDI file adds its tracks.
- Linked copies: a paste,
Ctrl+DorAlt+dragmakes the same clip again — edit one and every copy follows (notes, or an audio clip's gain, fades and reverse). A link mark and a ×N count show it. Make unique (Alt+U) takes the selection out of its group; Select linked copies (Shift+Alt+L); Link selection to this clip (Alt+L); Link to… (Alt+N) picks, by name or track, a linked group or a clip of its own to become. In the inspector, a linked clip's Link row shows how many copies it has and offers Link to…; renaming it in the Name row renames every copy. Right-click an empty place in the arrangement ▸ Copies are linked to make independent copies instead. - The clip browser (
Alt+F5, or View ▸ Clip browser) shows every linked group and every clip of its own once, as tiles in the clip's colour with a miniature of what it holds; type to filter by name or track. Drag a tile onto the arrangement to place a linked copy there. Click a tile to choose it for the paint tool: with the arrangement focused,B(or2) takes the tool out — a click places a linked copy, a drag paints copies end to end along the track, a right-drag (orAlt+drag) erases the copies of that clip only; each stroke is one undo step;Escputs the tool away. Double-click a tile to select all its copies.
Scroll with the wheel, Shift+wheel for time, Ctrl+wheel to zoom. Under the lanes, the song map is the horizontal scroll bar: every track a line where it has clips, the view a frame — drag the frame, drag its ends to zoom, press elsewhere to go there.
The arrangement's tools, Follow and the grid
The arrangement's toolbar holds its name, the tools, the grid, Follow and the panel menu …. The tools are a radio set — the chosen one is lit — and the keys are FL's letters and the number row while the arrangement has the focus (the piano roll's tools otherwise):
| Tool | Key | What it does |
|---|---|---|
| Select | E or 3 | Click a clip to pick it, drag it to move it, drag its edge to resize it; a drag on empty lanes selects. In hand at start |
| Draw | P or 1 | Click an empty lane to add a bar-long clip in the grid cell you clicked; drag to draw it to the length dragged. On a clip it moves and resizes, as Select |
| Slice | C or 6 | Click a clip to cut it in two on the grid; the cut is drawn under the pointer first |
| Erase | D or 4 | Click a clip, or drag across clips, to delete them (one undo step) |
| Mute | T or 5 | Click a clip, or drag across clips, to mute or unmute them |
| Zoom | 8 | Click to zoom in at the pointer, Alt+click to zoom out, drag across bars to fit them |
B (or 2) is still the paint tool of the clip browser (see above), and Z zooms to the selection. The other actions of the old row — split, glue, duplicate, mute, repeat, make unique, delete, loop and zoom to the selection, Snap to the grid — are in the panel menu … and in the clip's menu, with their keys.
- Follow (on at start): while the song plays, the view turns the page when the playhead leaves it, starts outside it or wraps round the loop. A view you scrolled away yourself is left alone.
- The grid (it starts at one bar): its menu lists the values in musical order — Bar, 1/2, Beat, 1/8, 1/16, 1/32 — with a check on the current one, then Triplets (
Shift+3; a value and its triplet, "1/8T") and Follow the zoom (the grid becomes the finest value whose lines stand at least 12 points apart).Ctrlwhile dragging ignores the grid. The piano roll's grid menu is the same. - On a narrow window the toolbar folds: first the grid's and Follow's words, then the name becomes its glyph, then the tools become the chosen one and a chevron that lists them all.
What the clips show. A clip's content is drawn at four zooms: far, a MIDI clip's pitch contour, a drum clip's pulse and an audio clip's loudness; closer, the notes in rows ranked by pitch (a melody in pitch order), each drum a row, the waveform's peaks and loudness; close, the notes at their length and brightness by velocity, the stereo sides apart (L, R), an automation lane's values beside its points ("−15.0 dB"). The selected track's clips are lit a step; while a track is soloed, the others' clips are dimmed; a clip under the playhead brightens while it plays; a muted clip is hatched. Moving a clip leaves its old place dashed and the clip riding over a soft shadow, with "Drop → 3.1" on the help line; resizing lights the edge and the help line says the length it lands on (Alt stretches, Ctrl ignores the grid). Point at a MIDI clip and a small notch shows in its top right corner: drag it to repeat the clip at its length (one undo step).
Sections, folders, track headers and a track's icon
- Sections are named spans of bars in a lane under the ruler (Sections), each with its length ("8 bars"); the one playing is the strongest. Add one from the lane's menu or from the lanes key in the corner above the headers (of the time selection, or four bars). Click a section to select it, double-click to rename it, drag it along the bars (one undo step), drag its end to change its length; its menu selects or loops its time and removes it. Dragging a section moves the section itself; moving the music under it with it is planned.
- Folders: the add-track menu's Folder, or a track's menu ▸ Put in a new folder. A folder is a row of its own with a chevron, its name and M · S (they mute and solo its members, in one step); its lane shows the members' clips as thin bars. Closed, it is one row ("Folder · 4 tracks → Drum bus") and its members take no height; open, the members are indented under it. Drop a header between two members to put it in their folder, anywhere else to take it out; Take out of its folder and Ungroup do it from the menu.
- Track headers: the number, the name, a line under it (the instrument, the armed input with its meter, or Frozen), a slim meter, and M S ● A as letters at rest — gathered into one well under the pointer; only the engaged key is lit (S amber, ● red, A violet; M outlined amber when a solo silences the track). Heights 24, 32, 44 (the default), 64 (with the level as a slider) and 96 (with the inserts in words), from the track's menu ▸ Height, or any height by dragging a row's foot (
Alt: every track). Drag the headers' edge for their width (120–360). - A mode per automation lane: an automation lane's header shows its mode chip (Read, Touch, Latch, Write); click it to give that lane a mode of its own over its track's.
- A track's own icon: the track's menu ▸ Icon…, or a click on the icon before its name, opens the icon picker: 316 drawings in 17 families (drums, percussion, tuned percussion, guitars and basses, strings, winds and brass, keys, electronic, voice, sound and FX, mix, marks and shapes…), the ones you used lately in a row at the top, None to take it away, and a search field that finds an icon by its English or Spanish name or an alias, accents aside. The icon shows before the track's name, on its mixer strip's head and in the inspector. Each pick is one undo step.
- An empty song offers Start your song with three starters (an instrument track, a drum kit, an audio track), a place to drop a sound, a loop or a MIDI file, and Or open a demo song.
The tempo track and markers
A song can change tempo and metre as it goes, and carry named markers (round 29).
- The tempo track is a lane under the ruler (View ▸ Tempo track, or the ruler's menu): each point is a tempo, held flat to the next point or ramping straight to it. Double-click the lane to add a point (on the grid, at the tempo where you clicked); drag a point to move it (
Shiftfor fine tempo steps,Ctrloff the grid);Alt+clickturns a point's ramp on or off; double-click a point to type its tempo; right-click for Ramp to the next point, Remove the point and Remove the tempo track. The header beside the lane shows the tempo at the playhead. - The top bar's tempo shows the tempo at the playhead (inside a ramp, its value there). Dragging it and the wheel (a notch, one BPM) move the point the playhead is under by that much — inside a ramp, the ramp's start; a double-click (120) or TAP set it — the song's tempo when there is no tempo track.
- Metre changes are chips on the ruler before a bar's number ("7/8"). Right-click the marker lane or the ruler ▸ Add a metre change here (at bar 1 it opens the song's own metre); click a chip to edit its signature, drag it along the bar lines between its neighbours, right-click to remove it. The bars after a change keep their numbers; notes never move. The top bar's metre edits the metre in force at the playhead.
- Markers appear in a lane under the loop lane.
Alt+Madds one at the playhead (or double-click the lane, or right-click the ruler ▸ Add a marker here); click a marker to put the playhead there; double-click it to rename it; drag it along the grid; markers on one tick sit side by side; right-click for Rename…, Colour…, Loop to the next marker, Select to the next marker, Export to the next marker… and Remove the marker.Alt+,andAlt+.go to the previous and next marker;Alt+Shift+Oloops between the markers around the playhead. The lane's menu lists every marker under Go to. - Export between markers: File ▸ Export audio… ▸ What ▸ Markers, then pick the two markers by name (two at different places: the dialog says so otherwise, and never exports the whole song instead).
- Everything follows the tempo: notes, audio clips, automation, modulators, synced effects, the click (the first beat of every bar accented; a bar of 7/8 counted in eighths) and plug-ins made by others. An unwarped audio clip plays at its natural speed from the point of its file at its start: split it, trim it or comp it anywhere and every piece plays on where it was; move or copy clips elsewhere and each lands on its own bar, playing the same part of its file (the pieces of one take moved together still meet). A tempo change never changes what a take plays where it comes in, and the pieces of one take move together, so a split never jumps; a change inside a take lets the rest of it run on at its own speed — warp it to keep it on its bars. A reversed clip keeps the point of its file it lands on, at its end. While audio records the tempo stays as it is — undo and redo of a tempo change too; recording notes leaves it free.
- MIDI files carry the whole tempo map out (a ramp as a tempo change every sixteenth note — a very long one, over 1 024 beats, in fewer, longer steps, each its stretch's average — and every marker, those at the end too) and in — importing with Set the project to … BPM in … keeps the file's tempo changes, metre changes and markers: at the song's start they are the song's; dropped at a later bar they start there (the bar line nearest the drop), the song keeping its own tempo and metre before it. DAWproject files carry the tempo track, the metre changes and the markers both ways. A file's tempo points, metre changes or markers past a million beats are left out, and the import says so.
The piano roll
Select a MIDI clip and show the piano roll (F7, or its tab under the arrangement): it edits that clip's notes.
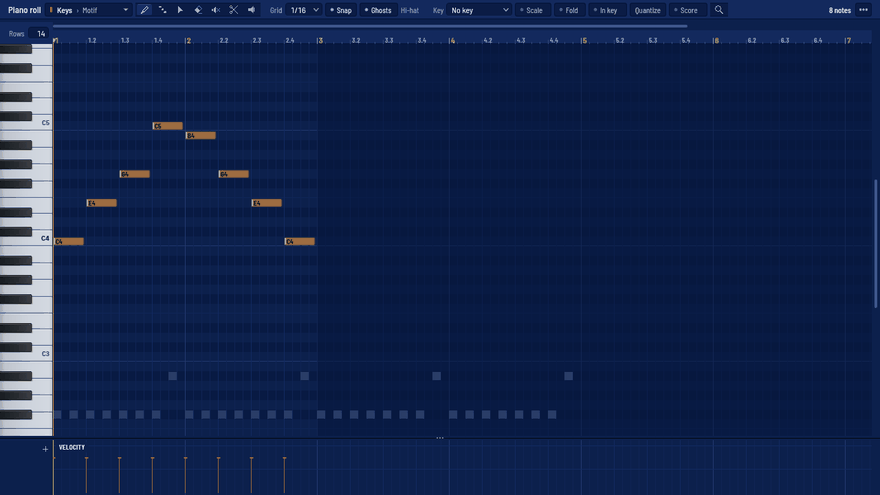
| Tool | Key | What it does |
|---|---|---|
| Draw | P or 1 | Click adds a note, drag moves, drag the right edge resizes, right-click deletes |
| Paint | B or 2 | Drag across the grid to paint notes |
| Select | E or 3 | Drag to select; drag notes to move them |
| Delete | D or 4 | Click or drag over notes to delete |
| Mute | T or 5 | Click a note to mute it (it stays, silent) |
| Slice | C or 6 | Drag a line to split notes |
| Play | Y or 7 | Click notes or rows to hear them |
Up/Down transpose the selection (Shift: an octave), Left/Right nudge it, Q quantizes, Ctrl+C/Ctrl+V copy and paste. Velocities are stems in the lane under the grid: drag them, or Alt+wheel over a note. A drum kit shows one named row per pad.
The keyboard and the notes. The keyboard at the left is drawn as a piano: ivory and ebony keys at a real piano's widths (C to E share five rows, F to B seven, so only E|F and B|C fall on row lines), every C named in its key, middle C heavier. The key under the pointer is lit, the key a click sounds is lit more, and while the song plays the keys sounding light in the track's colour. The corner above it, Rows, sets the rows' height: Compact 8, Default 12 or Tall 18 (Ctrl+Alt+wheel over the notes zooms them freely). A note's fill follows its velocity, with a brighter attack and its name inside once it is wide enough; a selected note is lifted and ringed; a muted note is hollow.
Ghosts (the Ghosts lamp in the head, on by default) shows the other clips' notes faintly behind this one — the same track's in its colour, other tracks' in grey — and the head names whose they are ("Pluck · Lead · Choir"). They are never selected or moved.
The head says which clip is open: the track's stripe and name › the clip's name, a menu of this track's other clips and the other tracks' (Other tracks), and, with notes selected, how many and their range ("6 notes selected · E4 – C5 · velocity 90 – 95"). Its tools, grid, Snap, Ghosts and the scale's parts fold on a narrow window, as the arrangement's do.
Lanes under the notes. Under the grid, each clip shows its velocity lane and the lanes it holds. The + in the velocity lane's cell adds one: Release velocity (how fast each note is let go — drag its stems; a ring on the floor is a note with none), Pitch bend, Channel pressure, the named controllers (mod wheel, breath, expression, sustain, …) or Other controller ▸ for any number from 0 to 119. In a lane:
| In a lane | What it does |
|---|---|
| Pencil, line, curve (the keys in its cell) | Draw freehand; drag a straight line; drag a curve (Alt bends it the other way). Line and curve snap to the grid |
| Drag a point | Moves it (and the points selected with it); Ctrl keeps it in time |
Shift + drag | Selects the points in the rectangle; Delete deletes them |
| Right-click a point | Deletes it |
| × in its cell | Removes the lane (Undo brings it back) |
The bend lane shows the instrument's bend range at its edges. A lane belongs to the clip: it moves, splits, loops, copies and links with it; the bend, pressure and pedals go back to rest where the clip ends. With Lanes follow the notes (on, in the + menu), moving, copying and pasting notes takes the controllers under them along. The rows share the space under the splitter; when there are more than fit, the wheel over their cells scrolls them. MIDI files bring their bends, pressure and controllers into these lanes and take them out again on export, with each note's release velocity.
The channel rack
The channel rack (F6) shows every track as a row of steps over the selected clip's bars: click a step on, right-click it off, drag to paint. A step is an ordinary note.
- A row is the channel's lamp, its two knobs, its mixer track, its name plate and its steps; the channel's colour is a stripe at the left (whole when selected), and the selected row is tinted across the grid. A lit step is filled from its floor to its velocity in the channel's colour; beats two and four sit a step lighter.
- A drum kit lists its pads under its own row, stepped in, with a tree line; its plate says how many pads it has ("3 pads"). Its chevron folds the pads under the kit's row (the row keeps showing their hits) and opens them again.
- A melodic channel shows its pattern as a small piano roll in one well across the page, and an audio channel its sound's waveform.
- Two bars a page when the rack is fitted; the pattern map at the head's right shows every bar of the pattern (the page in view raised, each beat's hits as a mark) — click a bar to page there; the scroll bar pages through the rest.
- At the foot: Add a channel opens the instrument picker for a new channel at the end; under it a drop zone — Drop a sound here for a new channel, or onto a channel to replace its sample — lights while you drag a sound from the browser over it.
The pitch editor
Double-click an audio clip — or its menu ▸ Edit pitch, or Edit pitch in the inspector — and its take opens in the piano roll's place, Melodyne's way: each note is a blob on the row it sounds, as thick as the voice is loud, with the pitch curve running through it (what was sung, dim, under what will sound). Sibilants and breaths are marked along the bottom. The take is analysed beside the window the first time (a second or so per minute of audio; a recorded take is analysed as soon as it lands) and the result is kept in Cantus's cache, so it opens at once next time. The file is never changed: the clip plays a render of your edits, made beside the window, and while a render is on its way you hear the take as it was (never silence). Export waits for every render.
- Edit tool: click a note to select it (
Shiftadds; drag on empty ground for several). Drag it up or down to move its pitch — on the notes of the key (Snap: Scale), on semitones, or anywhere (Free; holdAltfor cents). Drag it sideways to move it in time, or drag one of its ends to stretch it: only the gaps beside it give way, its neighbours stay exactly as sung. Double-click a note to pull its centre onto its note (again to let it go).Up/Downmove the selection a step (Shift: an octave,Alt: 10 cents),Ctrl+Aselects every note,Ctrl+Jjoins,Qquantises,Escclears. - Split tool: click inside a note to cut it in two; Join puts neighbours together.
- The note (the panel below): what the selection sounds and was sung, and its centre (how far its centre is pulled onto its note, keeping its natural drift and vibrato), drift (the slow wander: 100 % as sung, 0 % flat), vibrato (0–200 %), formant (the voice's colour, up or down, the pitch kept) and gain.
- The macros act on the selection, or on every note when none is selected: Correct pitch by an amount (each note that far toward its note — a note off the key toward its nearest note; 0 % leaves it alone), Correct drift by an amount, and Quantise each note's start to what Quantise to on the bar says: a grid, or another track's notes (each note onto the nearest one within an eighth note).
- Key: found from the notes; change it on the bar (Tonus's scales). Original compares with the take as sung (A/B) — the inspector has the same switch. Reset undoes every edit on the selection. ▶ plays from the first selected note. Every edit is one undo step.
- MIDI: drag it onto an instrument track in the arrangement and the melody lands there, at the voice's place; click it for a new track. Double: a second voice a third or a fifth above in the key, from the same take, on a track of its own. MIDI out and Double are also in the audio clip's right-click menu.
- When the editor is narrow, what the bar has no room for is in its … menu, and the panel under the notes scrolls sideways.
The pitch lane: right-click an audio track's header ▸ Pitch lane shows its notes in a lane under it, in the arrangement — drag one up or down to move it, double-click it to pull it onto its note — for small fixes without opening the editor.
Formants are kept when a note moves (measured within 3 dB at ±3 semitones). It works on one voice or one instrument line at a time; chords are not split into notes.
Warping and stretching audio
Warping makes an audio clip play in the project's time: faster or slower than it was recorded, without changing its pitch, and following every tempo change of the tempo track. The file is never changed: the clip plays a render made beside the window.
- Loops warp themselves. Import a loop (from File ▸ Import audio…, a drop from Windows or from the browser) and Cantus finds its tempo, its beats and its first downbeat; a file of a whole number of bars (or one whose WAV carries its tempo) is warped at once to the project's tempo, in the same undo step as the import (one step for every file of a drop). Longer files, every take you record and every take brought back after a crash play at their natural speed until you warp them: a recording plays as it was played.
- Warp a clip yourself: right-click it ▸ Warp ▸ Follow the project tempo (or Follow in the inspector or the editor) — nothing moves until you move a marker, even under a tempo ramp — Detect tempo (markers on every bar it found), or Warp from here (its tempo counted from the beat where you right-clicked; in the inspector, from the playhead). Turning Follow off plays the clip at its natural speed and keeps its markers for when you turn it on again; turning it off, resetting the warp or laying it again never moves what the clip plays at its start (nor on its linked copies). A linked copy under another tempo than its copies' is made unique when you first warp it, so they keep playing as they did. Set the project tempo from this clip goes the other way: the clip's tempo (what the analysis found, while it does not follow) becomes the tempo where it starts.
- Warp markers pin a moment of the audio to a beat. Any audio clip under the pointer or selected shows its transients (the hits found in it) as ticks along a band at its top; a clip that follows the tempo also shows its markers as gold flags — the ones on its two ends too — and takes clicks on the band. Double-click the band to add a marker (on a transient, it lands on it); drag in the band to add one and move it at once. Drag a marker to move that moment of the audio to another beat — it snaps to the grid (hold
Ctrlfor free) and the audio between its neighbours stretches to fit. HoldAltwhile dragging to slide the audio under the marker instead. Double-click a marker, or right-click it ▸ Remove warp marker, or click it and pressDel, to remove it. On a clip that does not follow the tempo the band takes no click: dragging near its top moves the clip, as anywhere else on it. - Stretch a whole clip: hold
Altand drag its right edge (Shiftstill slips). A linked copy stretches on its own (it leaves its group). - The clip editor's Warp tab: double-click the clip (or Edit warp) — the editor has two tabs, Pitch and Warp, and opens in the one you used last. The Warp tab shows the clip large on a bar ruler, with the same gestures on any audio clip, and a bar with the mode, its own snap grid (1/4 to 1/32, or free), the transposition, Formants, Follow, the clip's tempo (½, ×2 when it was counted at half or double), Detect tempo, Quantise… and Reset warp — what does nothing in the clip's mode is shown greyed; in a narrow window the bar takes a second row.
Ctrl+wheel (or a pinch) zooms in on the clip about the pointer, the wheel (or the bar under it) scrolls, andQopens Quantise audio. - Modes (the inspector's Warp section, or the bar) — choosing one does not warp the clip:
- Complex — anything: full mixes, pads, chords. Keeps the attacks sharp, a chord's voices steady and the stereo image in place.
- Rhythm — drums and percussive loops: each hit is played exactly as recorded, only moved; Slice ends chooses what fills the gap after a hit when it is slowed down (Fade, Loop, Mirror: back and forth).
- Melodic — one voice or one instrument line: the cleanest for a solo, with the voice's colour kept when transposed.
- Re-pitch — like a turntable: the speed and the pitch change together (no processing artefacts; Transpose is then off).
- Transpose shifts the clip by semitones and cents without changing its time (a clip that does not follow the tempo keeps its natural speed); Formants ▸ Keep keeps a voice's colour when it is transposed (no "chipmunk"). The level stays as it was.
- Detected and Confidence in the inspector: the tempo and bars the analysis found, and how sure it is. A marker's hint gives the speed the audio plays at after it, against the tempo in force there.
- Quantise audio… (the clip menu or the inspector, on every audio clip selected with the one you chose): pulls the transients toward a grid with a Strength, only the stronger ones if you choose (Transients over) — one undo step for every clip; only the hits you hear move (a loop's own period; a reversed clip's on the lines where they play), the rest keeps its speed.
- Bounce warped audio writes the clip's window as it sounds now to a new file beside the project's audio, and the clip then plays that file, unwarped (one undo step). Reset warp puts the clip back to its natural speed.
While a render is on its way (a fraction of a second for a loop, a few seconds for a long file) you hear a quick preview at the right timing and pitch — a clip transposed for the first time plays its own audio meanwhile; one whose markers move its audio waits a moment for its preview, never playing at the wrong bar — and the change from one to the next is crossfaded once. Export, stems, freezing, bouncing and a modulator's bake wait for the full render; if one ever takes too long, the status line says so when the job is done. Warped clips travel in DAWproject files with their markers and mode (a file Cantus wrote comes back with its warp exactly as it was); a clip at its natural speed travels as a file placed in seconds, so it keeps its speed in any application. Opening or dropping a .dawproject reads it in the background (its audio copied to disk as it goes, a file referenced beside it found there); it opens once nothing is being recorded or dragged, and never over another project opened meanwhile.
Automation
Right-click any knob, fader or effect control ▸ Create automation clip, or move a control and press Alt+A (automate the last thing you touched). The clip covers the time selection (else the loop, else four bars) on a lane under its track. On the lane: drag points, drag the ring between two points to bend the curve, click the line to add a point, double-click a point to delete it, right-click it for its shape (single or double curve, hold, stairs, pulse, wave). Double-click the clip for the large editor, with a drawing tool and articulators (flip, smooth, random, scale, LFO). An automated control shows a dot.
Hosted plug-ins are automated like Cantus's own: right-click a parameter in a plug-in's generic editor (or in a hosted instrument's Parameters list in the inspector), or move it in the plug-in's own window and press Alt+A. Their changes reach the plug-in at their exact sample inside the audio block.
Recording automation. While you record, every control you move — in Cantus or in a plug-in's own window — is written into an automation clip over the stretch you moved it in (one undo step when the pass ends). Switch it off in the record options (Automation). (This is the Latch mode below, for every track in Read.)
Writing automation while the song plays: Read, Write, Touch, Latch. Each track has an automation mode — the badge at the right of its header (R, W, T, L; click it, or Alt+Shift+W for the selected track), the inspector's Automation row; the master's is in its menu on the mixer. The automation arm in the top bar (the envelope key after loop) makes them write; its ▾ sets every track at once and the Touch glide.
| Mode | While the song plays, armed |
|---|---|
| Read (R) | Plays the automation. Moving a control writes nothing |
| Write (W) | Overwrites everything the track automates, from play to stop, each held where it was until you move it. After the pass the track switches to Touch |
| Touch (T) | Writes while you hold a control; let go and it glides back to the curve that was there (over the touch glide, 250 ms by default) |
| Latch (L) | Writes from your first touch until you stop, holding the last value |
What you write becomes ordinary automation clips over exactly the stretch you wrote; the control goes back to where it was before the first clip, and the whole pass — with the moves of your hand — is one undo step. It works for every automatable control: faders, pans, sends, effects' and instruments' parameters, plug-ins' parameters moved in their own windows, modulator depths, and controllers mapped to any of them. Round a loop, each pass writes over the last where it touches; with punch on, only the punch range is written.
Modulators
A modulator moves parameters for you: an LFO (five shapes, synced to the song or free in Hz, restarted by notes if you like), an envelope (attack, decay, sustain, release — opened by the track's notes or by an audio level), a follower (the level of any strip: duck a pad under a kick), steps (up to 32, synced, with glide) and a random source (held or smooth, repeatable from its seed). Each modulator drives any number of parameters, each with its own depth, plus or minus; a parameter may take several, and they add up on top of its automation. Two more are controllers you play or program, each with its own window: Tactus, the X-Y pad, and Calculus, the formula controller.
- Where they live: the inspector's Modulators section for the selected track, its channel, or the master (click the band's +). Each modulator shows its movement as a picture, its settings, its amount, and one row per parameter it drives: drag the depth, bake it, or disconnect it.
- Connect: right-click any knob, fader or plug-in parameter ▸ Modulate… and pick a modulator or make a new one already connected; or drag a modulator's handle (the grip at the left of its title) onto any knob; or press its map key and drag any knob — the drag sets that modulator's depth there.
- Depth on the knob: hold
Altand drag a modulated knob to change the depth of its modulation (only the drag: a double-click still resets the value). Modulated knobs wear coloured rings (the depth, in the modulator's colour), a moving dot where the parameter is now, and a violet mark. - Everywhere: every knob of Cantus's instruments and effects, the mixer's faders, pans and widths (the master's too), every send's level (its knob and row on the desk, its cable's level, the inspector's send and receive rows; a send's right-click menu has Automate and Modulate… for it), the inspector's Level section and a hosted plug-in's parameters take a modulator the same way. So does a modulator's own amount: let a random source move how deep an LFO goes (one level of nesting). Chorda's tuning (A4, stretch, stiffness) is set, never automated or modulated.
- Bake to automation: a route's bake key (or Modulate… ▸ Bake to automation) turns that modulator's effect into an automation clip over the time selection (else the loop, else the song) and removes the route, in one undo step.
Synced modulators follow the song position, so playing from bar 5 hears what a full play hears there; free ones start with playback. Exports sound exactly as playback.
Tactus, the X-Y pad
Tactus (Latin for touch) puts two parameters under one finger: drag the puck across the pad and the horizontal position (X) moves one, the vertical (Y) another — a filter's cutoff and resonance, a pan and a width, two sends — like FL Studio's X-Y Controller or a Kaoss pad. It is a modulator, so it lives where the others do and drives anything they can, as many parameters as you like, each through the axis and the range you give it.
Make one: in the inspector's Modulators section click the band's + ▸ X-Y pad, or right-click a knob ▸ Modulate… ▸ X-Y pad (it comes already connected to that knob). Open it: the Open key on its row (Window), or double-click its picture. The window floats like an effect's editor: drag it by its header, close it with its key or Esc, minimise or maximise it, scale it from its corner grip. The lamp in the header switches the pad on and off, and its ⋯ menu offers three colourways — Titanium, Copper and Frost (the formula's: Bakelite, Ivory, Ebony). One controller window is open at a time; it closes by itself when its modulator is removed.
Connect what it drives as any modulator: right-click a parameter ▸ Modulate… ▸ the pad, or drag the pad's handle (the grip at the left of its title in the inspector) onto a knob. Then set each link in the window's What it drives list, one row a parameter:
- The axis: click the row's X or Y tag to choose which axis moves it (a new link reads X).
- The range: the bar is the route's swing, the parameter's own value at its middle, and the lit part is what the axis sweeps of it. Drag one end of the lit part to set where the parameter is with the puck at the left (or the bottom, for Y), the other end where it is at the right (or the top) — FL's link range; cross them to turn it round. Drag the middle of the bar up or down to bend the way between (the automation's own curve). Double-click the bar for the whole travel again, unbent.
- The depth is the route's, as for every modulator: its row in the inspector, or
Alt-drag the knob.
Each drag in the list is one undo step; so is an axis click or a reset. The list grows with its rows and scrolls with the wheel when there are many; the pad's rails name the first two parameters each axis drives and count the rest.
Play it. Drag on the glass: the puck follows, each axis moves its parameters, and the whole drag is one undo step. The ring is where the puck is now; the crosshair is where it heads (your hand, the automation, or the path); a fading trail follows it.
- Polarity (the Pad card): Both ways (the default) makes the centre of the pad each parameter's own value, the puck pushing it up one side and down the other; One way makes the left and bottom edges the parameters' own values, the puck only adding.
- Inertia (the Motion card, 0 to 10 000 ms; the flywheel beside the pad shows it): the puck glides after your hand instead of jumping, starting gently and never overshooting. At 0 it follows at once. The knob spends three quarters of its turn on the first two seconds (half a turn is about 400 ms), the last quarter on the slow glides up to ten seconds.
- Horizontal and Vertical on the Pad card set the puck exactly, as a drag does; Amount is the modulator's amount, scaling every route at once.
Record a gesture as automation. While a pass writes automation — recording with the record options' Automation on, or the automation arm with the track in Write, Touch or Latch (see Automation) — drag the puck: Cantus writes two lanes, X and Y, over exactly the stretch you moved it in, and the pass is one undo step. Played back, the lanes move the puck as your hand did; edit them like any automation. To automate one axis by hand, right-click its rail (the words along the pad's foot for X, along its left side for Y) or its knob on the Pad card: the menu every parameter has — Create automation clip (Edit automation once there is one), Modulate…, Learn MIDI controller (Forget once linked), Reset to default. Or move its knob and press Alt+A (automate the last thing you touched); Alt+Shift+A links it to a MIDI controller the same way. Amount offers the same; the inertia, the path's settings and the polarity are the pad's own settings, not parameters, and offer none of it.
The last thing touched is the pad. After a drag on the pad, Alt+A makes the lanes of both axes, X and Y, in one undo step (as a recorded gesture writes two); when both already have theirs, it shows them. Alt+Shift+A links both to your MIDI controller: move a control for X, then another for Y (the status line says which it waits for; the control just learnt for X is passed over while Y waits; Esc lets both go). Each link is an undo step. A knob on the Pad card is one axis: Alt+A after it makes that axis's lane alone.
Paths: gestures that loop with the song. A path is a loop the puck follows while the song plays (stopped, your hand has the pad again), read from the song position — so a play from bar 9 hears what a full play hears there, and an export sounds the same.
- Draw path (the pencil key on the glass): drag a shape on the pad. On release it becomes the path, spread over one loop (the Loop in beats card's length, 4 beats at first), and plays.
- Record path (the record key on the glass): press play, then drag on the pad in time with the music. You hear your hand while you play; on release what you played becomes the path over the loop it began in, so it plays back where you played it. If a path was already playing, it stops for your drag (you hear your hand, not the old path) and the new one plays after. With the song stopped the key's drag only moves the puck.
- On the Motion card: Path (Off or Plays), Loop in beats (0.25 to 64, in quarter beats), Line (Straight or Smooth: the points joined by a curve). Inertia smooths a path too.
Drawing or recording a path is one undo step, the moves of a recording with it.
Presets — the well in the header: its arrows step through them; click the name for the list, each with what it does. Choosing one keeps the pad's connections and sets the axis and range of its first routes in order — so connect the parameter you want on X first and the one on Y second. The name stays while you play the pad and reads Custom once you change a setting.
| Preset | What it does |
|---|---|
| Filter sweep | Link X to a filter's cutoff and Y to its resonance: X opens it all the way (one way, left the knob's value), Y adds up to 60 %, bent; an 80 ms glide |
| Width and pan | Link X to a pan and Y to a width: from the centre, X pans both ways and Y narrows or widens about the knobs; 120 ms |
| Figure eight | A smooth figure-eight path over two bars that plays with the song: link X and Y to any two parameters |
| Performance pad | Both ways from the centre with a slow 400 ms glide: for the two parameters you play live |
Bake to automation works for the pad as for any modulator (a route's bake key, or Modulate… ▸ Bake to automation): the clip is what the route played — the axis, the range, the path, the inertia and any automation of X and Y included. AI agents make, connect and play pads too (What an AI agent can do). With its puck in the centre (Both ways), or connected at depth 0, a pad changes no sample.
Calculus, the formula controller
Calculus (Latin for a reckoning stone) moves parameters by a formula you type — of the song's position, its tempo and three knobs a, b and c — in the syntax of FL Studio's Formula Controller: 0.5*Sin(SongTime*Pi)+0.5 is a sine over two beats. One formula drives any number of parameters, each through its own range, in time with the song; a render from any bar hears what the full song hears there.
Make one, open it, connect it as the X-Y pad above: the band's + ▸ Formula (or Modulate… ▸ Formula), its Open key or a double-click on its picture, then Modulate… or its handle onto each parameter. In What it drives each row's bar sets that parameter's range and bend exactly as on the pad (a formula has one output, so no X/Y tag).
The window is a scientific calculator:
- The display shows the formula. Click it to type: a caret appears where you click; type, use Backspace, Delete, the arrows, Home and End. Every edit that is a whole formula is heard at once; the whole typing session is one undo step. While what you typed is not a formula yet, the controller keeps playing the last good one, and the reason shows under the display with the character it is at (A parenthesis opened at character 5 is never closed).
Enter,Escor a click elsewhere ends typing;Escwith a broken formula drops it and shows the last good one again. While you type, the app's keyboard shortcuts wait. A long formula is drawn smaller, then scrolls to keep the caret in sight. - The plot under it draws the formula's value over the last four beats and the next four, at the knobs as they are now: Now is the cursor, the lit bead the value.
- The keypad types its word at the caret:
Sin(,Cos(,tri(,saw(,Frac(,Round(,Int(,Rand,a,b,c,Pi(π),SongTime(beat),t, the parentheses,+ − × ÷ ^(typed+ - * / ^),If(,Max(,Min(. - The dials a, b, c above the keys: drag one up or down (one undo step a drag), double-click it for 0.5. The Knobs card moves the same three. Automate a knob (right-click a dial or its card knob: Create automation clip, or move it and press
Alt+A), link it to a MIDI controller (Learn MIDI controller in the same menu, or move it and pressAlt+Shift+A) or let another modulator move it, and the formula follows. - The Output card: Polarity — One way (FL's: the value 0…1 adds to the parameter, 0 its own value) or Both ways (0.5 is the parameter's own value, below it takes away); Amount, the modulator's amount.
The value is kept to 0…1 as in FL (anything that is not a number is 0), then the route's depth and range apply.
What you can write. Upper or lower case alike; a name may also be written with empty parentheses (SongTime()).
| Kind | What you write |
|---|---|
| Values | a, b, c (the knobs, 0…1); SongTime (also beat): the song position in quarter notes; t (also seconds): seconds since playback started; Time: milliseconds since playback started; GetTempo (also tempo): the tempo in BPM; Pi; e; Rand: a random 0…1 for each song position; numbers, with exponents (1e3) |
| Arithmetic | + - * /, ^ (a power; 2^3^2 is 2⁹, 2^-1 a half), % after a number (a hundredth: 50% is 0.5), ! (factorial), div and mod (integer division and remainder of the whole parts), fmod, shl and shr (times or divided by a power of two) |
| Comparisons and logic | = <> < <= > >= and in (1 when true, else 0); and, or, xor, not (above 0.5 counts as true) |
| Functions | Sin Cos Tan (Tg) Sec CoSec Ctg (Cot) ArcSin ArcCos ArcTg (ArcTan) ATan2(y, x) Sinh Cosh Tanh ArcCosh ArcTanh DegToRad RadToDeg; Int (Trunc, toward zero) Floor Ceil Round (halves to even) Frac (the fraction, with its sign) Abs Neg; Sqrt Sqr (the square) Exp Ln Log10 Log2 LogN(base, x) Power(x, y) (Pow) IntPower(x, n); Max(x, y) Min(x, y) Sum(x, y); Fold (reflects any value into 0…1) |
| Choices | If(test, then, else); Case(a, b, c) (b when a is 1, else c); IfE IfG IfGE IfL IfLE(x, y) (1 when x =, >, ≥, <, ≤ y); Inter(x, lo, hi) (1 when x is between them; InterNoSwap when lo ≤ x ≤ hi as written); Map(x, lo, hi) (x from 0…1 to lo…hi); clamp(x, lo, hi) |
| Random | Rand (above); SeededRand(n): a random 0…1 for each whole number n — the same every time |
| Cantus's waves | 0…1, one cycle for each whole number of their argument: sine(x) (starting at 0), saw(x), tri(x), square(x) (1 for the first half), pulse(x, width) (1 for the first width of the cycle) |
Three of FL's names behave differently, so that every render sounds the same: Time counts from when playback started (FL's reads the computer's clock), Rand comes from the song position (FL's is a running generator) and SeededRand is Cantus's own sequence. Three are refused because a render would depend on the moment it was made — MouseX, MouseY, Date — and two because FL's manual does not say what they compute: Tension and Warp. A formula is one expression, up to 512 characters; one too complex is refused with shorten it or nest it less.
A few formulas (for a 4/4 song):
| Formula | What it draws |
|---|---|
0.5*Sin(SongTime*Pi)+0.5 | A sine over two beats (the formula a new Calculus starts with) |
Frac(SongTime/4) | A ramp up each bar, falling back on the bar line |
square(SongTime) | On for the first half of every beat, off for the second |
SongTime mod 4 < 1 | On for the first beat of every bar |
SeededRand(Int(SongTime*2)) | A new random value every eighth note, the same in every render |
Map(sine(SongTime/8), 0.2, 0.8) | A slow swing between 20 % and 80 % over two bars |
If(SongTime < 32, SongTime/32, 1) | A climb over the first eight bars, then held |
a*Sin(SongTime*Pi*b)+c | FL's knob example: a the size, b the speed, c the centre |
Presets (the header's well, as on the pad) share one plan for the knobs: a is the rate (from one cycle in four bars to four a beat, in steps of a doubling: 0.34 is a bar, 0.67 a beat), b the shape and c the depth. Their texts are ordinary formulas — open one and change it.
| Preset | What it does (a · b · c) |
|---|---|
| Sine, Triangle, Saw, Square | Both ways about the knob's value, a bar a cycle; a the rate, b the phase, c the depth |
| Pulse | A short high, then low, each beat; b the pulse's width |
| Random each beat | A new random value every beat, the same in every render; b another sequence |
| Gate on beats | Opens on every beat for the width b, with soft edges (one way: for a level or a send) |
| Envelope each bar | Struck on every bar line, then dying away; a the attack, b the decay |
| Climb | Rises from the song's start over a (1 to 64 bars), bent by b, to the height c — a build-up |
A preset sets the formula, the knobs and the polarity, keeps the connections and lets every route read the whole formula (no range); its name stays while you turn the knobs.
Bake to automation turns a route into the clip it played (knobs, automation and range included). AI agents write formulas too, and one that is not a formula is refused with the character it fails at (What an AI agent can do). A formula connected at depth 0, or with nothing connected, touches no sample.
Note effects: arpeggiator, chords, scale
A track can change the notes it is given before its instrument plays them: an arpeggiator, chords and a scale, in a chain, in the order you set (FL's channel Arp and Chord, Ableton's MIDI effects). They act on the clips' notes and on what you play live, alike — while the song plays and while it is stopped.
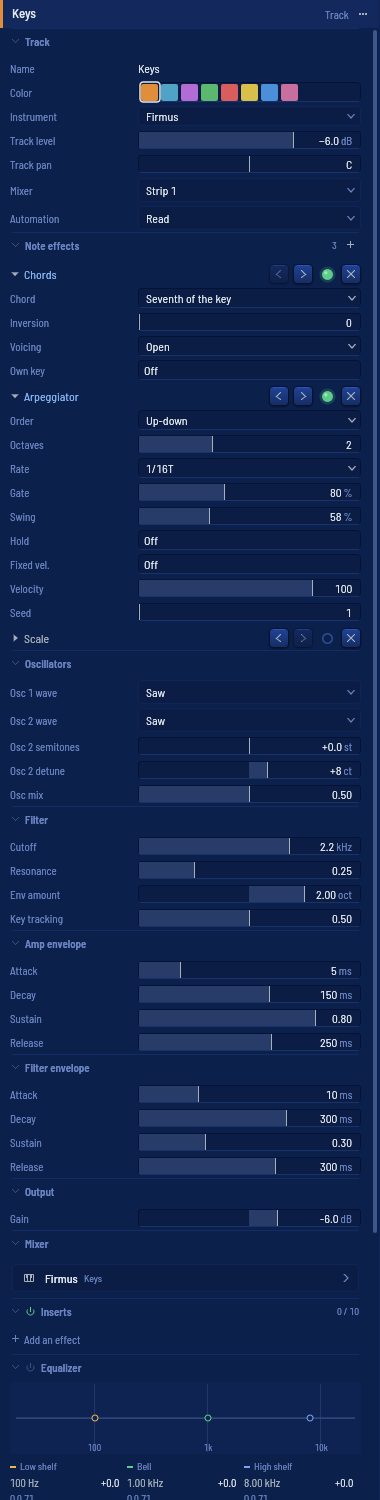
- Add one: select the track; in the inspector's Note effects section click the band's + (or the empty row) and pick Arpeggiator, Chords or Scale. A track holds up to eight. Each one's title row has earlier / later (its place in the chain), its on/off light and remove; click its name to fold it.
- Arpeggiator: Order (up, down, up-down, down-up, as played, chord, random), Octaves (1–4), Rate (1/1 to 1/64, dotted
.and tripletT, synced to the tempo), Gate (how long each note sounds, 5–200 % of a step), Swing (MPC-style, 50–75 %), Hold (the notes keep playing once your keys are up, until you play a new chord), Fixed vel. with its Velocity (or each note's own), and Seed (what Random draws from: the same pattern every time you play). The first step plays where the chord starts; a chord on the grid arpeggiates on the grid. - Chords: Chord (major, minor, dim, aug, sus2, sus4, 7, maj7, m7, m(maj7), m7b5, dim7, 6, m6, add9, m(add9), 9, maj9, m9, 5, 5+8, 8va — or Triad of the key and Seventh of the key, the key's own chord on each degree: I, ii, iii … in a major key), Inversion (0–3) and Voicing (close, open — the second voice up an octave — or wide — open, the root an octave down).
- Scale: notes Outside the key are moved to its nearest note (Snap to nearest; ties go down) or not played (Drop).
- Which key: chords from the key and the scale read the song's key (below), unless you switch on their Own key and choose its Root and Scale.
- Every parameter is automatable and modulatable: right-click its row ▸ Create automation clip or Modulate…, or drop a modulator's handle on it, as on any knob.
- What hears them: playback, export, stems, freeze and bounce all play the notes the chain makes — sample for sample the same. An insert that listens to the track's notes (Porta's MIDI trigger) hears them too; a modulator opened or restarted by the track's notes (an envelope, a retriggered LFO) follows the notes as written, before the chain — one opening per chord, not per arpeggio step. Recording keeps what you played (the keys), not the arpeggio.
- Bake to notes: on a MIDI clip's inspector, Bake to notes replaces the clip with one holding the notes the chain plays from it (its groove included) — one undo step. The new clip plays past the note effects (its Note effects ▸ Bypass light is on), so they do not act twice; switch it off to send a clip through them again.
The song's key, and the piano roll's scale
Set the song's key on the piano roll's toolbar: click Key and pick a root and a scale (major, minor, harmonic and melodic minor, the modes, the pentatonics, blues, whole tone, the diminished scales, Phrygian dominant, Hungarian minor, Japanese, chromatic) — or No key. It is saved with the song.
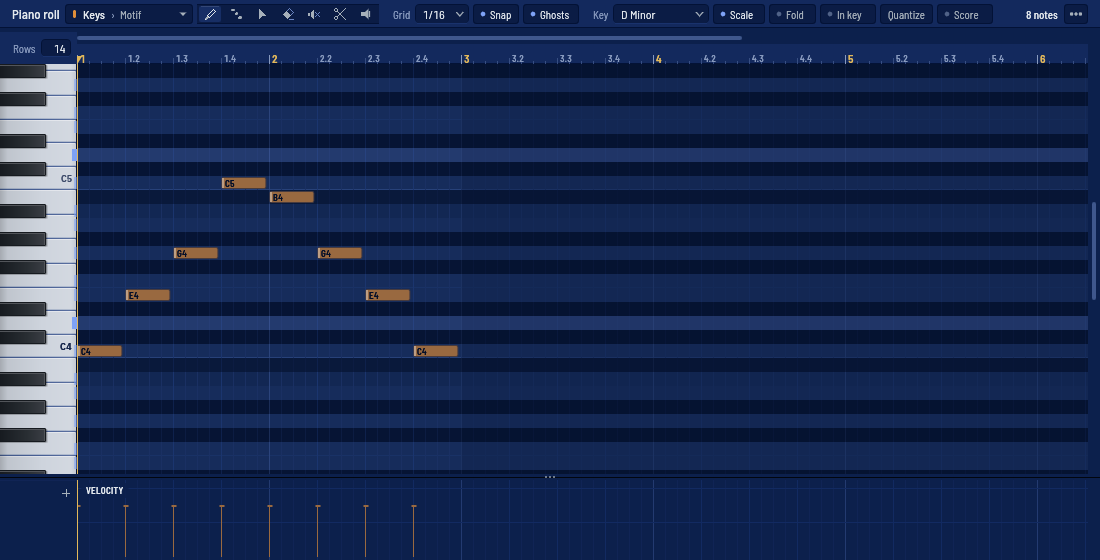
- Scale: the key's rows are lit — the rows outside it a shade darker, the root's rows tinted — and the keyboard marks the key's notes (the root wider).
- Fold: the piano roll shows only the key's rows (and any row a note of the clip is on, so nothing hides). Moving a note one row moves it one note of the key.
- Snap: drawing, painting, dragging and transposing (
Up/Down) keep notes in the key: a drawn note lands on the key's nearest note, a dragged one on the next note of the key the way it moved,Up/Downmove one degree of the key (Shift: an octave).
Grooves
A groove gives a clip a feel — notes late or early, accented, longer or shorter — without touching its notes. In a MIDI clip's inspector, Groove opens the list: the built-in swings (8ths and 16ths, MPC-style, 50–75 %) and the project's own grooves.
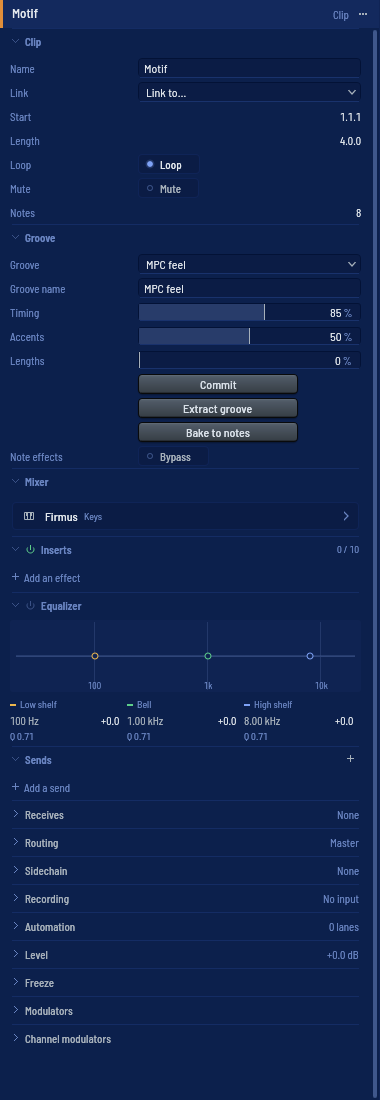
- Amounts: Timing (0–150 %: past 100 % it exaggerates), Accents (how much of the groove's velocities) and Lengths. The notes stay as you wrote them; playback, export and everything else hear them grooved.
- Commit writes the groove into the notes and takes it off the clip (one undo step).
- Extract groove puts a clip's feel into the project's grooves — a bar, on a 16th grid: each step's average lateness, accent and length. On an audio clip it reads the clip's transients (the ones Warp finds). The new groove then appears in every clip's list.
- Patterns: the channel rack's toolbar has a Groove field: the choice goes to every clip of the current pattern at once.
- Linked clips share their groove, as they share their notes.
A MIDI file export asks which notes to write: As played (each clip's groove applied and each track's note effects written out note by note — the file plays what you hear), or As written (the clips' notes, no groove, no note effects).
The score: notation, MusicXML, PDF and printing
Every note clip and every MIDI track can be read as an engraved score, made as Dorico, MuseScore and Sibelius make one — the notes read onto values the metre shows, tied where a beat or the half bar must be seen, beamed by the beat, spelled in the song's key with accidentals per bar, in the SMuFL font Bravura.
- The staff under the piano roll: the piano roll's toolbar has a Score switch (
Alt+S). The clip's part appears as one long staff under the roll; drag its top edge to make it taller. It follows the playhead while playing (Follow), shows the piano roll's selection in the selection colour, and scrolls with the mouse wheel;Ctrl+ wheel or − / + make the staff smaller or larger. - The Score pane (View ▸ Score,
Alt+Shift+S): the selected track's whole part, every clip of its playing lane, in systems that wrap to the pane's width and scroll down. - Reading, not moving: the score rounds the notes for reading only — the notes you hear never move. Each beat chooses straight values or triplets (sextuplets and quintuplets too) by what the notes fit; Read as forces a grid (eighths, sixteenths, 32nds, triplets, sextuplets) when a passage reads better one way.
- The part's settings (in the score's toolbar; each is one step of the undo history): Clef (Auto picks the clef with the fewest ledger lines; octave clefs for parts that live very high or low; very high or low passages get an 8va / 8vb line), Staves (Auto gives a part that spans both hands a grand staff), Split (a grand staff follows the hands — a melody that steps below middle C stays in the right hand — or splits at a fixed note), Pitch (a transposing instrument: a B♭ clarinet or trumpet is written a tone up, an E♭ alto saxophone a sixth up, a horn in F a fifth up; the key signature moves with it), Dynamics (pp … ff written from the notes' velocities), and the part's name (empty is the track's name).
- Tempo and metre come from the tempo map: a ♩ = 120 mark at the start and at every tempo change (a dotted quarter in 6/8 and 12/8; accel. or rit. where a ramp starts), and a time signature at every metre change.
- Editing on the staff: click a note to select it (
Shift+click adds). With the score clicked last,Up/Downmove the selection a step of the song's key (a semitone without a key),Ctrl+Up/Ctrl+Downan octave,Deleteremoves it. Input (orN) enters notes MuseScore's way:3–7choose the value (a sixteenth to a whole note),.a dot, the lettersA–Gput a note at the cursor — in the key, in the octave nearest the last note — and move the cursor on; a click on the staff moves the cursor;Escstops (note input also stops at the clip's end). In a transposed part the letters are the written notes. Outside note input,Shift+Up/Shift+DownandEsckeep their usual meaning (transpose an octave, clear the selection). Every edit is a normal command:Ctrl+Zundoes it. - Files (the score's Files menu): Export MusicXML… writes the clip's or the track's part, Export the song as MusicXML… every MIDI track as a part (MusicXML 4.0, which MuseScore, Dorico, Sibelius and Finale open; each note's velocity goes with it). Export PDF (A4 / Letter)… writes vector pages with the fonts embedded, the project's name as the title and the export's Artist tag as the composer. Import MusicXML… puts each part of a
.musicxmlfile on a new track as one clip (a compressed.mxlmust be unpacked first); into a song with no notes yet, the file's tempo, metres and key come with it, while a song with notes keeps its own. - Printing: Print… makes the PDF and hands it to your system's printing: on Windows the default PDF application prints it (Edge, Acrobat, SumatraPDF…; with none set up to print, the PDF opens so you can print it there); on Linux and macOS it is sent to the default printer with
lp(CUPS), or opens in the PDF viewer when CUPS is not there.
The session view: launching clips and scenes
The Session pane is a clip launcher, as in Ableton Live and Bitwig: the same tracks as the arrangement, side by side as columns, and scenes as rows. Each cell (a slot) holds a clip you can start and stop while the song plays, in time; a scene starts a whole row at once. The tracks, the mixer and the instruments are the arrangement's — the session only decides which clip each track plays.
- Switching:
Tabbrings the Session pane forward, or the arrangement back (Live's key); the top bar's window keys have a Session key, and View ▸ Session does the same. What you chose stays chosen: a session clip you click is the piano roll's clip. - What you see: each column's head shows the track's name and colour, its arm (●), mute (M), solo (S) and back to arrangement keys. A slot with a clip shows its name, a small view of its notes (or its waveform) and, while it plays, a bar along its foot. Its ▶ is the launcher: green while the clip plays, blinking while it waits for the bar (or the grid you chose), red while it records. An empty slot shows a small square — it stops its track — or, when the track is armed, a red dot that records into it. The scenes are at the right, with their names and, when a scene sets them, its tempo and metre ("128 · 4/4"); under them Stop all, and under each column its stop button.
- Launching: click a clip's ▶ (or press
Enteron the slot the cursor is on) — it starts on the next bar, or on the Launch quantisation at the top of the pane (none, 8 bars … 1/32, triplets). Click a scene's ▶ (Shift+Enter) to start its row; a scene that sets a tempo or a metre changes the song's when it starts.Ctrl+Enterstops the cursor's track,Ctrl+Shift+Enterstops everything. A track playing a session clip leaves its arrangement silent until you press its back to arrangement key (or Back to arr. at the top,Alt+B, for every track). - Editing in the grid (each edit is one undo step): double-click an empty slot to make a one-bar MIDI clip, a clip to open it in the piano roll; drag a clip to another slot to move it (
AltorCtrl: a copy), or onto the arrangement to put it there; drag clips from the arrangement onto a slot to bring them into the session (each track's into its own column); drop a sample from the browser on an empty slot. With the pane clicked, the arrows move the slot cursor (Shift: eight at a time),F2renames,Ctrl+Shift+Cchanges the colour,Ctrl+Dduplicates (a clip into the next free slot below; a scene under itself),Ctrl+C/Ctrl+X/Ctrl+Vcopy, cut and paste clips,Deletedeletes,Ctrl+Shift+Lturns the clip's loop on or off.Ctrl+Iinserts a scene,Ctrl+Alt+Icaptures one — a new scene holding a copy of whatever plays now. Right-click a clip, a slot or a scene for the rest: put a clip in the arrangement at the playhead, consolidate a track's clips into one, remove an empty slot's stop button, make a scene set the song's tempo or metre, move a scene up or down. Double-click a scene's name to rename it. - The clip panel (at the foot of the pane; the key at the top right shows or hides it; drag its top edge to make it taller): Launch — the mode (Trigger starts the clip, Gate plays it while you hold the button, Toggle starts and stops it, Repeat retriggers it while held), its own quantisation (Global follows the pane's), Legato (it takes over the position of the clip it replaces), and how much a pad's velocity sets its level. Loop — the loop on or off, the start marker, where the loop starts and how long it is (as Live writes them: bar.beat.sixteenth; drag a value,
Shiftfor fine steps, double-click to reset). Follow actions — what happens after the clip has played: action A or B (stop, play again, previous, next, first, last, any, other, or jump to a scene), the chance of A against B, after the clip's own length (Linked) or a time, and how many times. Follow actions draw their chances from the session's seed, so a performance plays the same way again. Envelopes — choose a parameter of the clip's track (its volume, pan, its strip, its effects, its instrument, or the last one you moved) and draw its curve over the clip's loop: a click adds a point, a drag moves it, a double-click or a right-click deletes it. The clip moves that parameter while it plays and hands it back to the track's automation when it stops. A short pane hides the panel so the grid keeps its rows: make the pane taller. - Recording into a slot: arm the track (●), then click the red dot of an empty slot (or press
Alt+Enter): it records from the next bar (after the count-in when the transport is stopped); click it again, or launch the slot, to stop — the new clip plays on. - Recording the session into the arrangement: switch Arr. record on (
Ctrl+Alt+R) and play: everything you launch and stop, and every follow action, is written into the arrangement exactly as you heard it, with the clips' envelopes as automation and the scenes' tempos in the tempo track. When you switch it off, the whole take is one undo step. - MIDI controllers: in the MIDI learn mode (
Ctrl+Shift+M) every slot, scene launcher, stop button, Stop all, Arr. record, Back to arr. and the Launch quantisation is outlined: click one, then press a pad or turn a knob. A pad launches its slot and, let go, releases it (a Gate clip stops); its light shows the slot's state. The scene cursor (Previous scene, Next scene) and every session action can be mapped too. - Launchpad and APC grids: plug in a Launchpad Mini MK3, Launchpad X, Launchpad Pro MK3, APC mini mk2 or APC40 mkII and it becomes a grid of the session — found by its port's name (or chosen under Settings ▸ MIDI or at the foot of the controller mappings pane, where you can also turn it off). Its pads launch the slots of the columns and rows it shows (the session ring, drawn as an orange box in the pane), lit in the clips' colours — green and pulsing while playing, flashing while waiting, red while recording; the scene buttons launch rows; the arrows move the ring (
Shift: a page); the stop buttons stop tracks (on a Mini or an X, the lowest scene button turns the bottom row of pads into stop buttons, and the Session button stops everything; on an APC mini,Shiftwith the first four track buttons moves the ring andShiftwith the last scene button stops everything). A grid's pads never play notes on the selected track.
The session: how launching, follow actions and recording work
The session view's own page tells you where everything is; this one tells you what happens when you press it.
Same tracks, same mixer. A column of the session is a track of the song: the same instrument, the same mixer strip, the same automation. A clip launched on a track takes over that track's arrangement until you press Back to Arrangement (on the track, or for every track) — even after the clip stops, the track stays with the session, as in Live.
When a launch happens. A clip waits for its launch quantisation — its own, or the session's global one (a bar by default) — and starts exactly on that boundary, to the sample. A launch pressed just before a boundary, too late for the engine to have it ready there (a few milliseconds to tens of them, by your audio buffer), still plays on it — a moment late, caught up to where it would be, never a whole bar later; and so does one pressed a 32nd note or less after a boundary (on a launch grid of a 32nd or finer, a quarter of a grid step). With the transport stopped, a launch starts it at once, from the playhead. A scene launches its whole row on the global quantisation, and sets its tempo and metre there (the metre on the next bar line).
Following Link, MIDI clock or time code. A launch from stop waits for the source to start: Link's next quantum, or the master's Start — however long that is; the clip shows as queued meanwhile, and the stop button calls it off. If the master starts from another place (MIDI clock's Start is from the top), the clip plays from there. Following Link, a scene with a tempo sets the tempo of the whole Link session when it takes effect, as in Live. A relock of Link, or the master moving the playhead, does not end what the session plays.
Launch modes. Trigger starts the clip (again) on each press. Gate plays it while held and stops it at the boundary after you let go. Toggle starts it, and stops it when pressed again. Repeat restarts it on every boundary while held. Legato makes a launched clip take over where the clip it replaces had got to, instead of starting from its start marker.
Follow actions. After its follow time (a time, or linked to its own length, times its count) a clip does action A or B — stop, play again, the previous, next, first, last, any or another clip of its column, or jump to a row — with the chance you set for A. The chances are drawn from the session's seed: the same performance plays the same way every time, and an export renders exactly what you heard. Change the seed for another performance.
Recording into a slot. On an armed track, the record button on an empty slot records from the next boundary (after the count-in, from stop) to the bar line after you stop it — or for the session's fixed length — and the new clip plays on at once, looping. MIDI is quantised by the session's record quantisation. Recorded over a looping MIDI clip that plays, the notes go into that clip (overdub). The take is kept like any recording: a crash loses nothing.
Recording the session into the arrangement. With arrangement record on, everything you launch, stop and every follow action is written into the arrangement exactly where you heard it — the clips, their envelopes as automation, the scenes' tempos — as one undo step, when you switch it off or stop. The arrangement then plays exactly what you heard, to the bit.
Good to know. A frozen track's clips do not launch (unfreeze it first). Freeze, bounce and export render the arrangement: record a performance into it first to keep it. Stopping the transport, or jumping the playhead, ends the performance. A tempo change keeps an unwarped audio clip playing the same stretch of its file; a warped one follows the tempo.
Audio to MIDI. Right-click an audio clip ▸ Convert to MIDI… turns a melody, a chord part or a drum loop into notes on a new track: see Convert audio to MIDI.
6. Mix: the mixer, inserts and sends
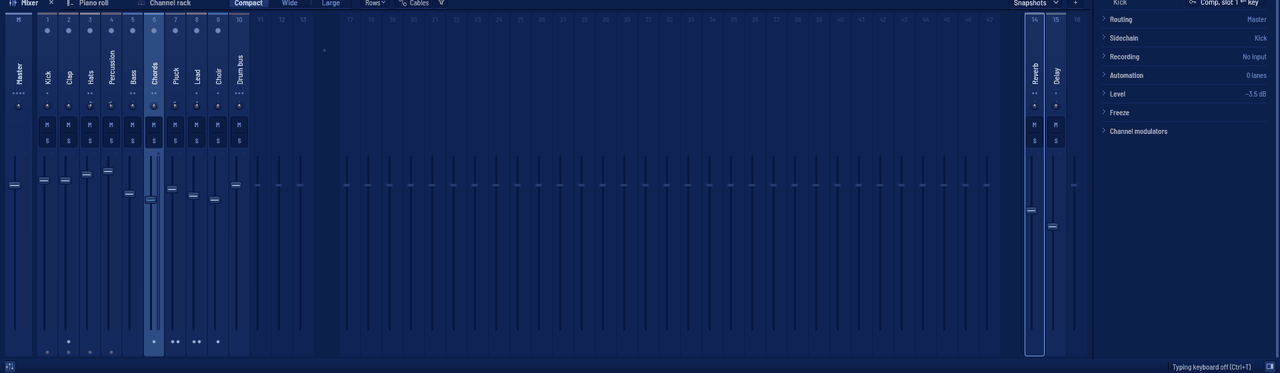
Each track feeds a strip of the mixer (F9); strips feed the master at the left, or another strip (a bus). A strip reads from top to bottom in the order the signal takes: its head (the number over the name, the track's icon, the arm dot), the inserts (a dot and the unit's kind for each; the first free row a faint +), its own EQ curve, polarity and swap, pan (and the width knob), M | S as one pill, the fader with its meter beside it and its level under it, the sends as small knobs, and the output ("Master" quietly, or "→ Drum bus"). Nothing reads "−∞" at rest; there is no label column. Three widths — Compact, Wide and Large (the unit's name on each insert, the send levels in dB, the EQ bands as dots on the curve, the master's short-term LUFS) — on the desk's header or with Ctrl+wheel; a short desk gives way row by row (the EQ, the polarity row, the inserts to one summary line, the sends…) and then scrolls. When the mixer is docked under a bar with room, its header — the widths, Rows ▾ (which rows the strips show, From the selected strip among them, and Insert panel), the solo chip ("1 soloed · Clear"), Cables, Snapshots and + — sits on the workspace's row of tabs, right of the tabs. Click a strip to select it (its body tinted, its stripe whole), Ctrl+click to add, Shift+click for a run; dragging one fader of a selection moves them all. With the mixer focused, M mutes, S solos, Alt+Left/Alt+Right move the strip. A muted strip goes quiet in ink and its M lights in the theme's accent (Settings ▸ Appearance ▸ Layout and controls ▸ Lit mute button: Grey lights it grey instead); a strip silenced by another's solo shows its M ringed in the solo colour. The returns docked at the right sit at the window's edge, as in FL Studio, and the room between the last strip and them holds the next empty strips, numbered — a click on one makes the strips up to it (Mixer's right dock: After the last strip puts the returns right after your strips instead).
Groups, for FL Studio users. FL has no "group" button: you group by routing. Cantus works the same way, with two kinds:
- A bus — route the strips to one strip: select them (click, then
Ctrl+click orShift+click — strips on the desk or tracks' headers in the arrangement) and pressCtrl+G, or right-click one ▸ Route the selected to a new bus. One step makes Bus 1 right after them, routes them to it and gathers their tracks in an arrangement folder named as the bus, as Live's and Bitwig's groups do; one undo takes it all back. Or drag their cables to a strip of your own: one fader, one set of inserts and one meter for the drums, as the demo song's Drum bus. Its effects process the sum. - A VCA group — one fader that moves the levels of its members without summing them (each keeps its own inserts and sends); see VCA faders and mixer snapshots.
Bands on the desk. A group of strips is drawn as a band over them: a gap and a seam either side, its name and count at the top. Select strips and right-click ▸ Group ▸ New group from selected (double-click its head to rename it). A click on its chevron folds the band into one strip that names its members and shows their meters side by side (Unfold brings them back — a folded group is never hidden); drag its right edge to take in the next strip or to give its last one back (Esc leaves it as it was). Each change is one undo step. An instrument with its own outputs (Chorda, Tympanum) draws its strips as a family — a solid bar with its glyph, Drums · Tympanum · 12 mics — that folds the same way; Each mic to its own strip makes a sub-group for each family of microphones (Kick, Snare, Toms, Cymbals, Overheads, Room) in the same step, and All to Main takes them away. A strip is in one band at most: a group sits inside one family or takes whole families. A strip fed only by a family's outputs — a drum bus, a parallel compressor — can join its band (right-click ▸ Add to …'s band; it is drawn at the band's end, marked added) and leaves it, the status line saying why, when its input stops coming only from that family. While the desk scrolls, a band's name stays in view.
- Inserts (up to ten per strip): click the
+row (or right-click the strip ▸ Add effect ▸, where the five effects you used last are at the top) to choose an effect in the device picker. A click on the inserts shows the strip's chain in the inspector, where each insert opens its window, has its lamp (bypass) and a Mix (dry/wet); right-click an insert on the strip for its menu. A keyed insert shows its key glyph ("← Kick" when you point at it, the source strip outlined). - Sends: a send is a small knob under its destination's name (Wide and Large; in Compact a dot — click it for its knob); its value in dB shows in the name's place while you point at it or drag. To make one, drag a cable (below), use the inspector's Sends ▸ Add a send, or turn on Rows ▾ ▸ From the selected strip and click the ▲ of the strip you want to send to. Each send taps after the fader (the default) or before it — its menu ▸ Before the fader; a send before the fader keeps sounding when you pull the fader down.
- Cables: each strip has two jacks in its foot — its input and its output. Drag from an output jack to another strip, or click one and then the destination (
Esccancels): plain makes a send at 0 dB,Ctrlmakes it the strip's only output,Altmakes it a sidechain key; while you drag, the help line says what it will do ("Route Chords to Drum bus") or why it cannot ("Refused: Kick already feeds Drum bus (a loop)"). At rest nothing is drawn; under a strip its routes read in words ("→ Drum bus", "3 routes"), and the strip under the pointer lights the strips it reaches. Cables in the header draws the selected strip's cables in a band under the desk (Show all in its menu draws every route, the others dimmed); point at a cable and its whole route to the master lights while the rest dims; click a cable to select it, pull its plug out of the input jack to move it,Deleteremoves it. Every change is one undo step. Four styles, in the Cables menu ▸ Cable style or in Settings ▸ Appearance: Patch (curves that hang between the jacks), Flow (the default: Patch with a light that runs along a cable while sound goes through it, faster when louder, still when stopped), Subway (straight runs in lanes that never overlap, with rounded corners) and Jack (plugs and cords that sag and settle for a moment when you drop them). The theme's follows the look's own style. - Routing: right-click a strip ▸ Routing ▸ Output or Send to,
Shift+F10for the selected strip's route menu, or select several strips andCtrl+G(Route the selected to a new bus). In a cable's or a send's route menu, Level ▸ Type a level… takes a level in dB (−∞ to 0;Enteror a click elsewhere sets it, in one undo step;Esccancels). The routing matrix (Alt+F9) shows every source against every destination: click a cell to route, drag for the level (Shiftfor fine),Ctrl+dragcopies down a column. Strips and groups move by dragging or withAlt+Left/Alt+Right; a track header dropped on a strip plays into it. - Device windows have Swap, minimise (to the tray in the status bar), maximise and close.
F8opens the selected track's instrument (or brings it to the front, or closes it when it is already in front),Esccloses the device you used last,F12closes every floating one.
Solo follows the routing: a soloed strip is heard with what feeds it and what it feeds.
The inspector
The inspector (I) shows the selected track, strip or clip as a signal-flow sheet. For a strip, under its head (the colour, the number, the name, Mixer strip and the ⋯ menu):
- Source — what plays into the strip: the track's icon, the instrument's name and the track's; a click shows the track, the arrow opens the instrument. A bus or a return lists the strips routed into it; the master says The whole mix.
- Inserts — a row per insert (its number, the unit and its kind, its lamp, a mini view's key under the pointer) and one + Add an effect row. The mini view opens under the row with three of the unit's values to drag (a compressor: Threshold, Ratio and its live Reduction); each keeps Learn, Modulate… and automation. Drag a row by its number to reorder: it lifts, and a line shows where it lands.
- Equaliser — the strip's EQ curve to drag, and under it a band table: each band's frequency, gain and Q, each figure draggable.
- Sends and Receives — each send its switch, name, level bar and value; an empty section is + Add a send.
Then the sections that fold to one line each, with their state at the right — a click on a title opens or closes it:
- Routing — the output, the input, the channel's polarity, swap and mono, the delay compensation and the latency.
- Sidechain — which insert it keys and from which strip, and under each keyed insert Hear the key (round 40): the strip plays that insert's key in place of its own signal — a compressor's as its detector hears it (after the key's level and EQ) — so you can tune the key by ear. One insert at a time; click again to hear the strip. It is a listening switch: never saved, never in an export.
- Recording — the input, monitoring, Take from: Before FX · After FX (see An audio track), the trim, Armed, Low latency.
- Automation — the strip's track's mode (Read · Touch · Latch · Write), a line per lane with a small picture of it and its points, and Show in the arrangement: it opens the track's automation lanes, scrolls the arrangement to them and gives it the focus (one undo step).
- Level — volume, pan and width as value bars (the well filled to the value, the number inside; Settings ▸ Appearance ▸ Layout and controls ▸ Inspector values: Slim bars for thin bars), the VCAs the strip follows, Mute · solo, Safe from snapshots and Safe from solo; under the volume a slim meter on the same scale (green, yellow, amber, the clip colour above, a peak hold). With several strips selected the volume moves them together. Level takes the place of the old pinned strip at the panel's foot.
- Freeze — Freeze strip (or Unfreeze) and what it does; frozen, how many inserts were rendered and the render's size on disk ("2 inserts rendered · 12 MB").
- Modulators — open when the strip has some.
Freeze and bounce in place
Freeze turns a heavy track into a recording of itself, so its instrument and effects stop using the processor — and gives it back, exactly, when you unfreeze it.
- Freeze a track: right-click its header ▸ Freeze track,
Alt+Shift+F, or the inspector's Freeze row. A track on a strip of its own freezes with the strip: its instrument, clips and the strip's inserts and EQ. A track that shares its strip freezes its own instrument and clips. Freeze a strip (a bus, a return) from the strip's menu: it freezes with everything it gathers. - It renders first (a card at the corner shows how far, with Stop); the song keeps playing and nothing changes until it is done. Then the track is frozen in one undo step: a snowflake on its header and its strip, its clips frosted.
- A frozen track or strip is still mixed: its fader, pan, width, mute, solo and send levels — and their automation — stay live, and so do the mute and solo on the header of a track frozen with its own strip (its level and balance are inside the render: mix it with the strip's fader). Unless a modulator inside what it freezes follows it (or the bus it plays into): then its mix is part of its sound and is locked too — the card says so. Anything that would change its sound (its notes, its instrument, its inserts, the tempo, a strip moved among the ones it gathers) is refused, and the card says how to give it back: Unfreeze (the same menu entries, the same key). A knob turned in a frozen plug-in's own window goes back where it was, with the same card — so does a preset or a sample loaded from its own browser. Unfrozen, it plays live again, to the bit.
- What also plays somewhere else keeps playing: freezing a bus does not silence a strip that keys its compressor and plays to the master, nor a return the strip that sends to it. Solo stays a listening aid — a freeze is made as if nothing were soloed; with something soloed inside what you freeze, unsolo it first. A solo that silences part of what a frozen strip sounds with (one of the tracks or strips heard through it) plays that strip live while it lasts; a solo that silences all of it — a solo elsewhere — only mutes it, without waking its plug-ins. Saving a project moves a frozen take into its Audio folder and keeps it frozen.
- Its plug-ins are unloaded while it is frozen and come back with their settings. A freeze needs the plug-ins it renders (a bypassed one is not needed): one that is not loaded is named, and nothing is frozen. So does a file it plays that is not there yet (a sound pack downloading, a drive unplugged; a take on a comp lane below, or a muted clip, does not count): the freeze names it, and a frozen track waits for its files before its render is made again. A track whose plug-ins change their latency during the song (an automated look-ahead or oversampling) cannot be frozen nor bounced in place: the status line says so.
- Renders are kept in the project's own folder inside a Freeze folder beside it (Freeze/Song for Song.cantus; in Cantus's own cache for a project not saved yet), named by what they hold: freezing again what did not change is instant, and a project opened without them (on another computer, at another sample rate) plays live while they are made again in the background. Save as takes them along — copied in the background; closing Cantus while it copies keeps the window open, with a card, until the copy is done (Close now skips it; what was not copied is found where it was next time). A project renamed or copied beside the original finds its renders in the original's folder, and its next save brings them into its own. Renders no undo can bring back are removed from the project's folder when you save; other projects' renders beside it are never touched.
- With the loop on, a frozen track plays its recording straight through: at the jump back to the loop's start you hear what led into that bar, not a reverb's tail from the loop's end (as in other DAWs; unfreeze it to hear the jump exactly).
Bounce in place renders to an audio clip, on a new track right under the original, at the same place:
- Bounce in place (track menu,
Alt+Shift+B): this track through its strip's inserts; the new track gets a strip of its own with the old one's fader, pan, width and sends. - Bounce in place (source only): the instrument and clips before the track's level; the new track plays into the same strip, through the same inserts.
- Bounce clips in place (the clip menu): only the selected clips (on several tracks, one bounce each); with a time selection — chosen after the clips, or with none selected — the keys bounce what plays inside it, its edges moved out to the notes held across them. A track header chosen last makes the keys bounce the whole track, a strip chosen in the mixer the whole strip; the master is never frozen nor bounced. Clips or a time range cannot be bounced while something hears the track's notes (bounce the whole track), and comp windows joined by a crossfade are bounced together or not at all. The clip menu's entries act on clips, never on a strip or the master chosen before: the clip you right-clicked, with the clips selected with it.
- Bounce strip in place (the strip menu): everything the strip gathers; what was keyed from it, or followed it, follows the new strip. Unsolo what is soloed inside it first.
- The original is muted — or removed, if you tick Remove the original after a bounce in the track menu (Cantus remembers your choice; a track whose notes something still hears is muted instead, and the result says so). Its level, fader and send rides go with the bounce, and so does its solo. Through a plug-in with latency, the new clip's audio sits on the grid and the new track keeps the delay (the inspector's Delay row; the key at its right takes it away), so those rides and anything keyed from it stay in time — and the clip plays in time wherever you move, copy or export it. The tail (a reverb's) is kept until it rings out. One undo step. If you edit what it renders while it renders, it is bounced again from your edit (an edit elsewhere does not restart it); Stop while its file is written leaves nothing. A track that monitors a live input — or one that keys it or plays notes into it — is not bounced (switch its monitoring off first).
7. Master: the master chain, Fervor, Latitudo, Culmen
The master has its own chain of up to ten inserts, run on the whole mix before the master fader. Click the master's head to see its chain in the inspector (The whole mix → the inserts → Audio output), or right-click its name ▸ Effects ▸ + Add effect.
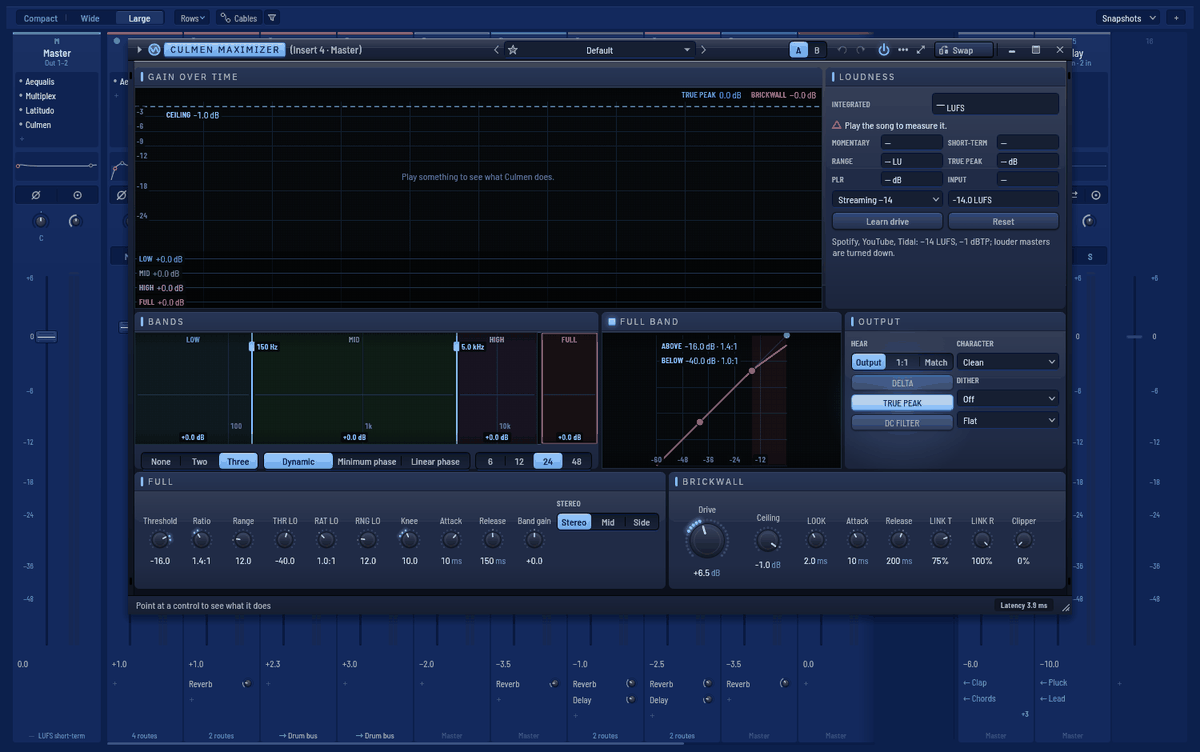
The demos master in this order, and it is a good start:
- Aequalis (EQ): a high-pass under the sub, a little air.
- Multiplex or Comprimo: gentle glue.
- Latitudo (stereo): the preset Master: tighten the low end or Master: wider top, mono bass keeps the bass in mono and the top wide. Watch its correlation meter: it should stay above zero.
- Culmen (maximizer): choose a target — Streaming −14 (−14 LUFS, −1 dBTP), Apple −16, CD −9, Club −7, Broadcast −23 — then play the loudest part of the song and click Learn drive: Culmen listens, sets the drive, listens again and stops on the target, in one undo step. The Loudness card shows momentary, short-term and integrated loudness and the true peak; the verdict says On target or how many LU you are over or under. Culmen works in three bands plus the full band, into a true-peak brickwall at the ceiling; its Character (Clean, Punch, Loud, Bus, Safe) and its ten presets cover most masters.
Fervor (saturation) adds colour: Tape, Tube, Overdrive, Fuzz, Clip, Fold or a drawn Curve, with oversampling, tone, mix and Level match, so that louder never fools you. On the master, the presets Master clipper and Tube glue on the mid are the gentle ones.
The mastering assistant
Right-click the master's name ▸ Mastering assistant…, or open the master chain's + Add effect list: the first row is the assistant. It listens to your mix as it reaches the master and proposes a chain of Cantus's own effects to master it — nothing it does is hidden: what it proposes are ordinary inserts you can open and change.
- Choose where the song is going: Platform (‹ › steps through Spotify, Apple Music, YouTube, TIDAL, Amazon Music, SoundCloud, CD, Club and EBU R 128). The line under it says what the platform aims at — Spotify plays every song at −14 LUFS and wants the true peak at or under −1 dBTP — and the bottom of the panel says where that number comes from and when it was checked.
- Choose the Balance: a genre's curve (Pop, Rock, Electronic, Hip-hop, Acoustic, Classical), or Load reference… — a finished track you like the sound of (WAV, FLAC, MP3, OGG, AIFF). With a reference the assistant matches its tone and width; the platform still sets the loudness.
- Listen to the whole song or only the loop. If the master already has effects, choose whether the proposal replaces them or is added after them.
- Click Listen and propose. Cantus renders the mix (a song of three minutes takes as long as an export), measures it and tries the chain on it until the loudness lands on the target. Stop stops it.
The table shows, for the mix, the proposed master and the target: integrated loudness, true peak, loudness range, the loudest three seconds, width (how much side there is against the middle), what folding to mono loses, and the lowest correlation. The chart draws the balance per octave — bars for the mix, a line for the proposal, rings for the target. Under it, each unit of the chain and why it is there: an EQ toward the curve (at most ±3 dB a band; ±6 with a reference), gentle glue when the song's dynamics are wider than the genre keeps, stereo width or a mono bass when the mix folds badly to mono, and a true-peak limiter whose gain lands the platform's loudness under its ceiling.
A/B plays the mix (A) or the proposed master (B) from the same place, the louder one turned down to the other's loudness: you compare tone and dynamics, not level — louder always sounds better, and the A/B does not let it fool you. Nothing in the project changes while you compare.
Apply puts the chain on the master in one undo step (Edit ▸ Undo takes it all back). Then play the song and adjust anything by ear — every knob is yours.
Listening for AI agents
When you allow an assistant such as Claude to work in Cantus (Settings ▸ AI), it can listen too: audition renders a range — or a soloed part, or the mix without the master chain — and answers with the numbers above for the range and each section, the spectrum against a genre's curve, clicks at section changes, and a WAV of what it heard (in Cantus's own cache); analyse_tracks measures every track in the mix; masking_matrix says which tracks fight for the same frequencies, and where; set_mix_targets sets tracks to the loudness the agent asks for, in one undo step; master_assist, apply_master_chain and replace_master_chain (which asks you first: it takes the master's own effects out) are the mastering assistant above. Cantus keeps a copy of the song's state at each marker (or every eight bars) while it renders, so after the agent changes the last chorus it hears only the last chorus again — the same sound, to the sample, as playing the whole song. With a hosted plug-in in the project that copy cannot be made; the range then starts eight seconds early, and the answer says so. The prompt Master for streaming asks an agent to do all of it for a platform you name.
8. Export
File ▸ Export audio… (Ctrl+Shift+E in the default keys) opens the export window: presets on the left, the choices on the right, and a line that says exactly what will be written.
- Presets: Streaming (MP3 320 kbps, 44.1 kHz, −14 LUFS, −1 dBTP), CD (WAV 16-bit, 44.1 kHz, shaped dither), Stems for mastering (every strip, WAV 24-bit at the session's rate, not normalised) and Podcast (mono MP3 128 kbps, −16 LUFS, −1 dBTP). Change any choice and the Custom card lights.
- What: the song (from the start to the end of the last clip, plus a tail you choose), the time selection, or stems — one file per mixer strip (after its fader) or per track (before its strip), all starting on the song's first beat, delay compensation included, optionally through the master chain.
- Formats: WAV 16-bit, 24-bit or 32-bit float; FLAC 16 or 24-bit; MP3 CBR 128–320 kbps or VBR V0/V2/V4/V6 (LAME), gapless; Ogg Vorbis quality 3–10. Sample rate: the session's or 44.1, 48, 88.2, 96, 192 kHz (MP3 uses 44.1 or 48). Mono or stereo.
- Dither (off, TPDF, shaped) when writing 16 or 24 bits.
- Loudness: off, or a target (−9, −11, −14, −16, −19, −23 LUFS) with a true-peak ceiling (−0.1, −0.3, −1, −2 dBTP); Culmen's own limiter holds the ceiling when the gain needs it. Stems are never normalised.
- Tags: title, artist, album, year, comment, and a Cantus encoder credit.
Exports run in the background with a progress bar; Stop leaves no partial file. Your last choices are remembered.
- MIDI: File ▸ Export MIDI… — the whole song, the selected track or the selected clip, as a type 1 file with the tempo, metre and track names.
- DAWproject: File ▸ Export DAWproject… to move a project to Bitwig, Studio One and other DAWs that read it (a report lists anything that could not travel).
9. Sounds: the browser and sound packs
The browser (Alt+F8, the first window key) docks at the left. It lists your Favourites, the sound packs you installed (Packs) and My folders (click + to add any folder of samples).
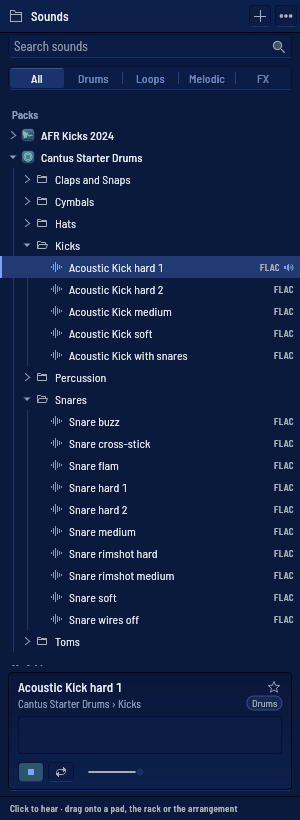
- Click a sound to hear it; click again to stop. Each row has one mark for what it is: a pack its cover, a folder the folder glyph, a sound its own small waveform; tree lines show where a sound lives.
- Search: type in the search field to find sounds across every pack and folder. The match is lit inside each name. The results are grouped by the pack or folder they are in, each group titled with its count; five a group until Show the other N sounds; each hit shows its place under its name ("Kicks › Hard"). Click a group's title to keep the search to that place: a chip says so (click its × to let go), and another chip names the family tab chosen.
- The tabs under the search (All, Drums, Loops, Melodic, FX) keep one family of sounds, read from their names; the counts follow the tab.
- The sound chosen gets a card: its name with its star at the right, where it lives, its tags, and a waveform well — click it to play; while it plays the heard part is lit and a line shows where it is. Under the well the card's keys: play, loop (the sound starts again when it ends), the preview level (drag it while the sound plays — it does not start again), and the numbers ("0:00.4 / 0:01.2 · 48 kHz · Stereo").
- The star keeps a sound in Favourites, listed first in the browser; it belongs to this computer's settings, not to the song.
- Drag a sound onto a Pulsus pad (the pad plays it), onto Exemplar's key map (a zone on that key), onto the channel rack (a new sample channel with its own strip, or onto a channel to replace its sample), or onto the arrangement (an audio clip where you drop it). Each drop is one undo step.
- With nothing installed, the browser offers Start with a drum kit: Download fetches Cantus Starter Drums (81 one-shots, 33 MB).
The Sound packs window (Sound packs…, or More packs…) shows every pack as a cover drawn from what it holds (drum rings, a waveform, a keyboard, an impulse response…), grouped by category, with its name, what it is, how many files and its licence, and its state: Get · 140 MB (a click fetches it); while it downloads, a thin bar, "42 % of 54 MB" and Cancel; Installed with a check, and Open (it opens in the browser's tree); or Update · 4 MB. Its head counts the packs ("8 free packs · 3 installed · 471 MB on disk") and filters them (All · Installed and each category); Sort at the right orders them by category, name or size. Click a cover for its page beside the grid: details, licence and credits, Install, Update, Remove, Show the folder, and Install from a file… for computers without internet. Where packs are kept › at the foot shows the folder. The packs: Cantus's own, Karoryfer's kits, VCSL and VSCO 2 percussion, a TX81Z for Exemplar, the Salamander Grand Piano (a Yamaha C5, 16 velocity layers), DRSKit, an acoustic drum kit recorded by the DrumGizmo team, and the OpenAIR Impulse Responses for Aula.
Every pack is free. Most are CC0 (no credit needed); the Salamander Grand Piano is CC BY 3.0 and DRSKit CC BY 4.0: their credit is shown on their page in Sound packs… and in Help ▸ Credits, and kept in the pack's folder (DrumGizmo also asks, in its own words quoted on the pack's page, for a credit wherever a song's other credits are given). Either way, the music you make with them is yours. Packs are saved in %LOCALAPPDATA%\Cantus\Content\; every file is checked against its SHA-256.
Pack instruments. An installed pack that brings instruments (the Salamander: with 8 velocity layers, about 120 MB of memory, or all 16, about 185 MB) shows them in the device picker's Keys shelf and on its Sound packs… page (New track with …); each plays in Exemplar. Long samples are streamed from disk: only their first moments stay in memory. The first time, Cantus decodes the samples once into its sample cache (1 GB for the Salamander's 8 layers, 2 GB for 16), beside the window, with Loading samples… n of m on the status bar; later loads take a fraction of a second. If the disk cannot keep up, the status bar counts Disk late: n.
The acoustic drum kit. DRSKit (DrumGizmo team and Jes Eiler of DRSDrums) was recorded with 13 microphones; when you install it (a 2.8 GB download), Cantus mixes them into a stereo kit — every drum at its place in the stereo field, the snare's bottom microphone in polarity, the toms' and cymbals' close microphones turned down on the other drums as a mixing engineer's gates would — so each hit plays as one stereo sample. It takes about two minutes after the download and leaves about 470 MB; while it installs it needs about 7.6 GB free (the download, the unpacked kit and the mix side by side — the pack's page says so, and an install without the room is refused before anything is downloaded). If the mixing is cancelled or fails, the download is kept: the next try starts from it. DRSKit acoustic drums is then on the device picker's Drums shelf, playing in Exemplar on the General MIDI drum keys with its own drums only: kick 36 (35 a more open kick), side stick 37, snare 38 (40 a damped snare), toms 41 · 43–45 · 47–50, hi-hat closed 42, pedal 44 and open 46, crashes 49 and 57, ride 51 and 59, bell 53. The General MIDI keys the kit has no sound for (tambourine, cowbell, the Latin percussion) stay silent, so a General MIDI part never plays a cymbal in their place; DrumGizmo's other articulations sit above General MIDI 2's percussion and clear of the XG and GS kits' extra keys below it (13–26): the chained ride on 88–90, the brushes on 91–100, and the half-open hi-hat and the tips on 101–106. Each drum has its strengths as velocity layers down to 24 dB under its loudest, and the hits of a layer take their turns in order — counted per drum and per layer, so a roll, a tom fill across the drum's keys or an accent on every fourth hat never plays the same sample twice in a row; a closed or pedal hi-hat silences an open one. In the piano roll and the channel rack the kit shows a row per drum, by name, in the interface's language (Exemplar's Drum rows switch, in its Edit view). The microphones' balance is fixed by the mix: faders for each microphone need an instrument with several outputs, a later step.
Round robin in order. Exemplar's Edit view has the round robin's order: In order (each note takes the next turn of the samples it reaches — whatever key or velocity reaches the same ones shares the turns — by its place in the song, so a render from any point chooses what the whole song does there) or By note (drawn from each note — how Exemplars in projects and user presets saved before this version keep playing). An imported instrument plays its round robins in order.
A missing pack. A project that plays a pack this computer does not have opens a card that names the pack and its silent tracks: Install in Sound packs…, Use the installed pack (when the project points at another copy, say from another computer), or Find the folder… (when files of an installed pack were moved). The rest of the project plays as usual.
10. Instruments and effects: the device picker
The device picker shows every instrument and effect — Cantus's own and the CLAP and VST3 plug-ins installed on your computer — as tiles.
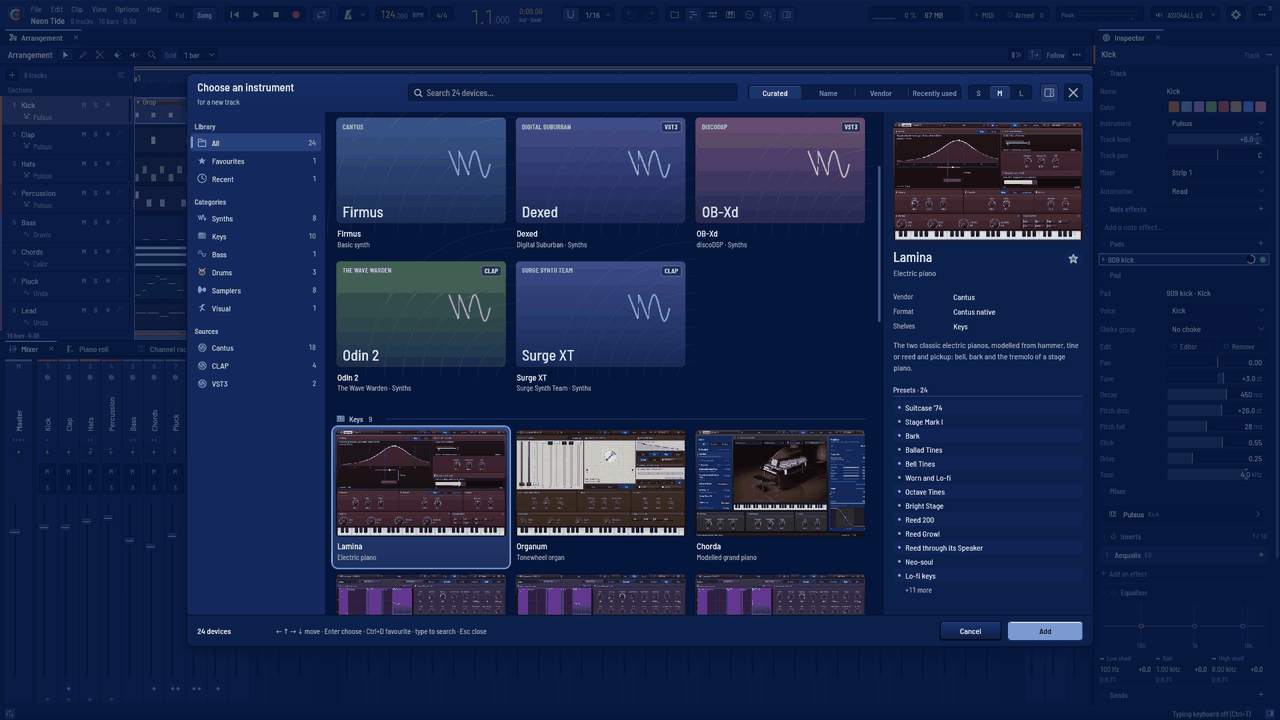
Open it with the + above the track headers (a new instrument track), by clicking a track's instrument chip (swap the instrument), Swap on any device window, an empty insert slot, or View ▸ Device picker…. Search by name, maker or kind; filter by shelf (Favourites, Recent, a category, or Cantus / CLAP / VST3); arrows move, Enter chooses, Ctrl+D marks a favourite, Esc closes. Installed pack instruments (the Salamander Grand Piano) are under Keys, DRSKit under Drums. Swapping an instrument keeps its notes, clips, mixer strip and effects; swapping an effect keeps its slot, mix and bypass.
| Instrument | What it is |
|---|---|
| Firmus | The simple synth every new track starts with |
| Pulsus II | Drum machine: synthesized drums and sample pads, choke groups |
| Unda | Wavetable synth: three oscillators, unison, two filters, drawn LFOs |
| Calor | Analog polysynth |
| Modulus | FM synth with eight operators; reads DX7 banks |
| Exemplar | Sampler: SFZ, Decent Sampler and SoundFont |
| Gravis | Bass: 808, synth and modelled electric bass |
| Lamina | Electric piano |
| Organum | Tonewheel organ with drawbars and a rotary speaker |
| Chorda | Grand piano played from a physical model: strings, hammers, soundboard, pedals |
| Tympanum | Acoustic drummer: modelled kits with movable microphones and recorded multi-mic kits, each mic on its own strip (Tympanum) |
The effects are Aequalis (EQ), Comprimo (compressor), Porta (gate and expander), Sibilus (de-esser), Multiplex (multiband dynamics), Terminus (limiter), Culmen (maximizer), Tonsor (clipper), Impetus (transient shaper), Discrimen (transient splitter), Spatium (reverb), Fervor (saturation), Latitudo (stereo), Speculum (analyser), Tonus (pitch correction), Concentus (chorus), Flexus (flanger), Phasis (phaser), Tremor (tremolo and auto-pan), Vibrans (vibrato), Anulus (ring modulator), Translatio (frequency shifter), Fluctus (volume shaper), Cribrum (auto filter), Fragor (distortion pedals), Lapsus (time shaper), Vetus (lo-fi), Libra (utility), Aula (convolution reverb), Delay and Reverb.
Each unit's face
Each of Cantus's effects and instruments wears a face of its own — all but the simple Reverb and Firmus, the synth every new track starts with, which keep the kit's plain look — as hardware does and as the best plug-ins do: its colour and the material of its panel (brushed metal, wood, matte paint, vinyl amp covering, glass…), the look of its display (a glowing screen, an LCD, ink on paper, an oscilloscope's grid), the shape of its knobs and switches (a value ring, a skirted knob, a chicken head, a graduated dial; a toggle, a rocker, a lamp button) and the lettering of its name. You recognise a unit at a glance, even small in a corner of the screen.
A face changes how a unit looks, never how it works: every control keeps its name and its value under it, its right-click menu (Modulate…, Learn MIDI controller, automation), the keyboard and the screen reader; the window still resizes from 75 % to 200 %. Faces follow your theme — every face has a dark and a light version, and words stay readable on it.
Prefer every unit in your theme's plain look? Settings ▸ Appearance ▸ Units wear their own faces ▸ Off. The choice is kept, and applies at once to the windows that are open. Hosted plug-ins shown in Cantus's view keep the plain look; the Cantus effects you use as CLAP or VST3 plug-ins in another program always wear their face.
Each instrument's face
The instruments' faces, one by one (the controls, the right-click menu and the keyboard work the same in every one):
| Instrument | Its face |
|---|---|
| Unda | Deep indigo glass; the wavetable glows cyan in 3D, the frame playing now in magenta |
| Calor | A warm brushed panel with orange legends, machined knobs, a scope under the filter |
| Modulus | A matte umber panel; operators, envelopes and spectrum on a green liquid-crystal display; membrane keys whose colour bar lights |
| Exemplar | A grey-violet anodised case; zones and waveform glowing violet on a phosphor screen, the loop's points in teal |
| Gravis | Black vinyl amp covering with a blue pilot light, pointer knobs; the pluck marker in red |
| Lamina | Burgundy lacquer in rose; the tine with its brass tone bar and the pickup behind glass |
| Organum | Walnut with a magic eye's green; drawbars in white, black and brown on a printed chart, ivory stop tabs that tip down and light, graduated dials |
| Chorda | Black lacquer (white in a light theme) and gold; the strings over a spruce soundboard, the cast frame's rim, the felt hammers |
| Pulsus II | A dark case with 808-yellow lamp keys; each hit on a yellow fluorescent display, its envelope in orange |
Chorda: the modelled grand piano
Chorda is a grand piano computed as you play — no samples. Every key has its own one, two or three strings, struck by a felt hammer and ringing into a soundboard; the strings of the other keys ring along when the dampers let them. So it answers the way a piano does: the harder you play, the brighter; a held chord rings on, the strings beating gently; with the sustain pedal (controller 64) the whole instrument resonates, and half pedalling works — a pedal partly down damps partly. The soft pedal (una corda, controller 67) shifts the hammers for the next notes: softer and darker.
Since this version Chorda 2 plays a new voicing, measured note by note against a recorded grand (the Salamander): every key tuned within 10 cents of it, its partials, decay and unisons voiced key by key. A song saved with an earlier beta that uses Chorda 2 plays the new voicing too; a song on Chorda 1 sounds as it always did.
The sustain pedal is also a knob — Sustain, on the PEDALS card in Play and Edit — so a song can pedal without a pedal: draw it as an automation lane (right-click the knob ▸ Create automation clip; points held, up on each chord change and down just after it, is how a pianist pedals), or let a modulator move it; half pedalling works there too. The pedal the strings hear is the higher of the knob and controller 64, so a real pedal still works on top of a lane. The demo With All Your Heart is pedalled this way.
- Play shows the piano in its room — the body and finish over the picture, the room, floor, walls and rug on the card in its corner (the look only, never the sound; one undo step, kept with the song), Drawn or Photographic (Instrument pictures) — the Source list at its left (the modelled piano, recorded pianos, your own), the keyboard under it, the Hammer, Resonance and Output cards, and The piano: the Lid, Perspective · Where you listen (with Open the mixer ›) and the Pedals (Sustain, Soft, Dampers, the dampers' curve against the pedal). The room's level and the width live in the Mixer view now; see Chorda: recorded pianos and the piano's mixer.
- Edit shows the piano from above — every key's strings at their length over the spruce soundboard, the bridge, the cast frame's rim, the row of felt hammers along where they strike, the dampers, the key you last played lit — and adds the tuning (A4, the stretch an aural tuner gives a piano's octaves, the strings' stiffness) with its curve in cents across the keyboard, the felt's stiffness, the strings' ring key by key, the unisons' spread, the bridge coupling and the phantom partials.
- Twenty-four presets, each tagged with the styles and the role it was made for (the preset browser filters by them): Concert Grand, Hall Grand, Game Theme and Baroque Pitch (A = 415 Hz) for film; Studio Bright, Pop Forward, Close and Intimate and Dry Studio for pop; Warm Ballad and Gospel Grand for worship; Jazz Club; R&B Keys; Montuno and Reggaeton Keys for latin; Rock Piano and Honky-Tonk; Trap Keys; House Piano; Felt Piano, Lo-fi Grand and Old Grand for lo-fi; Cinematic Soft, Pedal Wash and Ambient Halo (pads). Each has four macros: hardness, resonance, body and decay.
Model 2 (round 37). A Chorda you add now plays its second model: the strings reach you through the soundboard and case as two microphones over the strings hear them (the body), in a room, with the hammer's knock, the key landing on the keybed and the dampers falling back — and no two strikes of a key exactly alike. Two knobs belong to it: Room (on the RESONANCE card: how much of the room you hear; 0 % is the piano alone) and Action noise (in Edit: the knock, the keybed and the dampers; 0 % is none). A song made before keeps the first model, and sounds exactly as it did; to move its piano to model 2, load any of Chorda's presets on it (one undo step). The model is set, never automated.
Where you listen from (model 2). A modelled piano's perspective is a control, not a recording. On the MICROPHONES AND LID card: Mics moves the pair from over the hammers (0 %: close, direct, every hammer and damper heard) through the player's seat (35 %, the default) to the audience (100 %: more of the board's ring and the room, the top softened by the air); Width opens or narrows the pair (the mono sum never changes, so no setting can sound comb-filtered); Lid closes it (closed: darker, the strings covered; half; open). In Edit, the ROOM card adds Size, from a small studio to a hall (the room's decay is shown in seconds). Every one of them moves smoothly while the piano plays and can be automated. The presets use them: Close and Intimate and Pop Forward sit over the hammers, Hall Grand in the audience, Felt Piano with the lid closed, Jazz Club half open.
Changing A4, the stretch or the stiffness designs the strings again, beside the window, once the knob has settled (a second or two; the editor says designing the strings with how far it has come): the piano keeps its previous tuning until the new one is ready. An export always waits for it. These three are set, not automated.
Sectio: slicing a loop in Exemplar
Right-click a loop (WAV, AIFF, FLAC, OGG) in the sample browser and choose Slice into a new Exemplar track (or Slice into the open Exemplar), or choose Import ▸ Slice a loop… in an Exemplar's Edit view: the loop is cut into slices, one per key from C1 (MIDI 36) up, each at its own pitch — one undo step. Where it is cut: the file's own markers (a WAV's cue points, else its sampler loops; an ACID file's beats give the loop's tempo), else its transients, or a beat grid. Up to 64 slices (the status line says when more were found; a grid is made coarser to fit, and a loop with no tempo of its own uses the song's; loops longer than 5 min 49 s at 48 kHz cannot be sliced). A loop dropped on the Slices card (from the system or the browser) slices it again into that Exemplar.
The Slices card draws the loop with its slices numbered (where the numbers fit) and says how many, the tempo and how they were found:
- Edit the points: drag a line to move it (it lands on the nearest zero crossing), right-click one to remove it, double-click the waveform to add one. One undo step each.
- Slice again: choose Markers, Transients (drag its sensitivity: higher keeps fainter hits) or Grid (1/4 … 1/32): the new points show on the loop; Apply keeps them (one undo step), Cancel drops them.
- Dump to piano roll writes a clip that plays the slices in order, each until the next: at the loop's tempo it plays the file sample for sample; at another tempo the slices stay on the grid. A loop with no tempo of its own is read at the song's.
- Random, Stutter, Quantize (sixteenths) on that clip — one undo step each.
Slicing styles are presets for Exemplar in the library (tag Slicing style): Drum Break (transients, each slice cutting the last), One-Shots (slices ring out), Stutter Grid (1/32, choked), File Markers, Vocal Chop (beats, each slice only while held; a lead), Melodic Phrase (1/8, one voice gliding). On a sliced Exemplar a style re-cuts your loop its way and plays it its way (one undo step); on an empty one it plays a few built-in sounds until you slice a loop into it. No audio ships with them.
Every slice is a zone of Exemplar's: its pitch, gain, pan, reverse, choke group and its own low-pass (Low-pass in the zone table) are the zone's, its envelope its group's. The slice points are saved with the project. Agents have slice_sample (on files inside the project's folder and the folders you allowed) and dump_slices.
The modulation effects
Eight effects move the sound in time: Concentus (chorus), Flexus (flanger), Phasis (phaser), Tremor (tremolo and auto-pan), Vibrans (vibrato), Anulus (ring modulator), Translatio (frequency shifter) and Fluctus (volume shaper). Each one is inserted on a starting preset so you hear it at once — Concentus as Juno I, Flexus as Jet plane, Phasis as Phase 90, script, Tremor as Surf amp, Vibrans as Singer, Anulus as Bell, Translatio as Slow phase, Fluctus as Pump on the quarters — named in the frame's preset well. Each control's default (what a double-click returns it to) is still the setting that changes nothing. To insert effects doing nothing instead, choose Settings ▸ Editing ▸ Effects ▸ On insert ▸ Neutral settings. Other units start where they are useful too: Fervor on Tape on the bus, Multiplex on Mastering glue, Impetus on More punch, Discrimen on More attack; Comprimo, Porta, Sibilus, Spatium and Tonus already work at their defaults; an EQ, Latitudo and the analyser start flat, and Terminus, Culmen and Tonsor — the safeties at the end of a chain — start doing nothing until something goes over. Our CLAP and VST3 versions start on the same preset in another DAW.
| Effect | What it does | Worth knowing |
|---|---|---|
| Concentus | Thickens and widens | Juno I, II, I+II are the Juno-60's chorus as its circuit sweeps; Dimension 1–4 widen without the wobble; Free voices are 1–4 voices on your own LFO. The mono check tells you whether the width survives a mono speaker. |
| Flexus | The jet-plane comb | Through zero, the dry sound waits 5 ms so the moving copy passes through it, as two tape machines did; those 5 ms are the footer's latency, and Cantus compensates them, even when the switch is automated. Off, Flexus adds no delay. The sweep follows the LFO, how loud you play (Envelope), or a knob (Manual). The comb now draws the notches you hear. |
| Phasis | Sweeping notches | 2 to 12 stages (a notch for every two), feedback either way; the Phase 90 and Small Stone are presets. |
| Tremor | Level or pan in time | Tremolo, Auto-pan (a balance: the far side fades, the near side never gets louder) and Harmonic (lows against highs, like the brown amps). Square and saw shapes have a soft edge, so they never click. |
| Vibrans | Pitch that wavers | The depth is in cents, whatever the rate; Rise lets the vibrato arrive after each note, as a singer's does. |
| Anulus | Bells, metal, robots | The carrier is shown as a note with its cents; What a tone becomes draws the partials it makes of a test tone, its frequency (1 kHz) written on the display. |
| Translatio | Moves every partial by the same hertz | Not a pitch shifter: harmonics stop being harmonic. Up, Down, or Both (one per side); feedback makes the barber-pole spirals. Its other sideband is more than 60 dB down from 20 Hz to 20 kHz. |
| Fluctus | Sidechain pumping without a key | Draw the level over one cycle (a note value from 4/1 to 1/16): drag points (Shift: off the grid), double-click to add or remove one, drag a segment to bend it; segment shapes are the automation editor's. |
In time with the song. Every LFO can follow the song (Sync, a note value with dotted and triplet values, swing where it makes sense) or run free in Hz. A synced LFO is tied to the song's position, not to when you pressed Play: start from bar 5 and it is where it would have been; a loop that wraps puts it back; offline export sounds exactly like playback. The display of each effect draws what the LFO will do over the next two cycles, with a playhead where it is now.
In another DAW. The exported CLAP and VST3 versions read the host's tempo and position, so a synced Tremor or Fluctus follows that DAW's song too.
Each one's face. The eight wear faces of their own, built around the display that shows how each moves the sound; the other channel or voice is drawn in each face's second colour. The controls work as everywhere (the value above each knob and its name under it, right-click for Modulate…, MIDI learn and automation, the keyboard and the screen reader); every colour keeps its contrast in light and dark themes, and Units wear their own faces in Settings ▸ Appearance turns them off for the plain look.
| Effect | Its face |
|---|---|
| Concentus | Brushed silver with rack ears, machined knobs and lamp keys for the models; each voice's delay under glass as a bucket brigade's beads, the left voices ice blue, the right ones amber |
| Flexus | Violet lacquer, skirted knobs and bat toggles; the comb glows on a phosphor screen with a mark under every notch, and through zero the wet's line flares lime where it crosses the dry |
| Phasis | Matte orange like a stomp box, soft knobs; the response on a fluorescent display, every notch marked in teal |
| Tremor | A seafoam vinyl amp covering with graduated dials; the shape drawn by a chart recorder's pen on paper, the other side in amber |
| Vibrans | Periwinkle behind smoked glass, value rings; the pitch in cents on a tuner's liquid-crystal panel, with its scale and a pointer at the pitch now |
| Anulus | A walnut case — anulus is Latin for ring — with knobs that are rings; the sidebands on a lab oscilloscope in gold, each pair joined by a ring round the input |
| Translatio | Black anodised rack with pointer knobs; the spectrum on a green phosphor screen, an arrow carrying each harmonic to where it lands, the right sideband in coral |
| Fluctus | Carbon weave; the shape in magenta under dark glass, the playhead in cyan with the level it rides now |
Your plug-ins. When you press Scan for plug-ins (Settings ▸ Plug-ins), Cantus reads the standard folders — %LOCALAPPDATA%\Programs\Common\CLAP and …\VST3, C:\Program Files\Common Files\CLAP and …\VST3 — and any folder you added there. It also looks for new or changed files every time it starts, in the background (Look for new plug-ins at every start, on by default), and the status line names what it found — 3 new plug-ins: Odin 2, Surge XT, ValhallaSupermassive. Each file is scanned in a separate process, so a plug-in that crashes while being scanned is blocked, not fatal. Cantus's own effects are installed in your CLAP and VST3 folders too, for other DAWs.
Cribrum, the auto filter
Cribrum (Latin for a sieve) is a filter that moves in time with the song: two analog-modelled filters — the same five circuits as Cantus's synths (state-variable, transistor ladder, OTA cascade, diode ladder, Sallen-Key) — in series or in parallel, moved by an LFO, an envelope follower and a curve you draw. Insert it from the picker (it is under EQ and under Modulation); it starts on Bar sweep, a resonant ladder swept once a bar, so it is heard at once.
What passes. The window's picture is the music sieved: its spectrum as grains, lit up to what comes out of the filters and capped where it went in, under the response of both filters as they move. Drag a filter's handle across for its cutoff and up and down for its resonance (Shift is finer; a double-click puts both back). The chosen filter's handle sits on a rail that shows how far its movement can take it.
Movement. Choose the LFO, the follower or the curve on its key: its picture moves on the lane in time with the song, its own controls are beside it, and under them its depths onto the cutoff (in octaves), the resonance and the vowel. The three sources add up. The LFO runs on the song from 1/64 to eight bars (dotted and triplet) or free in Hz, in seven waves (sample & hold and a smooth drift among them), with a stereo phase. The follower hears the track or a sidechain — a kick opening a pad's filter; its range sets how much of the level moves the filter (narrow it and only each note's attack opens the filter: the envelope wah of the Cry wah preset). The curve is drawn as Fluctus's and the automation clips are (drag a point, drag a segment to bend it, double-click to add or remove one) and smoothed so a step never clicks.
The filters. Each has its model, its response (low-, band-, high-pass, notch, peak where the model gives it, and a vowel filter that talks A-E-I-O-U), 12 or 24 dB/oct, cutoff, resonance (every model sings in tune from 95 %), drive and vowel. The second filter can follow the movement, ignore it or move the other way. Spread opens the two channels' cutoffs apart.
Exact. At 0 % mix Cribrum passes the sound untouched, to the bit. A render from any bar moves the filters as the whole render does there; offline equals real time at any buffer size. Oversampling (2× or 4×) keeps a driven filter clean; its latency (a sample or two) is compensated.
Vetus, lo-fi
Vetus (Latin for old) ages a sound the way an old medium aged it. Insert it from the picker (under Distortion); it starts on Worn cassette — wow and flutter, tape hiss, the tape's band and a little wear — so it is heard at once.
Six modules, in the order a recording travels — digitised, put on a medium, worn, played back — each switched on by the lamp in its card's title (its controls answer while it is off, dimmed, so you can set a module up before you hear it):
- Bits — 1 to 24 bits (fractional: a sweep never jumps), Rounding, Truncation (a cheap converter's rougher grit) or μ-law (the telephone's: quiet sounds keep more levels), with or without dither. At 24 bits without dither it passes the sound untouched.
- Sample rate — down to 1 kHz. Raw, what lies above the new Nyquist folds back and the steps ring above it: the sound of an old sampler. Filtered puts an anti-alias filter before it (nothing folds back); Smoothed adds a filter after it (only the bandwidth is lost).
- Wow and flutter — the slow and the fast swing of a tape's speed, in cents whatever their rate; the wow free or on the song, part of it drifting as a real tape's does.
- Age — dropouts (the level falls and the top dulls for a moment) and wear (the level and the brightness wander slowly).
- Noise — a record's crackle and pops, the hiss of tape or of a vinyl surface, mains hum at 50 or 60 Hz. Follow lets it play only while the music does.
- Tone — the band of the medium that plays it back: tape, radio, telephone or gramophone, each with its colour (a tape head's bump, a carbon microphone's peak, a horn's resonances). Choosing a medium sets its band; its two edges and their resonance stay yours.
Character is the one knob that ages everything at once: every module that is on moves towards its oldest (fewer bits, a lower rate, more wow, more crackle, a narrower band) and the label prints the year it takes the sound back to. Which modules are on decides the flavour; Character, how far back.
The window. At the centre, the object that ages — a cassette (the reels turning, the level window holding the last second of the music, the tape creased with age, a spark at the head when a tick falls) or an LP on its turntable (the groove holding the music of its last turns, off its spindle with the wow, dusty and scratched): choose it in the window's ⋯ menu, beside the colourway. Turn the object back (drag round it anticlockwise) to raise Character; double-click to make it new. Beside it, what comes out: the output's spectrum over the input's, with the converter's Nyquist (drag it across for the sample rate), the bits' noise floor (drag it up for fewer bits) and the medium's band (drag its edges).
Exact. With every module off Vetus passes the sound untouched, to the bit. The noise, the dither, the dropouts and the wear are fixed to the song: a render from any bar, offline or playing, at any buffer size, has the same crackle in the same places.
Libra, the utility
Libra (Latin for the balance) holds a channel's everyday corrections. It inserts as a wire — nothing changes until you ask.
The channels. Stereo, Swap, Mono (both summed: check a mix in mono), Left or Right on both sides, Mid or Side alone (listen to the width by itself). Invert polarity of either channel; DC removal takes an offset away; Mute.
The delays make each channel late by up to 100 ms, in whole samples — two microphones on one source brought into line to the sample. Show them in ms or in samples.
The image and the gain. The balance turns one side down, never the other up (the master's balance); width from mono (0 %) to twice as wide (200 %); the gain ±36 dB.
The window. At the centre a brass balance: its beam tilts with the balance and reads it on a fine scale, its arms reach as wide as the image, each pan holds its channel's level, delay and polarity, and the correlation runs along its foot (towards −1, the channels cancel in mono). Drag it across for the balance and up and down for the width; double-click to centre it. Beside it the tuner — the note, its cents and its frequency, its reference A (415 to 466 Hz) dragged up and down — and the goniometer.
Saltus, pitch
Saltus (Latin for the leap) moves the pitch of what it hears. Insert it from Add insert ▾ ▸ Pitch ▸ Saltus; it starts as Octave up, twelve-string (the poly engine) — or on the starting preset you chose (below).
Four modes, the legends along the top of its display:
- Shift: two voices at fixed intervals, ±24 semitones and ±100 cents each, with their level and balance, over the dry.
- Harmony: two voices a number of scale degrees from the note heard — two is a third, four a fifth, major or minor as the key says. They count in the key and scale, in the chord held on MIDI (choose the track whose chords it follows), or sing the MIDI melody (the notes held, the singer's own vibrato carried).
- Octave: one and two octaves down and one up. Analog is a divider following the note, with no latency; Clean moves the note itself, its formants kept.
- Whammy: one voice swept by the pedal from the heel's interval to the toe's, followed over the glide — rock the pedal on the display, automate it, map it to a controller, or let MIDI notes play it: a held note presses the toe.
Mono or poly. The switch at the top right of the display shows each engine's latency: Mono follows one note at a time with a voice's formants kept (2.7 ms — for playing and singing through it), Poly moves every note of a chord or a whole mix (85 ms — delay compensation covers it in a mix). The factory presets come in both.
Formants stay where they are (a voice keeps its own) or move with the pitch (the tape sped up or slowed); the throat moves them on their own.
The window. The leap: a keyboard, the note heard lit on it and named large, and an arc from it to each voice, as thick as the voice is loud, with the interval's name and the note it lands on — drag a landing to another key to change its interval. Above it a grand staff writes the last seconds as they are played, and the notes now at its right edge, each falling to its key. In Whammy the pedal is drawn beside the keyboard.
Choose its starting preset. Every unit's preset list offers Use as starting preset: its settings now become what it starts on when you insert it, in every project. Reset to factory starting preset brings back the factory's. Settings ▸ Editing ▸ Effects ▸ On insert ▸ Neutral settings still inserts every unit at its defaults.
On Tabula Saltus is a pedal with the knobs Interval, Level, Dry and Pedal.
Arca, amp and cabinet
Arca (Latin for the chest) is a valve amp and its cabinet, for guitar, bass, keys or a voice. Insert it from Add insert ▾ ▸ Distortion ▸ Arca; it starts as Clean combo.
Five amps, the legends along the top of its display: Clean, Crunch, Chime, High gain and Bass — each its circuit solved valve by valve, from the input to the speaker. None leaves only the cabinet (an impulse-response loader). The oversampling (2×, 4×, 8×) shows the latency each gives; delay compensation covers it.
The chassis shows the amp working: the valves stand in the order the signal meets them, their heaters lit, each plate reddening as hard as it works, a bar under each; the needle at the right shows the supply sagging under a loud chord. The amp's power valves, its bias and its rectifier are written beside them.
The faceplate: Gain; the tone stack's Bass, Middle and Treble; the power amp's Presence (on the chime amp, Cut, turned the other way), Master and Sag (the supply from stiff to soft); Mix and Output.
The cabinet: choose one of five, or Loaded file for your own impulse response (a WAV, AIFF, FLAC or OGG). Choose the microphone (dynamic, ribbon, condenser), drag it across the cone — bright at the cap, darker toward the edge — and back from the grille in the side view (1 to 30 cm: closer, more bass). The response the choice makes is drawn under them.
Sixteen factory presets cover every amp, the cabinet alone, keys and a voice. At its defaults (no amp, no cabinet) Arca touches no sample. As a pedal on Tabula it shows Gain, Bass, Treble and Master.
Rota, the rotary speaker
Rota (Latin for the wheel) is the rotary cabinet of Cantus's organ, for any track. Insert it from Add insert ▾ ▸ Modulation ▸ Rota; it starts as Chorale (slow).
The switch along the top: Stop (the brake parks both rotors), Slow and Fast. Each rotor ramps to its new speed at its own pace — the horn in a fraction of a second, the drum over seconds; Ramp scales those times. With Switched by notes on, each note played on the track whose notes Rota hears throws the switch, to the sample.
The display draws the cabinet cut away, the horn and the drum turning as the engine turns them (blurred at speed); the cabinet from above, where you drag the microphones round it (their angle) and away from it (their distance); and the ramps: each rotor's speed since the switch, with a dot where it is now.
The cards set the horn's and the drum's slow and fast speeds, the microphones' angle, distance and the Balance of horn against drum, the cabinet's back (open or closed) and its valve amp's Drive, and the Mix and Output. Thirteen factory presets. At its defaults (mix 0) Rota touches no sample; it has no latency.
Loquax, the vocoder
Loquax (Latin for the talkative one) makes a voice speak through another sound. Insert it on the voice's track from Add insert ▾ ▸ Pitch ▸ Loquax; it starts as Robot — the synthesiser drones C3 while the voice speaks, so you hear the voice vocoded at once, with no notes and no key.
Who speaks and who sings. The track's own sound is the voice (the modulator). The carrier is chosen on the Carrier card:
- Synthesiser — Loquax's own polyphonic synthesiser (saw, pulse and noise, up to seven detuned copies a voice), played by the notes of the track the slot listens to: choose it as the effect's MIDI source, like Porta's trigger. A keyboard track can be muted — its notes still play Loquax.
- Sidechain — another track's sound, routed to the slot as its key (the sidechain field, as for a compressor): a pad, a guitar (a talk-box), a drum loop.
- Both — the notes and the key together.
Who speaks trades them: Sidechain speaks and this track is the carrier — drums or a loop that talk. Robot drones its own note (any note, C1–C7) while the voice is louder than its gate, with no notes at all.
The display. On the left, the object the voice speaks into — the gooseneck microphone, the talk-box's tube rising from its driver, or the desk microphone on its weighted base — its on-air lamp and glow following the voice. Choose it in the ⋯ menu, under Microphone, beside the colourways: it is the insert's own (kept in the song, one step of undo) and never heard. Each factory preset suggests its object (Talk-box the tube, Radio the desk microphone, Robot the gooseneck) and loading it sets it; a preset of yours keeps the one you saved it with. A/B leaves it, and changing it never marks the preset as modified. In the middle, the bank: every band a column of cells lit by what it says now; drag across the bands to draw their levels (−24 to +12 dB, one stroke one step of undo). The formant shift is drawn along the top. On the right, the meter bridge: the voice's needle and the carrier's, the lamps for a consonant heard, the hold and the robot.
The cards: the carrier and the roles, the raw carrier let through; the bands (8 to 64, slopes of order 4, 6 or 8, their range and width); the followers (attack, release, Hold freezes the vowel); the character (formant shift in semitones, band shift, tilt, flatten, stereo spread); the consonants (the sibilance let through above its corner, always or only on consonants, and noise into the carrier on them); the synthesiser's oscillators, unison and envelope; the robot; mix and output.
Fifteen factory presets, both carriers among them (Talk-box and Sidechain carrier use the key; Classic vocoder, Choir pad and String machine the notes). In the browser each is auditioned with the source's own line as its notes and its key. At its defaults (mix 0) Loquax touches no sample; it has no latency.
In another DAW Loquax is the plug-in Cantus Loquax (CLAP and VST3): it hears the notes the host sends to it, and its carrier through the sidechain input once its own Sidechain switch is set to Sidechain input.
Fractus, the glitch sequencer
Fractus (Latin for broken) is ten effects on ten lanes of a step sequencer that follows the song, with a cloud of grains beside them. Insert it from Add insert ▾ ▸ Modulation ▸ Fractus; it starts as Last beat stutter — the last beat of every bar repeats a thirty-second, the rest of the bar untouched — so you hear it at once on drums, a loop or a strum.
The lanes, one per module: Repeat (the event's first slice plays and is caught, then replayed — each repeat higher or quieter if you ask, and with Build the stutter that halves each part), Reverse, Tape stop (or Start, up from still), Shuffle (slices from up to eight back, some backwards), Pitch jump (the classic delay-line warble, or Clean as its Style), Crush, Filter sweep, Gate, Delay throw (the echoes ring on after the step) and Cloud (the grains take over for the event). The grid is set on the Grid card: steps of 1/4 to 1/64 (triplets too), one to four bars, swing. Every start, end and jump is crossfaded, so nothing clicks: how long (Joins) and the Seed of every roll are on the Events card of the Slicing page. The delay throw's time, feedback, tone, level and ping-pong are on the Sequencer page.
Painting. On the lanes' window:
- Press on a step and drag along the lane: a block from the step you pressed to the step under the pointer. Its height is its amount — the pad lights from its floor to where you let go (5 % steps); the amount is the module's mix for that event. A block you paint over another takes what it covers.
- Shift and drag: a stroke for chance — every block it passes plays that often (the dashed line under a block that may not play).
- Right-click a block to erase it.
Each stroke is one step of undo. A lane's name opens the page of cards its module is set on; the four page keys under the window (Sequencer, Slicing, Colour, Grain cloud) do the same, their dots showing which lanes are painted and which sound now.
Played by notes. On the Playing card, Played by chooses Steps, Notes or Both. With notes, the notes of the track the slot listens to (its MIDI source, as for Porta and Loquax; the keyboard's track may be muted) play the lanes while they are held: the First key (C3 by default) plays Repeat, the next key Reverse, and so on up to Cloud. Notes start On the step waits for the next line of the grid; At once acts on the note's own sample. The keys that play the lanes light on the display.
The grain cloud. Its level runs beside the chain at any time (0: off): grains read from up to two seconds back, their size, density, spray, pitch (to a scale: chromatic, major, minor, pentatonic, fifths, octaves), spread and backwards share, drawn live on the scope — each grain where it reads and at its pitch, with its trail. Frozen (the lamp over the scope, or the cloud card's switch) holds what the cloud has heard for as long as it stays on.
Eighteen factory presets: stutters and builds, tape stops and starts, reverses, gates, filter sweeps, delay throws, shuffles, lo-fi fills, grain pads, a cloud to freeze, and sets played by notes (Notes: the whole kit, Notes: stutters, Steps and keys). A preset brings its lanes. At its defaults — nothing painted, the cloud at 0 — Fractus touches no sample; it has no latency.
In another DAW Fractus is the plug-in Cantus Fractus (CLAP and VST3): its lanes are saved in the plug-in's state and painted in its own window, its steps follow the host's tempo and position, and the notes the host sends play the lanes.
Caelum, the shimmer reverb
Caelum (Latin for the sky) is a reverb for spaces no building holds: its tail climbs in pitch as it rings. Insert it from Add insert ▾ ▸ Space ▸ Caelum; it starts as Octave shimmer — a wide space, a third wet, whose tail climbs an octave at a time — so a chord rises into the sky as soon as you play it.
How it climbs. Each time round the tank, a share of the tail (the Amount on the Shimmer card) is traded for the same sound shifted by the first voice (+12 semitones, an octave, at first) and, at its own level, the second voice (+7, a fifth, silent until you raise Second level). Each voice can be anything from three octaves down to three up. The trade moves the sound's energy and makes none, so the decay you set is the decay you hear, shimmer or not. Shimmer tone cuts the lows and highs inside the loop: the climbing octaves fade out at the top instead of piling up.
The window is an observatory at night:
- The sky shows the last eight seconds: the tail glowing on the horizon over the tank's water, and the shimmer's octaves as bands of light above it, each lit as the energy reaches it — the higher ones later, as the tail ages. Infinite writes ∞ in the glass; Freeze frosts it; the ducking lights a slot in the frame's right rail.
- The sill under it holds the endless controls: Infinite, a lit pushbutton (the tail never decays: it holds at the level it has when you press it — engaging it changes nothing you hear at that moment — and whatever you play next layers in under a soft ceiling, the level a tail of the decay you set would reach on your playing, so it never runs away), Freeze (the tank keeps what it has and lets nothing in; the shimmer stops climbing), and Sustain, a glass gauge with a brass rider: what Infinite's wash does once you stop playing. At 100 % (the default — infinite means infinite) it holds for ever and keeps its tone: the shimmer's climb settles into a fixed balance, so the wash never turns shrill, even after ten minutes. Lower, the climb carries it away slowly; at 0 % it climbs out of hearing in seconds (about −30 dB in ten). A click throws a button and a click or drag on the gauge moves its rider (one step of undo each; a double click puts it back at 100 %); right-click for automation, modulation and MIDI learn.
- The astrolabe sets the voices: drag the alidade (the wide rule) to choose the first voice and the slimmer hand to choose the second. The angle is the note within the octave (the twelve semitones round the rim), the distance from the centre the octave on the spiral (−36 near the pin, +36 at the edge). A click on the plate puts the nearer hand there. Each drag is one step of undo.
- Decay by octave: eight glass tubes, each lit to the decay the tank really reaches at its octave (63 Hz to 8 kHz), shaped by the Damping card. The dotted line across them is the decay you set: drag up or down on the tubes to set it (one step of undo). While Infinite is on, the tubes read ∞ and take no drag.
The cards: Space (size, decay, pre-delay — free or a note value at the song's tempo, Sync — diffusion, and the tank's 8 or 16 lines: eight cost half as much), Damping (the high and low corners and their decays against the middle's), Shimmer, Shimmer tone, Motion (the lines' modulation and Bloom, the sound swelling into the space over up to four seconds), Ducking (range, threshold, attack, release) and Output (low and high cut, width, mix, output).
Ducking steps the reverb aside while the dry plays and lets it bloom in the gaps. It listens to the track itself, or to another track routed to the slot as its key (the sidechain field, as for a compressor): a vocal's shimmer that ducks under the drums.
Nineteen factory presets: octave and fifth shimmers, cathedrals, a bloom pad, Freeze swell (infinite; throw Freeze on a chord to hold it as a pad — no preset starts frozen, since a tank frozen from its first sample would hold silence), an endless ascent (its Sustain at 60 %: it keeps rising and fades into the top once you stop) and an infinite drone that build as you play, a ducked vocal shimmer, guitar ambience, pre-delays synced to the song (Eighth-note echoes, Dotted rise), a sub-octave cloud, plates, a shimmer snare and a bus haze. At its defaults (mix 0) Caelum touches no sample; it has no latency.
On Tabula's board Caelum is a pedal too (the decay, the shimmer, the first voice and the mix on its face); a board with Caelum takes a key, and the key reaches its ducking.
In another DAW Caelum is the plug-in Cantus Caelum (CLAP and VST3): its ducking hears the sidechain input once its own Sidechain switch is set to Sidechain input, and a synced pre-delay follows the host's tempo.
Vinculum, the bus compressor
Vinculum (Latin for a bond) is the compressor that glues a mix, on a bus, a group or the master. Insert it from Add insert ▾ ▸ Dynamics ▸ Vinculum; it starts as Glue (the VCA at 4:1, 30 ms attack, Auto release, −18 dB).
Three models, chosen on the faceplate's first switch:
- VCA — a console's bus compressor: Ratio 2:1, 4:1 or 10:1, Attack 0.1 to 30 ms and Release 0.1 to 1.2 s or Auto (a lone hit lets go fast, sustained work slowly, so the mix breathes without pumping).
- Opto — a photocell leveller lit by the output: soft at first, about 3:1 at depth in Compress, near 10:1 in Limit. Its times are the classic leveller's: about 10 ms to catch, half let go in about 60 ms, the rest within a second after a short burst and in about ten seconds after a long, hard passage — the cell remembers how long and how hard it worked, and a cell that has rested lets go quickly again.
- Vari-mu — a valve whose ratio rises as it works (to 4:1 in Compress, to 20:1 in Limit), with six Time constant positions (5 and 6 follow the programme) and a Valve colour on its own card.
The faceplate answers a click: a click on an engraved position chooses it, a click on a knob steps it, a click on the bat throws Compress or Limit. Its lamps are controls too: External key opens the key's list (its own input, or any strip of the desk), Auto release lights Auto (a second click gives back the release it had), Limit throws the character. The two needles show the gain reduction and the output; between them a window shows the model's gain element at work. The screen draws the transfer curve with the signal's point on it and eight seconds of reduction.
The cards: Threshold and Make-up; the Side chain — the key (also in its own field) and the High-pass that keeps the low end from pulling the detector; Valve (the vari-mu's colour); Mix (parallel compression) and Output. Fourteen factory presets cover every model: glue for a bus or the mix, drum smash and parallel drums, a vocal bus, mastering glue and a limit on each. At its defaults (the threshold at +24 dB) Vinculum touches no sample; it has no latency. As a pedal on Tabula it shows Model, Threshold, Make-up and Mix.
Lenis, the resonance suppressor
Lenis (Latin for gentle) smooths what rings: the whistles, the harsh peaks and the boxy build-ups that stand out of a sound's own spectrum, found moment by moment and taken down by a share, while the notes and the tone are left alone. Insert it from Add insert ▾ ▸ EQ ▸ Lenis (also under Dynamics); it starts as Gentle (half of each ring, the Soft curve, from 150 Hz up).
The screen is a bench analyser's: the input's spectrum as a glowing line with the cut hanging under it as a veil, a bar per frequency along the top for how much is taken away, and the focus at the foot — two gates, From and To, beyond which nothing is touched, and six numbered bands. Drag a gate left or right; drag a band's node left and right for its frequency and up and down for its amount (above the line it works harder, below it gentler, at the bottom it leaves that region alone); the wheel over a node sets its width; a double-click switches a band on or off. A band dragged while off switches on in the same step. Each drag is one step of undo.
The panel beside it: the Depth dial (drag it up or down; double-click for none) — at 100 % a ring comes down to the spectrum's own outline, at 50 % half way; the readouts of the most cut now and the latency; and the push keys: Quality (Fast, Standard, Precise: 5, 11 or 21 ms of latency at 48 kHz — Precise resolves the low mids, Fast hears sooner), Curve (Soft barely touches a peak just over the line, Hard takes every peak by its share), Listen · What is removed (only the rings, never the music) and Channels (Linked, Independent, Mid and side). A click pushes a key in; each key's menu offers automation and MIDI learn.
The cards: Detection (Sharpness — narrow rings only, or broad build-ups too — and Selectivity, how far a peak must stand out), Time (Attack, Release), Focus (the gates' frequencies), Focus band (the band chosen on its numbers or on the screen: its lamp, frequency, amount and width) and Output (Mix, Output).
The latency is compensated by the mixer like any latent insert's — a change of quality starts the analysis again (a gap of one latency) and the mixer re-aligns at once. Fourteen factory presets: harsh vocal, sibilance tamer, guitar fizz, piano ring, mix bus gentle, master polish, drum room ring, acoustic boom, podcast voice, snare ring, wide air (mid and side), strings and brass, surgical. At its defaults (depth 0) Lenis is its input delayed by its latency, to the bit. As a pedal on Tabula it shows Depth, Sharpness, Selectivity and Focus from.
Cedo, the ducker
Cedo (Latin for I make way) makes room: the bass gives way to the kick, the music to the voice, or the whole track pumps on the beat in a shape you draw. Insert it from Add insert ▾ ▸ Dynamics ▸ Cedo; it starts as Classic pump (the tempo fires it on every quarter, 9 dB down) and sounds at once, with nothing routed.
What fires it — the Trigger switch on its card (or a click on the trigger's flag on the bed):
- Sidechain: choose the strip whose sound ducks this one under Key (a kick, a voice). The key can pass a Filter (a high-pass or a band-pass, its Frequency and Q); its Detector reads its peak or its RMS against the Threshold; the duck attacks along an S, holds from the key's last sample over the threshold and lets go over the Release in its shape. Lookahead (up to 10 ms) lets the duck be down before a transient lands.
- Tempo: the drawn shape plays on every Cycle of the song (8/1 to 1/32, dotted and triplets), with Swing and Edge smoothing so its edges never click.
- MIDI: choose the track whose notes fire it under Notes from; each note plays the shape once, a cycle long, and Velocity can scale the depth.
The screen shows the shape over one cycle with what is ducked now swept in by the playhead. Drag a point to move it (it snaps to the sixteenths; Shift moves it freely), drag between points to bend the curve, double-click to add or remove a point, and right-click a point to change its segment (curve, S or held). In Sidechain the screen shows the envelope on each hit: drag the attack's, hold's and release's handles in time. Under it, the last four seconds of reduction with the hits; in Sidechain drag the threshold's dashed line up or down. Drag the level gauge beside the bellows down for a deeper duck.
Band: duck the Whole sound, only the Lows or only the Highs, split at the Crossover (drag it along the band strip) at Minimum phase (no latency) or Linear phase (no phase turn; click the split's word on the strip to switch). The Linear-phase floor sets what the linear phase's latency is sized for: Auto (the default) an octave under the crossover — the least latency it needs, changed only when you let go of the crossover — or a fixed 40, 60, 80 or 120 Hz (55.3, 36.8, 27.6 or 18.3 ms at 48 kHz), for a latency that never changes; each choice shows its latency. The mixer compensates it.
Output: Depth (∞ at its top is silence), Stereo link, Mix, Output and Listen (the output, the Delta it takes away, or the filtered Key).
Seventeen factory presets: classic, half-time, eighths and swing pumps, triplet breathe, trance gate, reverse swell, lows-only pumps at minimum and linear phase, a MIDI pump, kick ducks the bass, kick on the bass lows, hard sidechain, voice-over, podcast music bed, gentle radio and snare room (the Sidechain and MIDI ones need their key or notes chosen). At its defaults (depth 0) Cedo leaves the sound untouched, to the bit. As a pedal on Tabula it shows the trigger, depth, cycle and threshold; a keyed board's key, its beat and its notes fire it.
Purus, the real-time repair
Purus (Latin for clean) repairs a track while it plays: the mains' hum, clicks and crackle, a room's tail on a voice. Insert it from Add insert ▾ ▸ Utility ▸ Purus; it starts as Mains hum 50 Hz — the hum module on, at 50 Hz, followed as the mains drift, eight harmonics notched — so a ground loop's hum leaves at once. (The audio editor's Denoise and Declick repair a take offline; Purus does it as the song plays, on any strip.)
Three modules, each with its own switch, mix and output, each off until you switch it on:
- Hum removal takes the mains' fundamental and up to sixteen harmonics out. Frequency is Fixed (exactly the fundamental you set), Followed (the mains drift; it follows within 2 Hz) or Found by itself (it decides between 50 and 60 Hz, then follows). The notches' Depth and Notch width set how much and how narrowly. Gentle learns the hum and subtracts it instead of notching it: a bass note on 50, 100 or 150 Hz keeps its weight (it holds what it learned while the note sounds). Gentle looks 50 ms ahead, which is its latency.
- Click and crackle removal finds each click and rebuilds it from the music around it (the audio editor's own repair), and with Crackle above 0 takes a record's crackle out of the high band. Sensitivity stops at 0.70: higher, it starts to mend the music itself. 16 ms of latency.
- Room removal takes a room's tail down from a voice. Reduction is how far (up to 30 dB); the Decay time is the room's, set by hand or Estimated from the pauses; Direct sound says how close the microphone was (0 dB, the default, suits most; higher for a very close one). It takes out only as much room as the pauses show is there: a dry voice passes untouched; Early reflections keeps the first milliseconds, which carry the voice. 21 ms of latency (23 at 44.1 kHz).
The latency is only that of the modules switched on, and Cantus compensates it on the strip, so the track stays in time with the rest.
The window is a restoration bench:
- The screen is a spectrogram of the last six seconds, the low notes at the foot. What you hear glows warm; what Purus takes out of each place is laid over it in a cool colour, so the hum, the clicks and the room's tail show as what fell out of the picture. The hum's harmonics are a comb of needles on the left rail: drag a needle up or down and the fundamental follows it.
- The clicks' lane under it ticks once for each repair, with the count.
- The room's tail at the right shows the room's decay as it was (the bright line) and after the repair (the warm line), the difference shaded. Drag on it to set the reduction (the handle on its edge follows) and drag the mark where the early reflections end to keep more or less of them.
- Three cartridges, one per module: its toggle, a lamp lit by what it is doing, what it reads now (the hum's frequency, the clicks rebuilt, the decay) and its keys — 50 Hz, 60 Hz and Gentle on the hum's, Set by hand and Estimated on the room's, and Hear what is removed on each: you hear only what that module takes out, to judge it. Every click and drag is one step of undo; right-click a key for automation and MIDI learn.
- The cards hold every control: Hum removal, Click and crackle removal, Room removal, Output.
Sixteen factory presets: mains hum at 50 or 60 Hz or found by itself, a guitar amp's hum and buzz, a live guitar DI and a bass DI (gentle), vinyl clicks, a worn record's clicks and crackle, an old cassette, a podcast in a small room, dialogue in a reverberant room, a far-microphone interview, a lecture hall, a field recording, a video call and a strong cleanup. At its defaults every module is off and Purus touches no sample.
On Tabula's board Purus is a pedal too — a de-hum pedal before the drive (the fundamental, the harmonics, the depth and the mix on its face).
In another DAW Purus is the plug-in Cantus Purus (CLAP and VST3); when a module is switched, it tells the host its new latency.
Comparatio, the reference comparator
Comparatio (Latin for a comparing, a setting side by side) puts your mix beside the records you want it to stand with. Insert it on the master's last slot from Add insert ▾ ▸ Mastering ▸ Comparatio (or Utility); it starts at its defaults — your mix heard, untouched — and measures.
Load a reference: press Load reference… on the console's foot, or drop audio files (WAV, AIFF, FLAC, Ogg) on the console. Up to eight references stay in the list, each a numbered key; press a number to compare that one, Remove to take it off. The files are read from your disk where they are — never copied into the project — and each keeps its own analysis, so its length, loudness and tone show as soon as it is read. If a file has gone missing, or changed since you loaded it, the strip says so in red: load it again.
Compare: turn the big selector (or press a lamp, or A and B in the blind drawer) to hear the reference instead of your mix, at your mix's loudness — the switch is a short crossfade you cannot hear as a click. The cards set how the reference is matched: Match Integrated (over what has played, or with Measured over The whole file, steady from the first second), Short term (following your mix section by section) or By hand, an Offset in every mode, and the Crossfade. Reference playback plays it on Its own playhead while the song plays, Locked to the song (with Ahead by), or in a Loop — drag across the overview to loop the stretch you want. Each reference keeps its own playback: compare another and its own loop and offset come back; the match, the crossfade and the display stay as they are. Only the reference compared is kept in memory: another one is read again from disk when you choose it (your mix plays meanwhile, the strip says it is being read).
The screen shows both tonal balances (the reference's from its whole file, your mix's as it plays) and your mix against the reference — above the line what your mix has more of, below what the reference has more of, the soft band how sure the comparison is. The orange line is the match EQ: what would move your mix toward the reference, as far as the Match EQ card's Amount says and never more than Most boost or cut. Press Send to Aequalis and it becomes an Aequalis just before Comparatio, in editable bands, its output gain keeping your mix as loud as it was — one step of undo; send again and that Aequalis is updated. Under it, Dynamics (the two loudness histograms, crest factor, peak to loudness, loudness range) and Stereo (correlation and width, whole and in three bands). The two decks read short-term, integrated and momentary loudness, true peak and loudness range.
Blind test: press X to hear one of the two, hidden; answer X is your mix or X is the reference; each answer lights a lamp, and the drawer gives your score and the chance of getting it by guessing. New test starts again in a new order.
Every press and drag is one step of undo; right-click the selector or a lamp for automation and MIDI learn (a footswitch for A/B). Fourteen factory presets are ways of comparing: mastering by the whole file, mixing section by section, by hand, the reference one decibel down, locked to the song, two loops, quick and smooth switching, low end in detail, a gentle and a full match EQ, an album's songs side by side, a worship mix against a live record.
Renders never hear a reference: an export, a stem, a freeze or a bounce always hears your mix, whatever the selector says. Comparatio is not a pedal on Tabula's board: a reference is the master's monitoring.
In another DAW Comparatio is the plug-in Cantus Comparatio (CLAP and VST3): Load reference… in its window, or drop a file on it; the session keeps each reference's path, size and hash (never its audio) and says when a file is missing or changed; the host's offline bounce hears your mix. Send to Aequalis is Cantus's own.
Aula, the convolution reverb
Aula (Latin for the hall) is the reverb of a real space: it plays the sound through an impulse response — a recording of how a room answers a single click — the way the room itself would. Insert it from Add insert ▾ ▸ Space ▸ Aula; it starts in Cantus's Concert hall, a quarter wet, 12 ms late (the preset Hall at 25 %).
Where the response comes from (the Source card):
- Cantus's own — fifteen responses Cantus makes itself, the same on every computer, with nothing to download: Studio room, Small room, Wood room, Live room, Ambience, Chamber, Stone chamber, Concert hall, Large hall, Cathedral, Plate, Vocal plate, Dark plate, Spring and Long spring. All are true stereo: a sound on the left is heard on both sides, as in a room.
- A file — Load file (or drop a file on the editor) takes a WAV, AIFF, FLAC or Ogg response: one channel (mono), two (stereo: left to left, right to right) or four (true stereo, in the order left→left, left→right, right→left, right→right, as Waves, Altiverb and REAPER write it), 16, 24 or 32-bit float, at any sample rate (Aula converts it), up to 20 seconds. The file stays where it is; the project remembers its path. A file that is missing is said in the card, and the reverb is silent until it is back. Back to Cantus's own forgets the file.
- A free pack — Samples ▸ Get more ▸ OpenAIR Impulse Responses downloads eight real spaces measured by the OpenAIR library of the University of York (two churches in Nashville, York Minster, a mausoleum, a woman's club hall, a marble hall, a typing room and a slinky spring), under CC BY 4.0. Its credit is shown in the card whenever one of its files plays; credit OpenAIR (www.openairlib.net) and the authors named there when you publish music made with them.
The picture is the response in decibels over time, after the pre-delay, as the controls below shape it — it moves as soon as a knob does. While a new response is being prepared the display says Building the response…; the old one keeps playing until the new one is swapped in whole, without a click, and the tail of what was playing is kept.
| Card | Controls |
|---|---|
| Length and time | Stretch (50–200 %: a bigger or smaller room, lower or higher), Length (the part kept, faded at its end), Reverse (the response backwards: a swell into the sound) |
| Envelope | Attack (the response faded in), Decay (100 % as recorded; lower, the tail dies sooner), Gate (where the response falls this far under its peak it ends: takes a recording's noise floor away; Off at −120 dB) |
| Tone | Low cut and High cut (12 dB per octave, applied to the response), Damping (the highs die away faster as the tail goes on) |
| Output | Pre-delay (0–500 ms), Width (0 mono … 200 %), Mix (dry and wet crossfaded), Level |
Exact and light. Aula adds no latency: the first 64 samples of the response are played directly and the rest in partitions that grow eightfold, each one's work spread evenly over the blocks before it is needed, so a long hall costs the same in every block. It is within −130 dB of a direct convolution, gives the same bits at any buffer size, and exports, freezes and renders stems exactly as it plays. At 0 % mix it passes the sound untouched, to the bit.
In another DAW. The exported CLAP and VST3 Cantus Aula plays Cantus's own fifteen responses (a plug-in's state holds numbers, not files). Agents set its numbers with set_effect and load a file with set_impulse_response (only once you allowed files, and only inside the folders you allowed).
Fragor, the pedals
Fragor (Latin for a crash, a roar) is a pedalboard of distortion and fuzz: up to three pedals in any order, each modelled from its circuit — the knobs move the circuit's own resistors, so every position sounds as the pedal does. Insert it from Add insert ▾ ▸ Distortion ▸ Fragor; it starts with the green overdrive on the board, pushing gently.
The pedals:
- Green overdrive — Drive, Tone, Level. Soft clipping in an op-amp's loop and a mid hump: the classic push for a lead, and tightening for a distortion after it.
- Op-amp distortion — Distortion, Filter, Volume. A slow op-amp into hard-clipping diodes; turn the Filter up to take the fizz off.
- Silicon distortion — Dist, Tone, Level. A transistor boost and hard clipping, the middle scooped by the tone.
- Germanium fuzz — Fuzz, Bias, Volume. Two germanium transistors; Bias is the battery: at 100 % it is fresh, turned down it drains, and below about a third a fading note sputters and gates as on a dying battery.
- Triangle muff — Sustain, Tone, Volume. Two clipping stages for endless sustain, the mid scoop of its tone stack.
The board: drag a pedal to another slot (the two swap places); click an empty slot to add a pedal; right-click a pedal to put another in its place or take it off the board. The footswitch under each pedal bypasses it without a click. Right-click a knob for its menu (automate, modulate, learn a controller, reset); double-click resets it.
Over the board, the display shows one cycle of the note going in (faint) and coming out at the level playing, and its harmonics — odd ones solid, even ones hatched, the dominant ones marked — with the total distortion. The valve amp's tubes glow a little brighter while sound plays.
Beside it: Gate (before the pedals: off at −90 dB), Input (the level into the pedals), Mix, Output, Quality (oversampling 2×, 4× or 8×; more removes more aliasing and costs more) and Stereo / Mono (one circuit for both channels, as a real pedal).
Its look: the window's ⋯ menu offers three colourways — Valve (the amber of a valve amp at night, its face), Cream (cream card and brass) and Steel (steel with one signal red). The choice is yours for every Fragor and is kept between sessions; it never changes the sound.
History: the five circuits are those of the Ibanez TS808 Tube Screamer, the ProCo RAT, the Boss DS-1, the Dallas Arbiter Fuzz Face and the Electro-Harmonix Big Muff π, modelled from their published schematics; the names and the pictures in Cantus are its own.
Tabula, the pedalboard
Tabula (Latin for the board) is a pedalboard of Cantus's own effects: up to sixteen of them as pedals, in any order, with an optional A/B split and eight macros. Every pedal is the effect itself, so a board of one pedal sounds exactly as that effect on its own. Insert it from Add insert ▾ ▸ Guitar and amp ▸ Tabula; it starts on a guitar rig — the green overdrive low, a chorus, a delay and a spring reverb — so it is heard at once.
The board. The pedals stand on a dark board, cables carrying the signal between them and glowing as loud as it is at each point. Turn a pedal's knobs where they are; click its footswitch to switch it on or off (a 10 ms crossfade that never changes the latency). Drag a pedal to move it (drop it between two others, or onto lane A or B to split the chain). Double-click it, or choose Open its full editor, to open the effect's own window in place of the board; Back to the board returns. With many pedals the board wraps into rows, the cable running between them.
Adding and taking off. Add pedal at the end of the chain opens the picker: the shelves down its left, the shelf's effects as small pedals; click one and it joins the board, sounding at once. Under the board, Its place on the board sets the chosen pedal's Size (mini, standard, wide, double, round), its Place in the chain (Before, A, B, After) and its footswitch, and Remove takes it off.
The split. A pedal on lane A or B opens the split: the splitter box feeds both lanes, the mixer box joins them, its knob the A/B balance (left: A only, right: B only). The shorter lane waits for the longer one, so the two never smear (no comb filtering).
Macros. Eight knobs along the top. Press Learn, touch a macro, then touch a pedal's knob: the knob is mapped, from where it stands to the far end of its range, and wears a ring. A macro moves everything mapped to it; it wins over automation of the same knob. Randomise gives every pedal's knobs new values within musical ranges (one undo step).
Under the board the chosen pedal's main controls (each with its menu: automate, modulate, learn a controller), and the board's Input, Mix and Output.
The keyboard. Click the board, then: Tab and Shift+Tab choose a pedal; Space its footswitch; Enter its full editor; Delete takes it off; Ctrl+← and Ctrl+→ move it; ← and → choose one of its knobs and ↑ and ↓ turn it (with Shift, finely).
Presets. Each of Tabula's presets is a whole board: Guitar rig, Blues crunch, Ambient swells, Fuzz lead, Phaser funk, Wet, dry, wet, two for bass, two for synths, two for drums and two for voice. Your own presets keep the whole board too.
In another DAW, the exported Tabula shows the same window; the host automates the macros, the input, mix, output and the A/B balance, and the board is saved in its state.
Lapsus, the time shaper
Lapsus (Latin for a slip) bends time and level to the beat, as FL Studio's Gross Beat does: tape stops and starts, half time, stutters and rolls, reverse, scratches, gates and pumps. It holds two banks of thirty-six patterns — time patterns and volume patterns — chosen apart and played together. Insert it from the picker (under Modulation); it starts on Half time (every half bar's first beat an octave down), so it is heard at once.
The timeline. The time curve is drawn above, the level below, over the longer of the two patterns' cycles. The time curve's height is how far behind the music it reads: flat at the top is the music as it comes; a line falling at the diagonal is the tape stopped; half that slope is half speed; steeper is reverse; a held step is a repeat. What lies before the cycle's start is never read (Before the cycle: silence). While it plays, the playhead crosses both lanes and the slip — the dashed line to the ruler — shows where the music is read from. Drag a point (Shift: off the grid), double-click to add or remove one, drag a line to bend it; choose Pencil to paint steps a grid cell at a time. Every edit is one step of undo.
The banks. The pads show the time bank or the volume bank (the switch on top names what each plays). A click plays a pattern; a right-click gives a slot the factory's pattern back. Notes play them too: from Time note (C4) up for the time bank, from Volume note (C1) up for the volume bank — switched until another note, or only while held (Each note), and from their beginning with Restart on note. Route a track's notes to it from the insert's menu.
Exact. With both banks on Through (pattern 1) Lapsus passes the sound untouched, to the bit. Jumps of the time curve are crossfaded (Crossfade, 2 ms), the level glides (Smooth); a tape stop ends on the bar's own sample at any tempo, and a render from any bar is the whole render there. Ahead lets the time curve read the future at the cost of that much latency (compensated).
Delay, the stereo delay
Delay is Cantus's stereo echo: a time up to two seconds or a note value that follows the tempo, feedback, a tone filter in the feedback path so each repeat is darker than the one before, and ping-pong between the sides. Insert it from Add insert ▾ ▸ Space ▸ Delay; a click on its insert opens its window (the mini view under the insert keeps the time, the feedback, the tone and the dry/wet at hand).
The echoes are the window's picture and its control: the left side above the centre line, the right below; the sound at 0, then each repeat at its time, its height its level against the first, its colour cooling from the face's coral to rust as the tone takes its highs. With Ping-pong on, the first repeat is on the left and they cross from side to side; off, each side repeats itself. Drag on the picture: across for the time (the first repeat follows the pointer), up and down for the feedback (the dashed level lines follow it) — one step of undo. Shift is fine; a double-click goes back to 375 ms and 40 %. While sound plays, each repeat lights as the sound reaches it; at rest nothing moves.
| Card | Controls |
|---|---|
| What is heard | the repeats to −60 dB, the tail they make, what the tone takes from each repeat at 8 kHz, the side of the first |
| Time | Time (1 ms … 2 s), or the note value while synced; Tempo: Free · Sync, the note value (1/64 … 4/1, straight, dotted ·, triplet T, each listed with its time at the song's tempo now) and what the time is now |
| Repeats | Feedback (0–95 %), Tone (200 Hz … 20 kHz, in the feedback path) |
| Output | Ping-pong, Mix (the repeats against the dry sound) |
A change of time glides, so a sweep bends the pitch as tape does.
Synced to the tempo (round 40). Turn Sync on and the time is a note value at the song's tempo, following every tempo change and the tempo track: inside a tempo ramp the repeats slide with it, as a tape echo whose speed follows the ramp; at a sudden tempo change or a new note value they cross-fade to the new time in 50 ms — no click, no sweep. Sync picks the note nearest the time you had; choosing a note in the list turns the sync on; Free keeps the time it was playing in milliseconds (so a note value set once is Sync, then Free). While synced the big knob turns the note value, and a drag across the echoes moves to the note nearest the pointer. A song saved before round 40 plays as it did. Long values take more memory (a whole note about 5 MB, 4/1 about 18 MB at 48 kHz); a dotted 4/1 below 30 BPM is longer than the line and is held at 48 s (the window says so). The presets named by a note value (Eighth echo, Dotted eighth, Quarter throw, Trap vocal, Sixteenth bounce, Triplet) follow the tempo.
In another DAW. Delay is also a CLAP and VST3 plug-in, Cantus Delay, with this window; synced, it follows that DAW's tempo.
Plug-ins from other makers: installing and using them
Cantus plays instruments and effects made by others in the CLAP and VST3 formats, 64-bit. VST2 plug-ins (a lone .dll) and Apple's AU are not supported: when a plug-in offers several formats, install its CLAP or VST3 version.
On a Mac plug-ins live in /Library/Audio/Plug-Ins/CLAP and …/VST3 (for every user) or the same folders in your home's Library (for you); Cantus reads both. A plug-in there is a bundle (Name.clap, Name.vst3) and its editor opens in a window of its own that stays above Cantus while you work in it.
- Install it with its maker's installer, downloaded from the maker's own site. Leave it in the standard folder the installer proposes (
C:\Program Files\Common Files\VST3or…\CLAP). - Let Cantus find it. Restart Cantus: at start it looks for new plug-ins by itself and says what it found. Without restarting, choose OPTIONS ▸ Scan for plug-ins (the top bar's menus, beside the logo), or press Scan for plug-ins on the picker's empty CLAP or VST3 shelf. The settings live in OPTIONS ▸ Plug-ins and folders… (
Ctrl+,opens Settings; its Plug-ins page is in the sidebar; the picker's Find more plug-ins… goes there too). Later scans read only new and changed files. For a plug-in in another folder, first add the folder under Folders (Browse…, then Add) (Rescan everything reads every file again, blocked ones included). What it found is listed under Found; a file that crashed while being read is listed under Blocked, with Try again. - An instrument: press the + above the track headers (a new instrument track), or click a track's instrument chip to swap its instrument. In the device picker, search by name or choose the CLAP or VST3 shelf, and press
Enter. - An effect: click an empty insert slot — in a mixer strip or in the inspector — and pick it the same way.
- Its own window, or Cantus's view. A plug-in opens its own editor when you insert or pick it. Cantus view shows its parameters instead, drawn as Cantus's own devices are: grouped by the plug-in's pages, a search field (by name or by page), the readings it reports (a gain reduction, a level) as meters. Switch between them with Plug-in window | Cantus view at the top of Cantus's view, under Editor in the insert's menu (right-click a slot, or its ⋯), or the Editor row of an instrument's inspector. As default (Use as default for this plug-in) makes the view showing the one this plug-in opens in from then on, in every project; click it again to go back to its own editor. The choice is yours, kept in your settings — not in the project — by the plug-in itself, so an update keeps it. A plug-in with no editor of its own has only Cantus's view. Switching never touches its sound, its state or its automation. Its values can be automated, modulated and mapped to a MIDI controller like those of Cantus's own devices, from either view.
Each plug-in runs in a helper process by default, so one that crashes stops alone and Cantus keeps playing (see When a plug-in crashes below).
Free plug-ins worth trying (each from its maker's site; Cantus has no tie with them):
| Plug-in | What it is | Where |
|---|---|---|
| Surge XT (CLAP, VST3) | A large open-source synthesizer: pads, basses, leads, thousands of presets | https://surge-synthesizer.github.io/ |
| Vital | A wavetable synthesizer; its free edition has plenty of presets | https://vital.audio/ |
| Odin 2 (CLAP, VST3) | A thorough virtual-analogue synthesizer | https://thewavewarden.com/pages/odin-2 |
| Dexed | A Yamaha DX7 clone: FM electric pianos and basses | https://asb2m10.github.io/dexed/ |
| Decent Sampler | A sample-library player; hundreds of free instruments for it, Pianobook's among them | https://www.decentsamples.com/product/decent-sampler-plugin/, https://www.pianobook.co.uk/ |
| Valhalla Supermassive | Huge, spacious reverbs and delays | https://valhalladsp.com/shop/reverb/valhalla-supermassive/ |
| TDR Nova, TDR Kotelnikov | A dynamic EQ and a mastering compressor | https://www.tokyodawn.net/tdr-nova/ |
| ChowTapeModel | Analogue tape saturation | https://chowdsp.com/products.html |
| Airwindows Consolidated (CLAP, VST3) | Hundreds of Airwindows effects in one plug-in | https://www.airwindows.com/consolidated/ |
| Dragonfly Reverb | Halls, plates and rooms; open source | https://michaelwillis.github.io/dragonfly-reverb/ |
| Kilohearts Essentials | A toolbox of small effects: chorus, distortion, filters and more | https://kilohearts.com/products/kilohearts_essentials |
| Youlean Loudness Meter | A loudness meter in LUFS | https://youlean.co/youlean-loudness-meter/ |
Tonus: pitch correction for a voice
Tonus (in the picker's Pitch · vocal shelf) tunes a sung voice as it comes in — for the hard, stepped effect, for a natural correction, or for monitoring while you record (it adds 2.7 ms, reported to delay compensation).
- Put Tonus on the voice's track. Choose the key and the scale; on the keyboard, click a note to remove it (×) or bring it back (●), right-click to leave it alone (○).
- Speed: 0 ms (Hard) jumps from note to note; 50–100 ms corrects and keeps the voice's life. Amount sets how much is applied.
- To tune to what you play instead: MIDI notes (the notes held on a track, in any octave) or MIDI melody (the voice sings exactly the newest note) — choose the track under the switch; its clips and what you play on it live both count.
- More holds humanise (long notes keep their movement), flex (small deviations left alone), vibrato (the singer's, removed or doubled; or a created one), the formants and the throat (brighter or darker without changing the pitch), transposition and the reference A4.
The display shows what you sang (dim) and what comes out (bright), and the note you are singing with its distance in cents. Presets: Natural, Tight, Hard tune, Throat up, Throat down, MIDI lead and more. Details: docs/plugins/tonus.md.
Dynamics and analysis: Tonsor, Impetus, Discrimen, Speculum
Four effects shape a sound's peaks and attacks and show what is in it. Impetus starts on More punch and Discrimen on More attack; Tonsor, a safety, starts at 0 dBFS and changes nothing until a peak goes over, and Speculum only looks.
| Effect | What it does | Worth knowing |
|---|---|---|
| Tonsor | A clipper: cuts the peaks off | Ceiling, Drive, a Knee and three shoulders (Hard, Soft, Analog). Oversampling up to 16× keeps the harmonics it makes from folding back; True peak holds the ceiling between the samples too (about 1 ms of look-ahead), so a streaming service's −1 dBTP is really −1. Gain match takes the drive back out, so louder never wins. The meter shows how much (the deepest reduction), how often (the share of samples clipped in the last second), the overs between the samples in the input, and the output's true peak. |
| Impetus | More or less attack and sustain | Works on level differences, not a threshold: a quiet hit and a loud one are shaped alike. Speed is how long an attack lasts, Length how long a tail counts as one. Highs or Lows shape only one side of a crossover (snap without the low end pumping, or a kick's thump); a sidechain lets another track's hits drive it. A hit through it draws what it does before you play. |
| Discrimen | Splits each hit into its transient and its body | Each part has its own gain, a one-knob compressor and a tilt; Listen plays one part alone. Left alone the two add up to the input exactly. Zero latency costs nothing; Look-ahead (2 ms, compensated) catches every attack from its first sample. |
| Speculum | An analyser that never touches the sound | Tabs: Overview, Spectrum (averaging, slope, peak hold, mid/side/left/right), Spectrogram, Scope (free, triggered, or on the beat), Vector (and the correlation: under 0 means trouble in mono), Loudness (momentary, short-term and integrated LUFS, range, true peak, against a target — the EBU R128 readings). ⋯ ▸ Dock in the workspace makes it a tab you can resize, split or tear out; dock several and watch them at once. |
Pages: docs/plugins/tonsor.md, impetus.md, discrimen.md, speculum.md.
Each dynamics unit's face
The dynamics effects wear faces of their own, each built around the display that tells its story — how much it takes away. The controls work as everywhere (the label and value under each knob, right-click for Modulate…, MIDI learn and automation, the keyboard and the screen reader); every colour keeps its contrast in light and dark themes, and Units wear their own faces in Settings ▸ Appearance turns them off for the plain look.
| Effect | Its face |
|---|---|
| Comprimo | A black anodised rack face with rack ears, amber legends and skirted knobs; a needle meter reads the gain reduction, and the history and transfer are drawn on cream chart paper |
| Terminus | Flat graphite with a red line under the name — the ceiling; the output in ice blue and what it takes in red behind dark glass, value rings for knobs |
| Multiplex | Smoked violet glass; the bands glow in the face's violet, cyan and the hues between on a phosphor screen |
| Sibilus | Brushed silver with screws and vents; the sibilance glows ice-cyan, machined knobs |
| Porta | A mahogany door — porta is Latin for door — with green for open and amber for shut on a liquid-crystal panel, soft knobs |
| Culmen | Deep sapphire lacquer with rack ears, knobs ringed with LEDs; the bands and loudness on a fluorescent display |
| Tonsor | Carbon weave; the transfer curve drawn by an orange beam on an oscilloscope's graticule |
| Impetus | Black vinyl amp covering like a drum amplifier, pointer knobs; attack in lime, sustain in violet |
| Discrimen | A printed lab card with graduated dials; the transient in magenta and the body in teal, as a two-beam scope's channels |
Each tone, space and analysis unit's face
The tone, space and analysis effects wear faces of their own too, each built around its display. The controls work as everywhere (the label and value under each knob, right-click for Modulate…, MIDI learn and automation, the keyboard and the screen reader). Every colour keeps its contrast in light and dark themes, and Units wear their own faces in Settings ▸ Appearance turns them off for the plain look.
| Effect | Its face |
|---|---|
| Aequalis | Blue anodised aluminium, like a precision instrument: the curve in cyan behind smoked glass, the analyser in amber behind it, small capped knobs, an engraved name, values in even-width figures |
| Fervor | Warm brown vinyl amp covering with screws and vents, chicken-head knobs and bat toggles, the name on a badge: the curve glows in an amber fluorescent window, and the harmonics show even in amber and odd in filament yellow |
| Spatium | Deep indigo lacquer, a hall at night: the decay and the tail glow on a blue phosphor screen, the early reflections in cold cyan, with soft knobs and lamp keys |
| Latitudo | Brushed steel in a rack with screws and ears, like a broadcast phase meter: the stereo field and the tone are drawn on an oscilloscope's graticule, the mid in green and the side in orange, with graduated dials and rockers |
| Speculum | Grey-green enamel, like a bench analyser: the spectrum, the scope and the loudness are drawn on a backlit liquid-crystal panel, the held peak in red, with value rings and narrow capitals |
| Tonus | Magenta behind smoked glass, like a vocal booth: the pitch is drawn on chart paper, what comes out in magenta and what was sung in teal, with soft knobs and lamp keys |
When a plug-in crashes
A plug-in made by someone else — a CLAP or VST3 effect or instrument — can crash or hang. Cantus runs those plug-ins in a helper process of their own (cantus-sandbox), so when one fails, the helper stops and Cantus keeps playing:
- an effect that stopped passes the sound through untouched, in time with the rest of the mix (as if it were bypassed); an instrument that stopped falls silent;
- a card in the bottom-right corner says so — "Glacier stopped working. Cantus kept playing without it." — with Reload and Keep it off, and what happened in a line of its own. Point anywhere on the card to read the whole account;
- Reload loads the plug-in again with what you had set: its last good state and every value of the project. Several plug-ins that stopped together share one card and Reload all;
- Keep it off leaves it stopped: its slot shows stopped in red (an instrument's track shows the sign on its icon and an outlined channel button; point at them for why), and its menu — in the inspector and on the mixer strip's insert line — offers Reload plug-in whenever you want it back. Asking for its window brings its card back;
- a plug-in that crashes while it loads is told the same way: Reload it, or choose where it runs, and Cantus tries again. One that refuses to load, or does not load in time, is said as not loaded — never as one to install — and offers Reload plug-in in its menu; Cantus never tries it again by itself;
- Cantus never waits for a plug-in. Loading one, its window, its state, moving it: each is asked of its helper, and the window goes on meanwhile. A slot whose plug-in is still loading passes the sound through, a track whose instrument is loading is silent, for the moment it takes;
- the project loses nothing, and a save never pretends: saving asks every plug-in for its state as it is now and writes the file once they have answered. One that cannot answer in time is saved with the state it gave last, and the status line names it. Exports, bounces and freezes wait for their plug-ins the same way, and say so when one could not give its state as it was;
- a plug-in that hangs is given two seconds, then its helper is ended; while it hangs, the audio never waits for it longer than a few milliseconds, and the window never waits at all. A plug-in showing a dialog of its own (a file to open, a licence) is not hung: Cantus waits for you;
- a plug-in that keeps its helper waiting — a dialog of its own, perhaps behind Cantus — gets a card of its own — "Glacier is waiting for you", its whole name in the card's hint — with Show it (its dialog to the front) and Stop it (its helper is ended, Cantus plays on, and you can reload it; the card says when other plug-ins share that helper and would stop with it). What you ask of that helper meanwhile — another plug-in's window, a save — is done as soon as the dialog closes;
- notes and knob moves sent while a plug-in was late are not lost: it gets them as soon as it answers.
Where a plug-in runs. Settings ▸ Plug-ins ▸ Where third-party plug-ins run sets the default for this computer: Together (one helper for all of them; the default), By maker (one per maker), Individually (a helper each: a crash stops only that plug-in) or Within Cantus (no helper: the fastest, and a crash closes Cantus). Each plug-in can differ: right-click its slot (or open Runs on a hosted instrument's row in the inspector) and choose. The choice is saved with the project; changing it moves the plug-in at once, with its sound. A plug-in that crashes three times in a session is offered Run individually on its card — by name, when the card lists the plug-ins it took down with it, which are reloaded where they were. Only the plug-in that crashed is counted. The plug-in manager lists the plug-ins that ever stopped on this computer (Forget clears one). Cantus's own effects and instruments always run within.
What it costs. A plug-in in a helper adds a round trip per audio block: a few microseconds while plug-ins follow one another, a few tens of microseconds after a pause (ADR 0063 has the measurements). Point at a hosted slot to see where it runs and its CPU; the status bar counts Plug-ins late each time a helper did not answer in time (the sound went on without the plug-in for a moment; a larger buffer gives it more time). Exports, stems, freezes and bounces wait for every block, so they are always exactly what the plug-in makes; if a plug-in stops working during one, Cantus says so instead of calling it done, and Stop ends it even while a plug-in hangs.
11. Projects, autosave and settings
- File ▸ New project (
Ctrl+N), Open… (Ctrl+O), Save (Ctrl+S), Save as… (Ctrl+Shift+S). A project is a.cantusfile; saving keeps the previous one as.cantus.bak. - Audio files are collected when you save: recordings move into the project's
Audiofolder and imported files are copied there, so the folder travels whole. Collect audio and save does it on demand. A missing file shows MISSING on its clip; right-click it ▸ Locate file…. - Autosave writes a recovery copy every minute when something changed (Settings ▸ Saving, 10 s to 10 min):
<project>.cantus.autosavebeside a saved project, or in%LOCALAPPDATA%\Cantus\autosave\for an unsaved one. It never overwrites your file. Writing it never freezes the window (it runs in the background). - Recover your work: if Cantus closes unexpectedly — or you close it without saving — the next start offers what was left: the autosaved changes and any recorded takes that are in no saved file. Restore brings them back as one undo step (
Ctrl+Zshows the last save); Discard deletes nothing. New and Open ask before replacing unsaved work.
Templates and the start page
File ▸ New from template… (or Start page in the command palette) opens the start page: at its left a card for each template, at its right your recent projects (the last twelve you opened or saved; one that is no longer where it was says so). Click a card for a new, untitled project made from it — Cantus asks first if the open one has unsaved changes, as New does; click a recent project to open it.
- At start. The start page opens by itself when Cantus starts — after the audio setup of a first run and after a crash-recovery offer, and beside the start verse, never over it — unless Cantus was given a project to open (a file double-clicked, the command line) or restores work from a crash. Show at start, on the page itself or in Settings ▸ General, turns it off. Closing it (its ✕,
Escor a click outside) leaves the song Cantus opened on, as before. - Four starters come with Cantus, made from its own instruments and effects: Empty song (one instrument track), Beat (Pulsus II's kit, Gravis on the bass, an electric piano, a Reverb return, 92 BPM), Band recording (vocal, guitar, bass and keys audio tracks on inputs 1 and 2, a Reverb return, the metronome on) and Mastering (a track for your mix and the master's chain: equaliser, multiband compressor, stereo tool, maximiser and Speculum).
- Your own: File ▸ Save as template… keeps the project as it is under a name (a template of the same name is replaced — the panel says so). It appears among the cards; hover it and click its × twice to delete it.
- Track templates: File ▸ Save track as template… keeps the selected track — its instrument, colour, icon, level and pan, input and modulators — with its mixer strip: inserts, EQ, fader, sends and output (not its clips: a template is a sound, not a song). They appear on the Track templates shelf of the device picker and in the devices panel (drag one onto a track's header: it lands after that track) and in the command palette; the start page lists them under the recent projects, where a click on its × (twice) deletes one. Inserting one is one undo step: the track lands after the selected one, its strip takes the first blank mixer strip, and what it was routed to is found by name — a send to Reverb goes to this project's Reverb return; what this project does not have is left out, and the status line says what.
Templates live in Cantus's data folder (%LOCALAPPDATA%\Cantus\templates), project templates in projects, track templates in tracks; each is a .cantus file, so a template from an older version opens as any project does.
Settings (Ctrl+,, or the Options menu, which also opens each page directly; View ▸ Settings… still works). The window has a sidebar of pages, as FL's options, and opens on the page you left, in the next session too: General (the verse at start, on or off, and the Spanish Bible), Audio (driver, devices, rate, buffer, latency, the record offset, and the Audio cores at work — the audio thread and the cores helping it, 1 for the audio thread alone — each count shown with an engine and a model it is known from, drawn at the right of the list and large under the field: 4 · V4 · Fulvia, 12 · V12 · Enzo, more than 16 a turbo-ramjet; the line under it says how many are at work now, counted the same way; the real-time priority each audio thread was given is the last line of the band), MIDI, Appearance (language — English or Español —, the look's family and its mode — see the look —, interface size, the cable style, Units wear their own faces — on or off, see Each unit's face —, colours, the taskbar icon's colours, keyboard shortcuts), Saving, Sample cache (its size limit — 16 GB by default; when full, the least recently used samples go first — and Clear cache; it lives in %LOCALAPPDATA%\Cantus\cache\samples, or in a portable copy's data folder), Updates, Plug-ins and AI (see AI agents below).
AI agents (MCP)
Cantus can be driven by an AI assistant you already use — Claude Code, Claude Desktop, Cursor, VS Code, Gemini CLI, LM Studio — through the Model Context Protocol (MCP). The assistant brings its model; Cantus brings the tools: tracks, notes, the mixer, effects and their parameters, automation, export. Every change an agent makes is one step in the undo history, named AI: … (AI: write the verse), and Ctrl+Z takes it back like any of yours. Cantus sends nothing to any AI service itself; what your assistant sends to its own is its business (read its privacy terms).
Turn it on. Settings ▸ AI ▸ Allow external agents: On. Cantus opens a door on this computer only — http://127.0.0.1:39571/mcp, the port changeable below it — protected by a token kept in your settings folder, readable by you alone. Copy the token puts it on the clipboard; Make a new token disconnects every agent (set each client up again).
Connect a client. Copy setup for has a button per client; each copies what that client wants, with its own token, and says where it goes:
- Claude Code: a command — run it in a terminal (
claude mcp add --transport http cantus …);claude mcp listthen shows cantus connected while Cantus runs. - Claude Desktop: the lines for
claude_desktop_config.json, which start the bridgecantus-mcp(installed beside Cantus); or Save the extension (.mcpb)… and open the file it saves. - Cursor, VS Code, Gemini CLI, LM Studio: the JSON for their MCP file (
~/.cursor/mcp.json,.vscode/mcp.json,~/.gemini/settings.json, LM Studio'smcp.json).
A client that starts a program instead of an address uses the bridge too; when Cantus is not running, or does not allow external agents, it answers with a message saying so.
What an agent may do. Reading the project and the transport (play, stop, locate) run at once. Edits ask you first: a card at the bottom right says what the agent wants to do — Claude Code wants to: …, what it would touch — with Allow, Allow for this session (that one tool, from that agent, until it disconnects) and Deny; with no answer within two minutes nothing is done. Edits: Without asking lets edits run at once. Removing or replacing your material, undoing and files always ask, whatever that setting says. Files are off until you choose Ask each time, and then reach only the project's folder and the folders you add below it. Never allow refuses a tool by its name. Names and notes inside a project are treated as data, never as instructions.
Watch and undo. While an agent is connected, a chip in the top bar shows its name (its light turns blue while one of its calls waits for you). A click opens the AI activity: the agents, each with Undo all of its changes — it undoes the agent's steps from the most recent and stops at the first one that is not the agent's, saying which — and Disconnect; the jobs at work (long renders), with their progress; and every call and what became of it, refusals included. A right-click on the chip opens Settings ▸ AI.
One switch. AI area: Off refuses every agent, closes the door and hides the area; Cantus is a complete DAW without it.
12. Keyboard shortcuts
Help ▸ Keyboard shortcuts lists every shortcut and lets you change them, or load the FL Studio, Ableton Live or Bitwig Studio presets. The defaults:
| Keys | Action |
|---|---|
Space | Play / pause (also stops a recording) |
R | Record |
Home | Go to start |
Ctrl+L · Ctrl+M | Loop on/off · metronome on/off |
L · Shift+T | Pattern / song mode · tap the tempo |
Alt+R · Alt+C · Alt+P · Alt+T | Arm the selected track · count-in · punch · show takes |
Ctrl+Shift+A | Add an audio track |
Ctrl+N · Ctrl+O · Ctrl+S · Ctrl+Shift+S | New · open · save · save as |
Ctrl+Shift+N | Demo songs |
Ctrl+Shift+E | Export audio |
Ctrl+Z · Ctrl+Y | Undo · redo |
Ctrl+X · Ctrl+C · Ctrl+V · Ctrl+D | Cut · copy · paste · duplicate |
Ctrl+A · Delete · Esc | Select all · delete · clear the selection |
Ctrl+E · Ctrl+J · 0 · F2 | Split clip · glue · mute clip · rename |
Left Right (Shift: a bar) | Nudge |
Up Down (Shift: an octave) | Transpose notes |
Q | Quantize |
P B E D T C Y or 1–7 | Piano roll tools; in the arrangement E P C D T (or 3 1 6 4 5) pick Select, Draw, Slice, Erase and Mute, 8 Zoom, and B or 2 is the paint tool |
Shift+3 | The grid's triplets |
Shift+L · Z | Loop the time selection · zoom to it |
Alt+A | Automate the last parameter you moved |
Alt+Shift+A | Link the last parameter you moved to a MIDI controller |
Ctrl+Shift+M | MIDI learn mode |
Ctrl+Shift+K | Show the controller mappings |
F5 F6 F7 F9 · Alt+F8 · I | Arrangement, channel rack, piano roll, mixer · browser · inspector |
Alt+F5 | Clip browser |
F8 · F12 | The selected track's instrument · close floating devices |
M · S · Alt+Left/Alt+Right | Mixer: mute · solo · move the strip |
Alt+F9 | The routing matrix |
Alt+U · Alt+L · Shift+Alt+L · Alt+N | Make unique · link the selection to this clip · select linked copies · link to… |
Ctrl+T | Typing keyboard plays notes |
Ctrl+Plus · Ctrl+Minus · Ctrl+0 | Interface zoom |
Ctrl+, | Settings |
Ctrl+Shift+P · Alt+H | The command palette · the undo history |
Ctrl+F | Find a preset for the selected track's instrument |
Ctrl+F6 · Ctrl+Shift+F6 | The next area · the area before |
Ctrl+Alt+Enter · Ctrl+Alt+C | Maximise the area you work in (again: give the others back) · collapse or expand it |
Shift+F10 | The menu of the selection (in the mixer: the selected strip's route menu) |
Alt+S · Alt+Shift+S | The score under the piano roll · the Score pane |
Tab · Enter · Shift+Enter | Session ⇄ arrangement · launch the slot · launch the scene |
Ctrl+Enter · Ctrl+Shift+Enter · Alt+Enter | Stop the track's clip · stop all · record into the slot |
Ctrl+I · Ctrl+Alt+I · Alt+B · Ctrl+Alt+R | Insert scene · capture scene · back to arrangement · arrangement record |
On a Mac Cmd (⌘) takes the place of Ctrl and Option (⌥) of Alt, and the macOS preset is the default: the table's keys, except that the metronome is Cmd+K (or K while the typing keyboard is off; ⌘M minimises the window, as in every Mac application) and redo is Cmd+Shift+Z. The menu bar at the top of the screen holds Cantus's menus with their shortcuts, which follow any change you make here. On a trackpad, pinch to zoom an editor's time and swipe with two fingers to scroll it; Cmd with a swipe zooms too.
13. Privacy and updates
Cantus has no telemetry. An installed or portable copy asks GitHub once a day whether a newer version is out — an anonymous request that carries no version, machine or user information — and asks you before downloading anything; Settings ▸ Updates ▸ Check daily turns it off.
When you say yes, Cantus downloads the new version's file for your system, checks its SHA-256 against the release (and, on Windows, the publisher's signature when the build is signed) and applies it when you close Cantus — or now, with Restart and update:
- Windows: the installer runs silently, keeping the components you chose.
- Linux (AppImage): the new AppImage replaces the one you run, in the same place and under the same name. The old one is kept beside it, ending in
.old, until the new one has started; if the new one ever fails to start, rename the.oldback. In a folder Cantus may not write to, it says so and the release page has the file. - macOS: the new disk image opens when Cantus closes (Close and open the disk image does it now); drag Cantus onto Applications and choose Replace. (Replacing the app in place by itself is planned.)
A portable copy, a copy from a Linux distribution's packages or Flatpak, and a system no release has a file for are told about the new version and shown its page. Sound packs are downloaded only when you click Install. Everything else stays on your computer. The details are in PRIVACY.md; the licences of everything Cantus is built from are in THIRD-PARTY-NOTICES.md (also in Help ▸ About Cantus).
14. Known issues and limitations
This is a beta. What we know about:
- Warping was measured, and tuned by ear on test material: tell us how a stretch sounds on your music. A plug-in that runs Together with many others costs a little more CPU than within Cantus (about 1.3× with 32 instances); choose Within Cantus for a plug-in you trust when the CPU is tight (§10, When a plug-in crashes).
- A frozen track that loops plays, at the jump back to the loop's start, what led into that bar rather than the loop end's tail (a freeze is one straight pass, §6).
- MP3 files cannot be imported (WAV, AIFF, FLAC and Ogg can).
- No crossfades between separate clips (comp seams do crossfade, §4) and no clip gain envelopes.
- Recorded automation writes every move made while a pass records (no latch or touch modes yet). In stems exported through the master chain, a hosted effect on the master is left out of the stems (the full mix has it).
- Splitting a looping clip silences its right half: select the time range you need, copy it and paste it instead (the pasted part keeps the loop).
- Automation clips are pasted only within the project they came from, while Cantus stays open; a first save or a Save As that copies imported audio into the project folder can pause the window while the files are copied; Ctrl+V with nothing copied does nothing and says nothing.
- Chorda designs its strings for the audio device's sample rate when it is wanted: a song with Chorda asks for them as it opens, and opening the instrument picker starts the reference piano, so it is ready by the time you choose it (a second or two, beside the window — the window never waits; nothing is designed at start for a song without it). Played before that, or at a sample rate it has not met (after changing the device), it is silent until the design is ready, and its editor says designing the strings with how far it has come. Its tuning parameters (A4, stretch, stiffness) are set, not automated or modulated: they offer no automation clip.
- Lamina plays a little quieter than the other instruments (about 4 dB) at the same fader, and the Salamander Grand Piano about 5 dB quieter. DRSKit is a raw, uncompressed kit: a groove sits around −26 LUFS with peaks near −8 dBFS (at full strength it reaches −0.8 dBFS, near the most the headroom rule allows) — raise its fader or put a compressor on its strip, as with a recorded kit.
- The Salamander's first load decodes its samples into the sample cache (1–2 GB on disk; about 10 s), beside the window; a note played before its samples arrive is silent. Later loads are quick.
- Names in other scripts use your system's fonts (read when first needed, never shipped with Cantus). Arabic and Hebrew show left to right with unjoined letters, and scripts that join or reorder letters (Devanagari, Thai…) show them without that: the toolkit does not shape text yet.
- Audio: the built-in Realtek ASIO driver delivers no sound on some laptops (use WASAPI or FlexASIO); ASIO4ALL can take several seconds to start; many ASIO drivers set the buffer in their own control panel; plug an interface in before starting Cantus. Exclusive-mode WASAPI is not offered.
- Performance: dense projects at small buffers can drop out on modest computers; raise the buffer if the top bar counts dropouts.
- The audio device cannot be changed while recording; the sample browser has no keyboard navigation yet; projects refer to sound-pack samples by their full path.
- macOS is a preview: the disk image is not signed by Apple yet, and it has been tested on GitHub's macOS machines, not yet on a Mac at a desk. Mackie Control and HUI were tested with emulated units; tell us how your surface behaves (External gear).
- Not in this beta: several arrangements per project. Dragging a section moves the section itself, not the music under it; insert and delete time are not in this beta.
- The new look (Slate, round 39) was checked in pictures the program draws itself, not yet on many real screens: if anything overlaps, is cut off or looks blurred at your screen's scale, please send a screenshot. The themes of earlier versions are back, redrawn in it.
- Sectio (the slicer, §10) finds about 92 % of the hits within 10 ms on clean loops and about 76 % on real recorded drums (88 % within 20 ms); brushed or ridden jazz drums are the hardest (43–65 %). Move a slice by hand, or re-slice at another sensitivity, where it misses. Slices cannot yet go to separate outputs.
- Pulsus: a pad's chain that holds an effect with latency is late by that latency in the track stem (the full mix and the pad's own output are aligned).
- Presets are levelled and checked by measurement (each in its loudness window, unclipped, under its CPU budget), not yet all tuned by ear; about twenty quiet, dynamic presets sit under their window by design. Ducking presets (Porta and Comprimo Duck) need a key signal routed to them before they do anything.
- AI: an assistant panel inside Cantus (with your own key or a local model) and generating audio are not in this beta — agents connect from outside through MCP (§11). Stems and audio to MIDI run on the processor (the graphics processor is used only where the runtime offers one, on macOS); a separation of a three-minute song takes about a minute. A range an agent listens to starts a few seconds early when the project holds a hosted plug-in, and Space's modulation and Organum's rotary turn from their start, so such a range is close to, not identical with, the whole song (the answer says so).
15. Report a bug
Help ▸ Report a bug… opens the bug form on GitHub (you need a free GitHub account). Say what you did, what you expected and what happened; give your Cantus version (Help ▸ About Cantus), Windows version, audio interface, driver, rate and buffer (all in the audio chip); attach a small project that shows the problem if you can. Tell us about your audio interface even when it works, with the hardware report, and send ideas with Help ▸ Suggest a feature…. English or Spanish, both are welcome.
Cantus is made by Luis Ángel Almazán — lalmazan.com — and is free software under the GNU GPL, version 3 or later.